Stores on TaxWisp Paid Plan
This is the store guide designed for Shopify stores on TaxWisp Paid Plan. Please refer to the Installation Guide if you have not configured and enabled TaxWisp already on your store.
This guide explains how to use the advanced capabilities available in the TaxWisp Standard and Premium plans to automate, manage, and scale your sales tax exemption workflow.
If you've already completed the Installation Guide, you're ready to start managing tax exemption requests with TaxWisp. While the Basic Plan provides the essential tools to collect and approve exemption requests, the Standard and Premium plans introduce additional capabilities that help growing businesses reduce manual work, improve compliance, and deliver a better customer experience.
Throughout this guide, you'll learn how to:
- Receive and manage tax exemption requests.
- Configure manual and automated approval workflows.
- Use AI Co-Pilot for document validation (Premium).
- Configure customer exemption request experiences.
- Choose where customers submit exemption requests.
- View analytics, reports, and audit history.
- Bulk import existing tax-exempt customers (Premium).
- Configure secure document storage (Premium).
- Use Tax Exemption Preclaim (Premium).
- Manage subscriptions and advanced TaxWisp settings.
Getting Started
You have installed the TaxWisp already following the on-screen instructions. After installation, go to the TaxWisp app from your Shopify admin portal and pin the app to your navigation to make it easily accessible.
Accessing the TaxWisp Dashboard
The TaxWisp Dashboard provides a centralized overview of your store's sales tax exemption activity. It allows you to monitor incoming exemption requests, review customer information, manage approvals, configure settings, and access reporting tools from a single location.
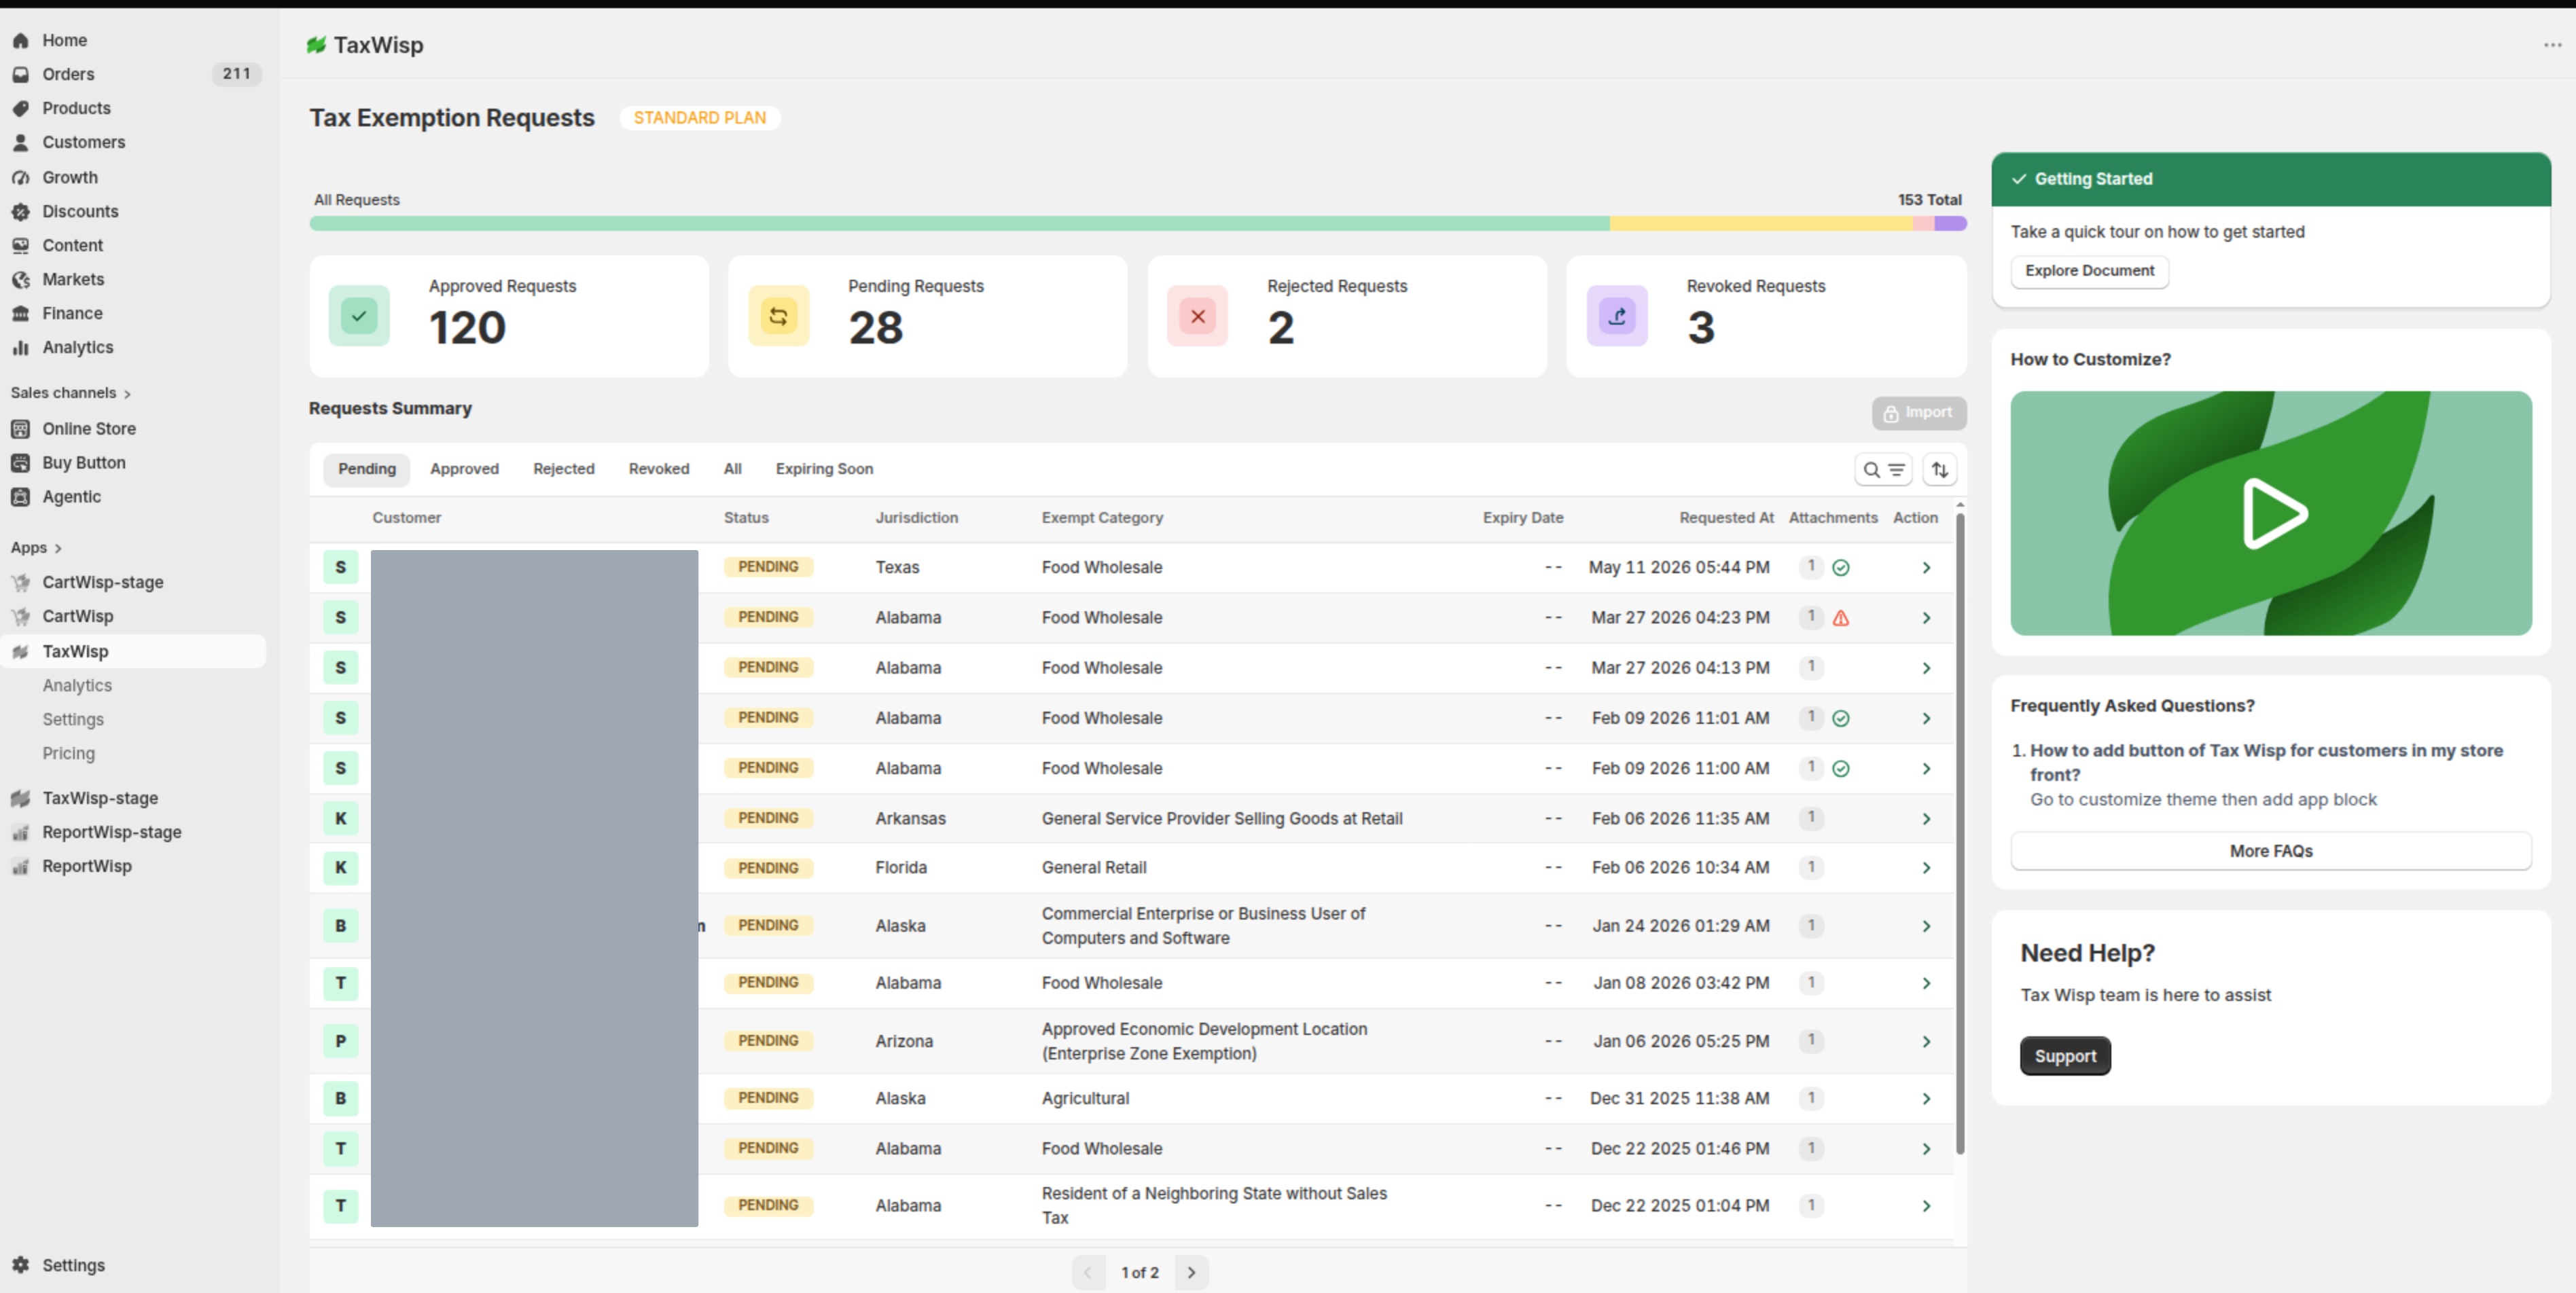
The Dashboard includes quick access to:
- Exemption Requests – Review, approve, reject, or monitor customer exemption requests.
- Analytics & Insights – View exemption trends, reports, and audit history.
- Settings – Configure communication emails, customer tags, customer experience, storage providers, approval settings, and storefront content.
- Pricing – Review your current subscription and upgrade your plan when additional features are required.
- Extension Shortcuts – Quickly open Shopify Theme Editor or Checkout Editor to add TaxWisp extensions to your storefront.
The Dashboard also provides summary cards showing important exemption metrics, allowing you to understand the current status of your exemption activity at a glance:
- Pending Requests
- Approved Requests
- Rejected Requests
- Expired Exemptions
- Total Tax-Exempt Customers
These summaries help merchants quickly identify requests that require attention and monitor the overall health of their exemption program.
Managing Tax Exemptions
The TaxWisp Dashboard serves as the central workspace for managing your customers' sales tax exemption requests. From reviewing submitted exemption certificates to approving customers, configuring automated approval workflows, and tracking exemption status, every stage of the exemption lifecycle is managed from a single location.
Tax exemptions can only be applied for jurisdictions where your business has a valid tax presence or is legally permitted to sell tax-exempt products or services.
Receiving Tax Exemption Requests
Depending on your store configuration and subscription plan, customers can submit tax exemption requests through different experiences.
Available on Standard & Premium Plans
- Online Storefront – Customers submit their exemption request directly from your storefront without leaving your website.
- TaxWisp Customer Portal – Customers are redirected to the TaxWisp Customer Portal, where they can submit exemption requests, track their request status, and manage future exemption renewals.
Available on Premium Plan
- Tax Exemption Preclaim – Customers can claim tax exemption before submitting their exemption certificate. Orders are placed immediately as Pending Verification, allowing customers to complete the exemption process before fulfillment.
For more information about the customer experience, refer to the Customer Guide.
Whenever a customer submits an exemption request:
- The request is immediately visible in the TaxWisp Dashboard.
- All configured communication email addresses receive an automated notification.
- The request includes the customer's information, exemption details, uploaded exemption certificate, supporting documents (if provided), submission date, and current request status.
Store administrators can then review the request manually or allow TaxWisp to process it automatically, depending on the configured approval workflow.
Approval Workflows
TaxWisp supports multiple approval workflows, allowing merchants to choose the level of automation that best fits their internal compliance process. Whether you prefer reviewing every request manually or fully automating approvals using AI-powered validation, TaxWisp provides flexible approval options for businesses of every size.
Manual Approval (Standard & Premium Plans)
Manual Approval gives store administrators complete control over the review process. Every exemption request remains in a Pending state until it is reviewed and a decision is made.
Before approving a request, we recommend reviewing:
- Customer information
- Selected tax jurisdiction
- Exemption category
- Uploaded exemption certificate
- Supporting documents (if provided)
Once you've completed the review, you can either Approve or Reject the exemption request.
Once approved, the customer's account is automatically marked as tax-exempt. Future eligible purchases will be processed without sales tax until the exemption expires, is revoked, or the customer submits an updated exemption request.
Auto Approval (Approve All Requests)
If your business prefers a fully automated workflow, you can configure TaxWisp to automatically approve every incoming exemption request.
When Approve All Requests is enabled:
- Every exemption request is approved immediately after submission.
- Manual review is skipped.
- Customers become tax-exempt instantly.
- Configured customer tags are automatically assigned.
- Future eligible purchases are processed as tax-exempt.
- All approval activities are recorded in the Tax Exemption Audit History.
You can also define an Exemption Validity Period by specifying the number of days, weeks, months, or years that an approved exemption remains valid. Once the validity period expires, customers must submit a new exemption request before they can continue purchasing tax-exempt.
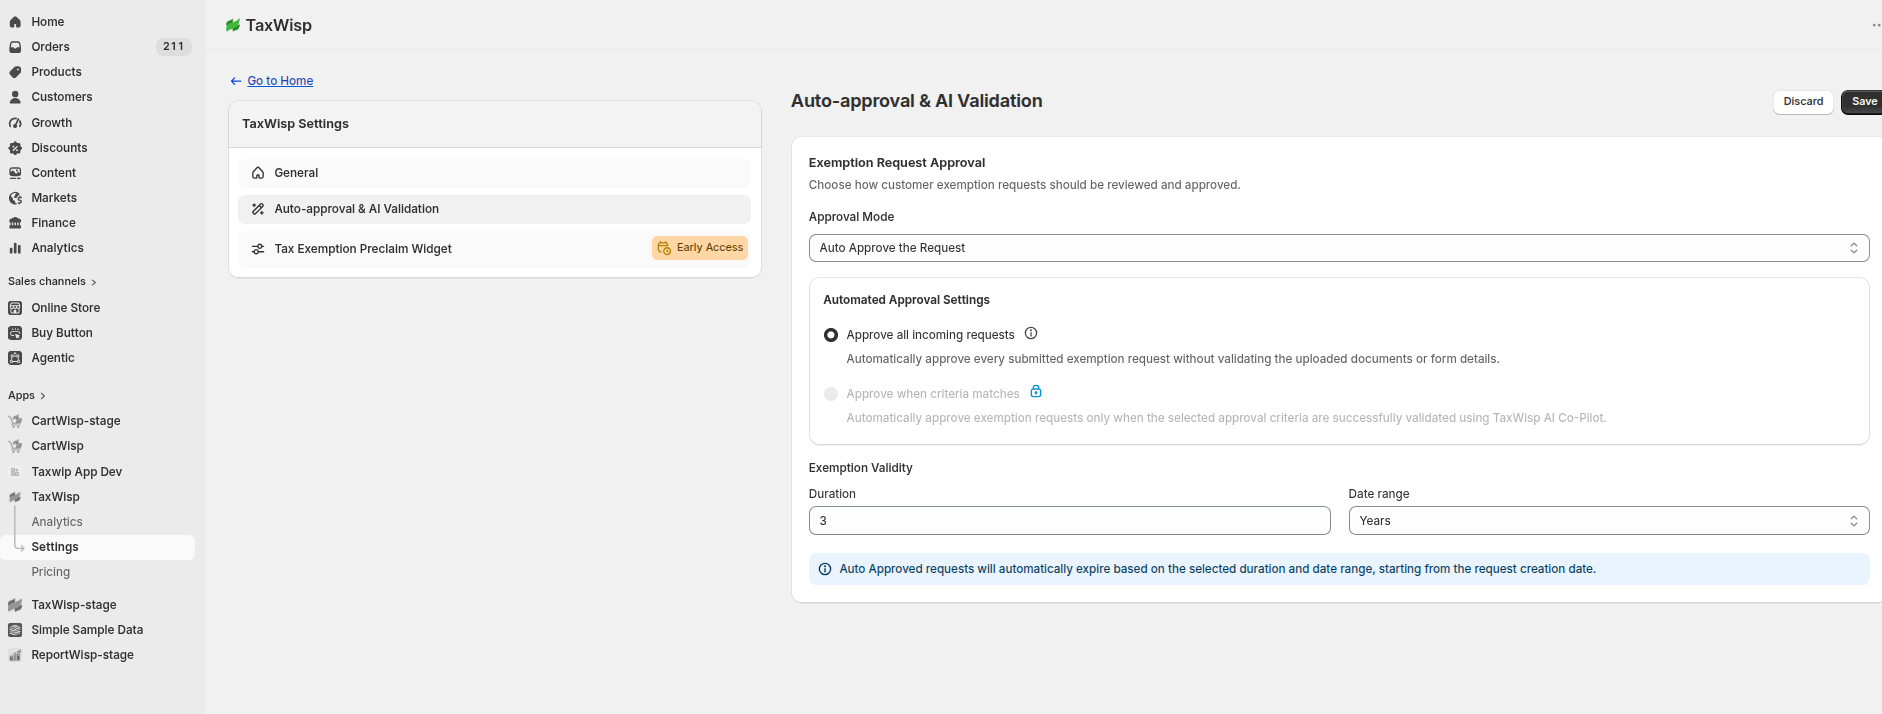
Auto Approval is best suited for merchants that work with trusted customers or have internal processes to verify exemption eligibility outside TaxWisp. If exemption documents must be validated before approval, consider using Criteria-Based Auto Approval available on the Premium Plan.
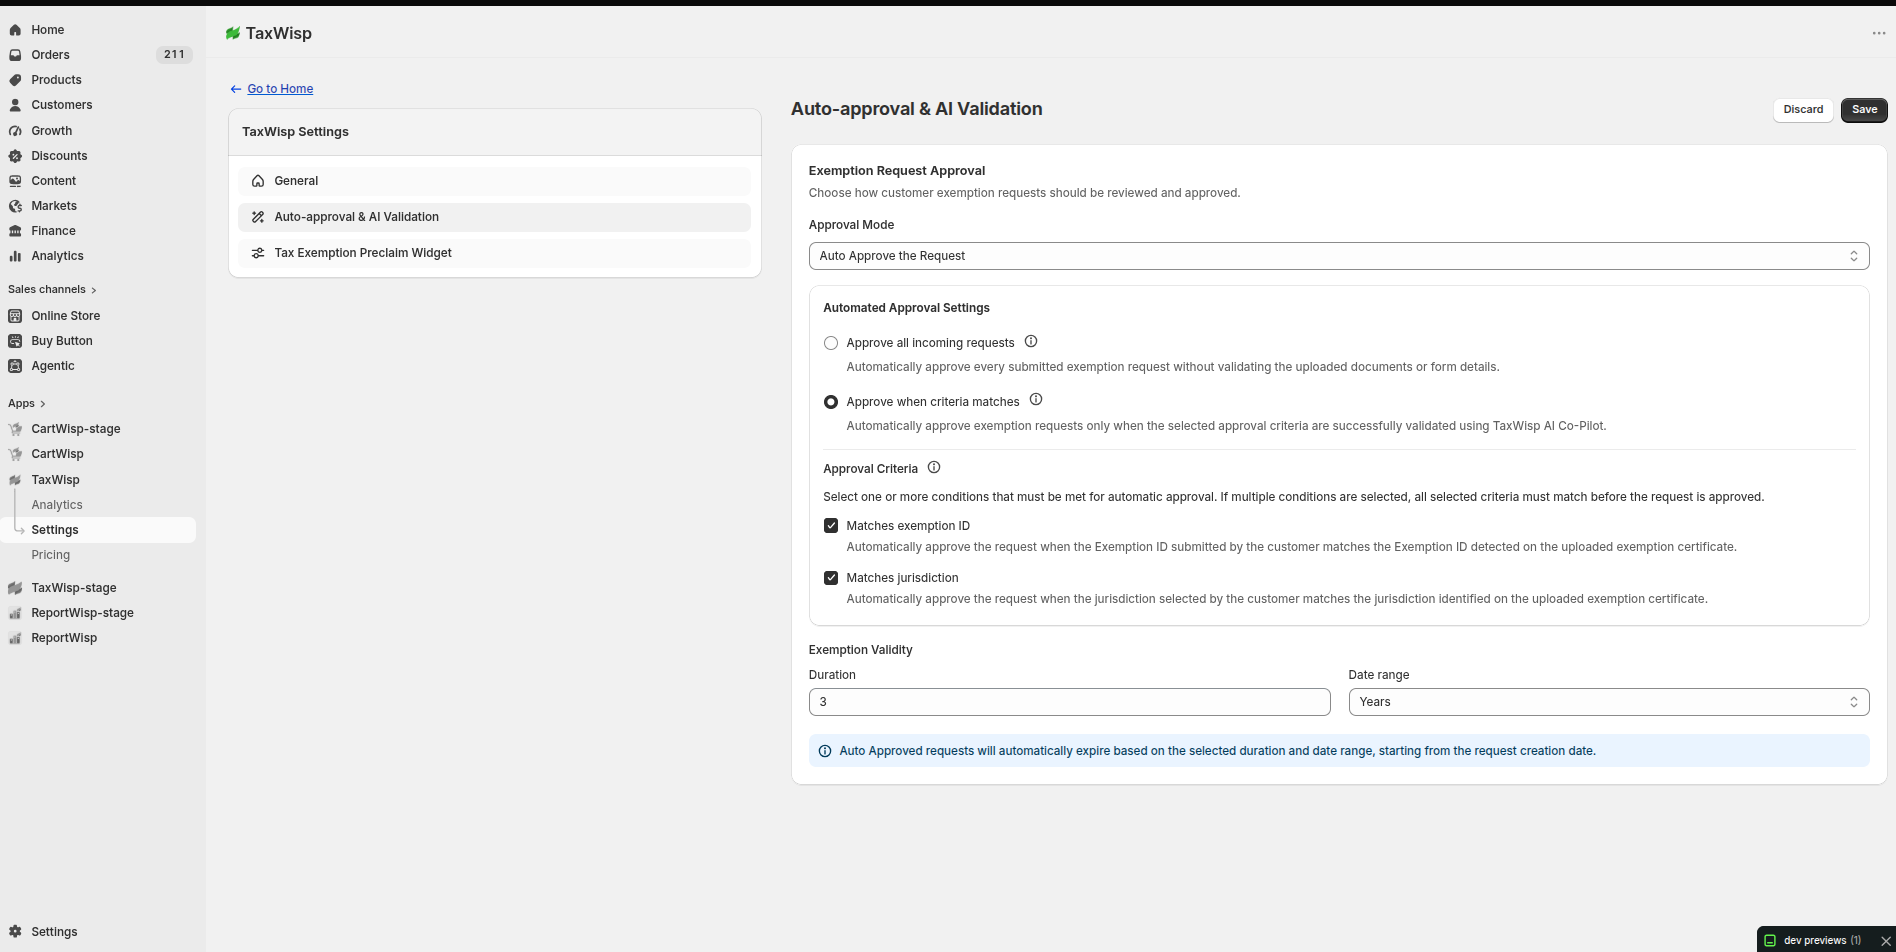
Criteria-Based Auto Approval (Premium Plan)
The Premium Plan introduces Criteria-Based Auto Approval, combining AI Co-Pilot with configurable approval rules to automate exemption approvals while maintaining greater control and accuracy.
When a customer submits an exemption request:
- AI Co-Pilot analyzes the uploaded exemption certificate.
- The AI extracts relevant information such as Exemption ID, Tax Jurisdiction, and Certificate details.
- The extracted values are compared with the information submitted by the customer in the exemption request form.
- TaxWisp evaluates your configured approval criteria.
- If all selected criteria are satisfied, the exemption request is automatically approved.
- If one or more criteria are not satisfied, the request remains in Pending status for manual review.
You can configure one or more of the following approval criteria:
- Matches Exemption ID – Approves the request when the Exemption ID entered by the customer matches the Exemption ID extracted from the uploaded exemption certificate.
- Matches Jurisdiction – Approves the request when the selected jurisdiction matches the jurisdiction identified on the uploaded exemption certificate.
If multiple criteria are selected, all selected conditions must be satisfied before the exemption request is automatically approved.
Criteria-Based Auto Approval uses AI Co-Pilot Document Validation and is available exclusively on the TaxWisp Premium Plan. AI validation consumes the monthly AI validation credits included with your Premium subscription.
Reviewing Tax Exemption Requests
Once a customer submits a tax exemption request, it appears in the Pending section of your TaxWisp Dashboard. Before approving or rejecting the request, you should carefully review the information provided by the customer along with the uploaded exemption certificate and any supporting documents.
To review a request:
- Open TaxWisp from your Shopify Admin.
- Navigate to the Pending tab under Exemption Requests.
- Click on the exemption request you want to review.
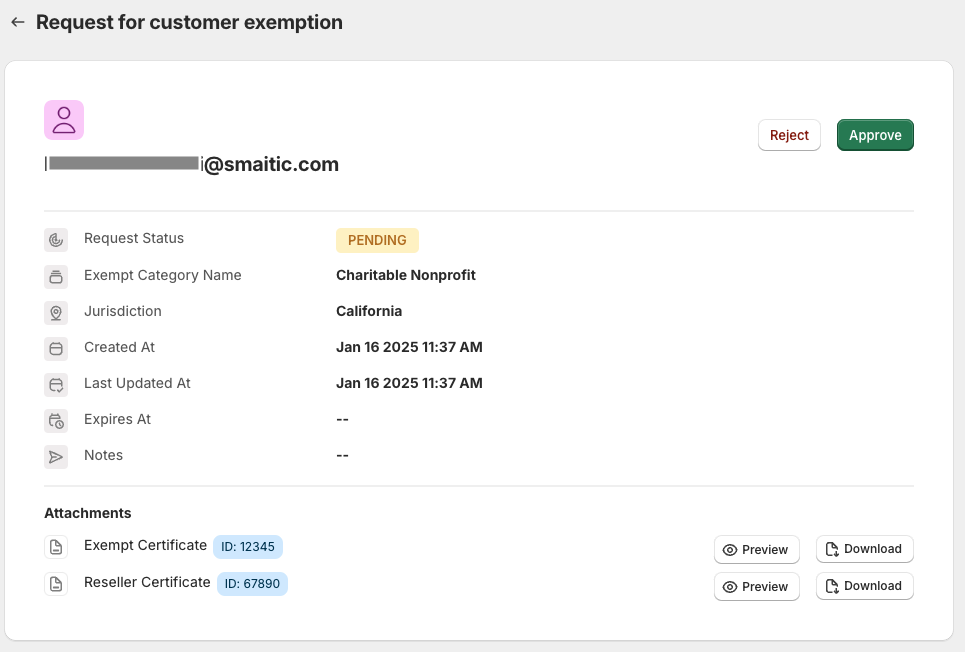
The Tax Exemption Request Details page provides all the information required to verify the customer's eligibility for sales tax exemption.
Information Available on the Request Details Page
Customer Information
Review the customer's basic information, including:
- Customer name
- Email address
- Organization or business name (if provided)
- Contact details.
This information helps verify the identity of the customer requesting tax exemption.
Exemption Details
Review the exemption information submitted through the exemption request form, including:
- Selected tax jurisdiction
- Exemption category
- Exemption ID (if applicable)
- Business type
- Additional information provided by the customer
Ensure that the selected exemption category and jurisdiction are appropriate for the uploaded exemption certificate.
Uploaded Exemption Certificate
Customers can upload one or more exemption certificates and supporting documents as part of their request.
You can:
- Preview uploaded documents.
- Download documents for offline review.
- Verify document authenticity.
- Confirm that the uploaded certificate is complete and legible.
We recommend ensuring that:
- The certificate has not expired.
- The certificate belongs to the requesting customer or organization.
- The information on the certificate matches the information submitted in the exemption request.
AI Document Validation (Premium Plan)
For merchants on the Premium Plan, each exemption request also includes AI Co-Pilot Document Validation.
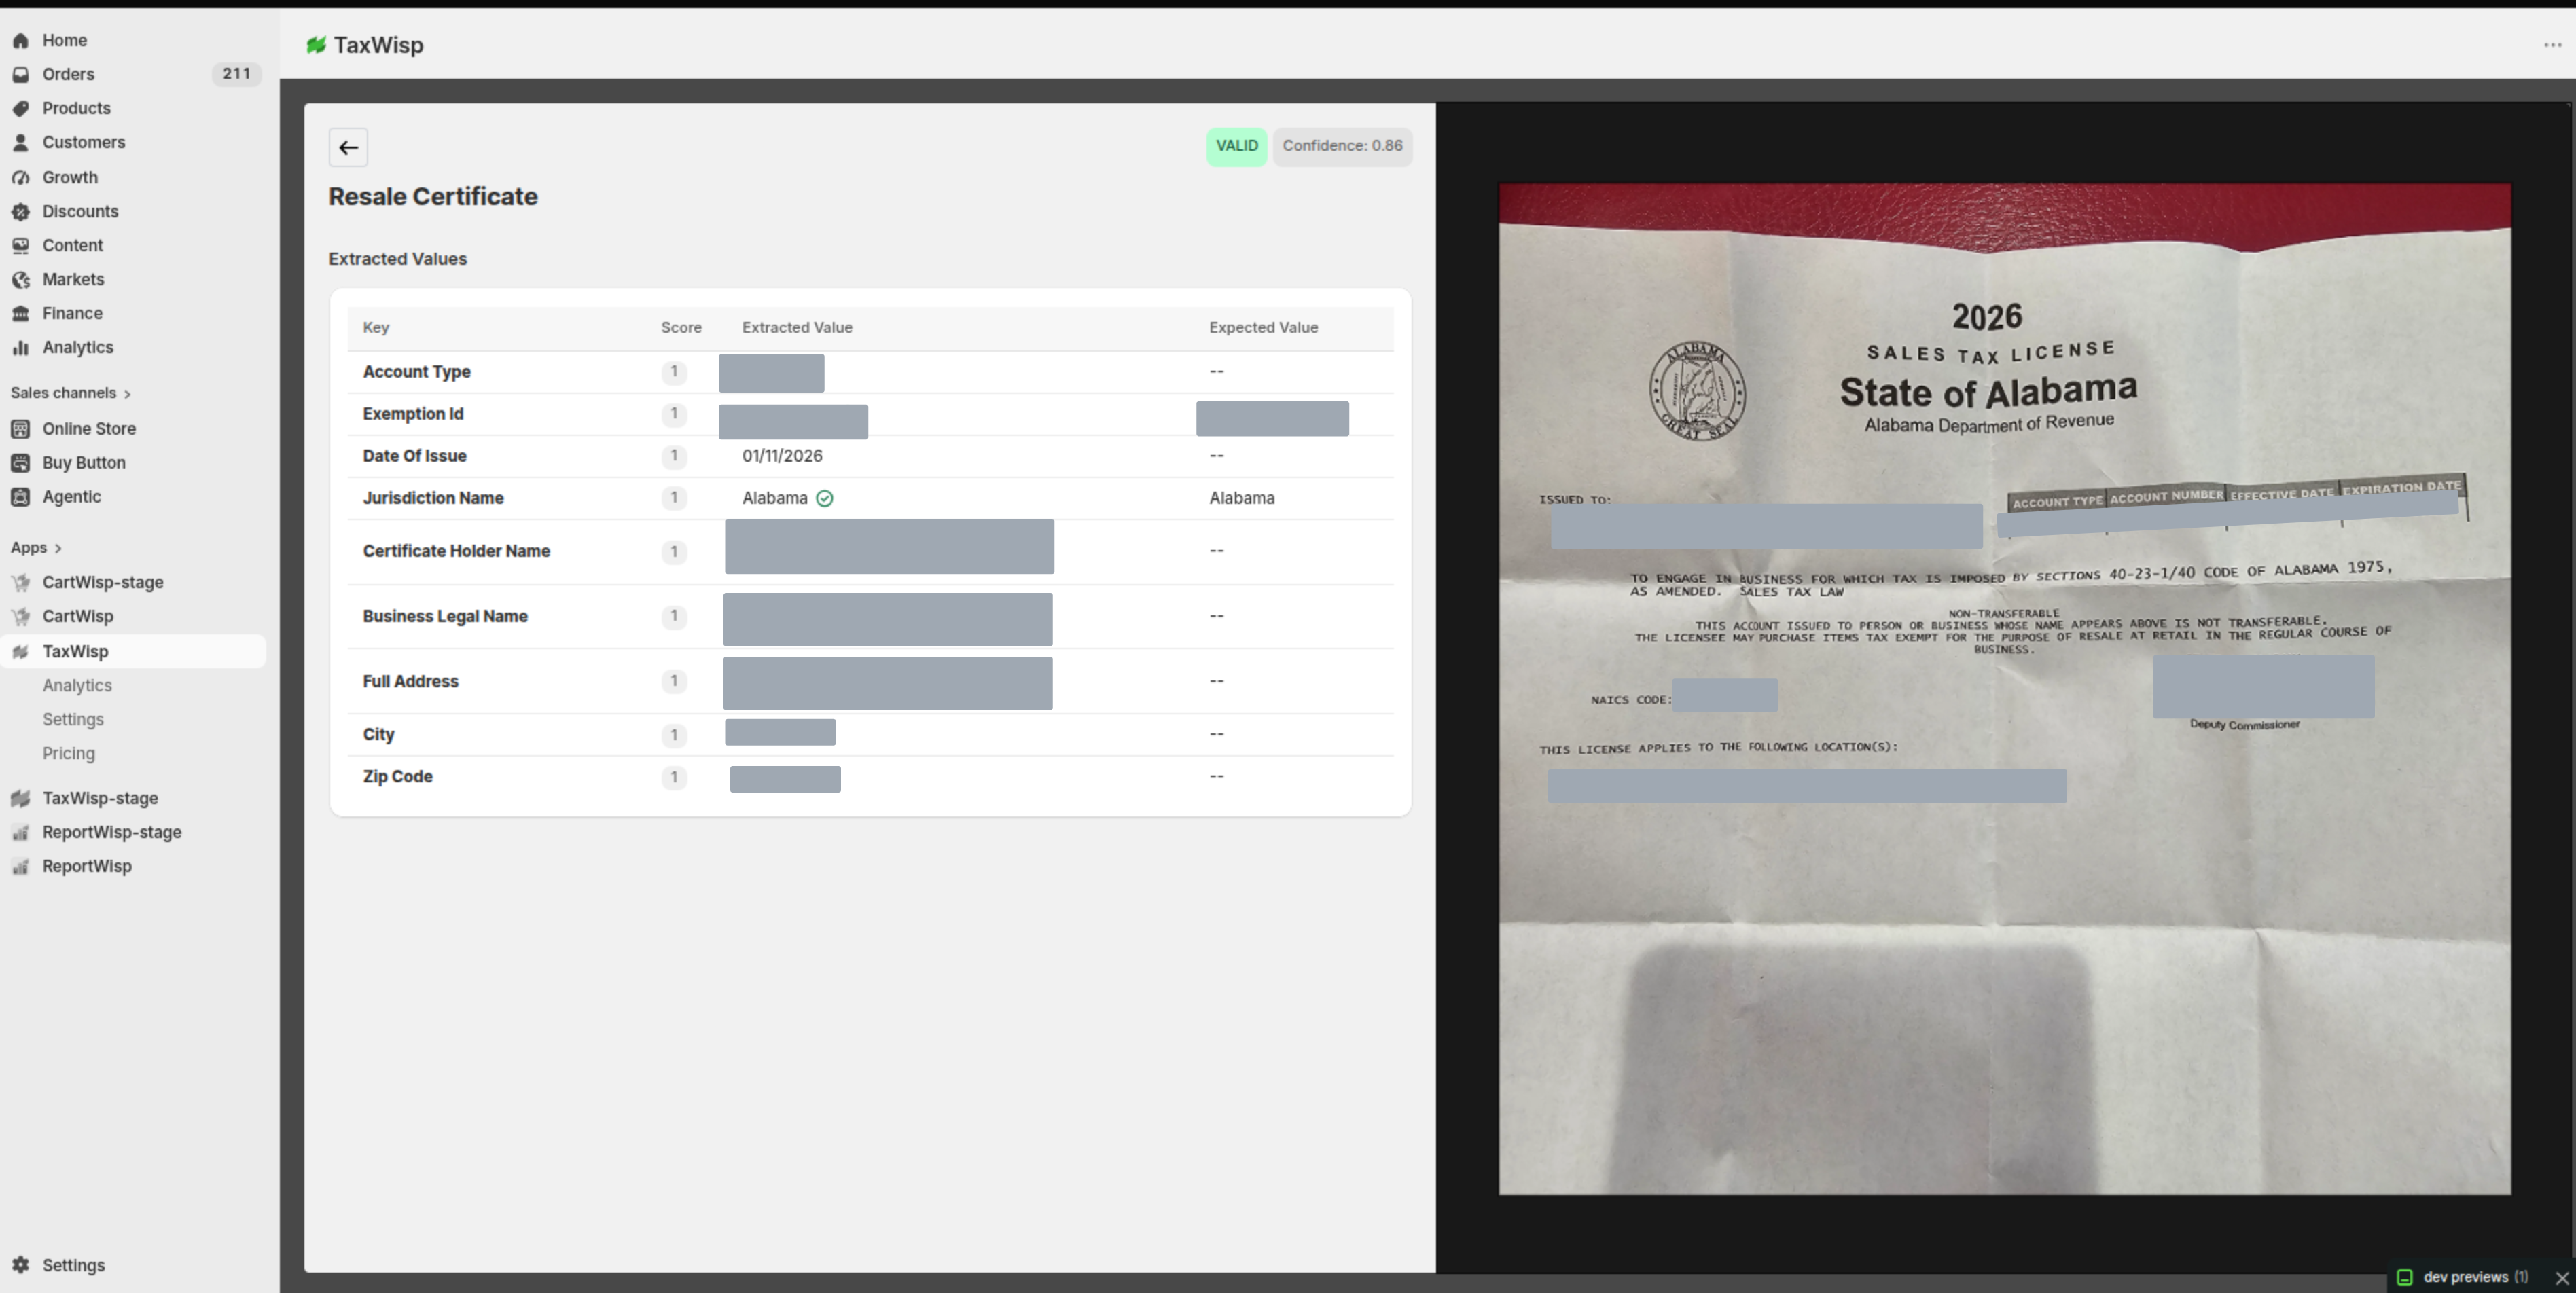
AI Co-Pilot automatically analyzes the uploaded exemption certificate and extracts important information such as:
- Exemption ID
- Tax Jurisdiction
- Organization details
- Certificate information
The AI Validation panel also displays:
- Validation status
- Confidence score
- Extracted document values
- Matching analysis
- Validation summary
These insights help merchants review exemption requests more efficiently and are also used when Criteria-Based Auto Approval is enabled.
AI validation assists with the review process but does not replace your organization's compliance requirements. If Criteria-Based Auto Approval is not enabled, you should always review the request before making a final approval decision.
Recommended Review Checklist
Before approving an exemption request, verify that:
- The customer's information is accurate.
- The selected exemption category is appropriate.
- The selected jurisdiction matches the exemption certificate.
- The uploaded exemption certificate is valid and has not expired.
- Any required supporting documents have been provided.
- The exemption qualifies according to your organization's tax policies.
Completing these checks helps ensure accurate exemption approvals and simplifies future compliance and audit activities.
Next Step
Once you've completed your review, you can decide whether to:
- Approve the exemption request.
- Reject the exemption request.
- Leave the request in Pending status while requesting additional information from the customer, if necessary.
The next section explains how to approve, reject, revoke, and manage customer tax exemptions.
Managing Tax Exemption Requests
After reviewing a customer's exemption request, TaxWisp provides several actions to help you manage the complete lifecycle of that exemption. Depending on the customer's eligibility and your business requirements, you can approve, reject, revoke, update, or re-approve exemption requests at any time.
All request management actions are performed from the Tax Exemption Request Details page.
Approving Tax Exemption Requests
If the submitted exemption request and supporting documentation meet your organization's requirements, you can approve the request.
To approve a request:
- Open the exemption request from the Pending tab.
- Review the customer information and uploaded exemption certificate.
- Click Approve.
- Select the Exemption Expiry Date.
- Confirm the approval.

Once approved:
- The customer is automatically marked as Tax Exempt.
- Your configured customer tags are applied automatically.
- Future eligible purchases are processed without sales tax.
- The customer receives an email notification confirming the approval.
- The approval activity is recorded in the Tax Exemption Audit History.
Choose an expiry date that matches the validity period of the customer's exemption certificate or your organization's internal compliance policy.
Rejecting Tax Exemption Requests
If the exemption request is incomplete, contains incorrect information, or the uploaded certificate does not satisfy your organization's requirements, you can reject the request.
To reject a request:
- Open the exemption request.
- Click Reject.
- Enter the reason for rejection.
- Confirm the action.
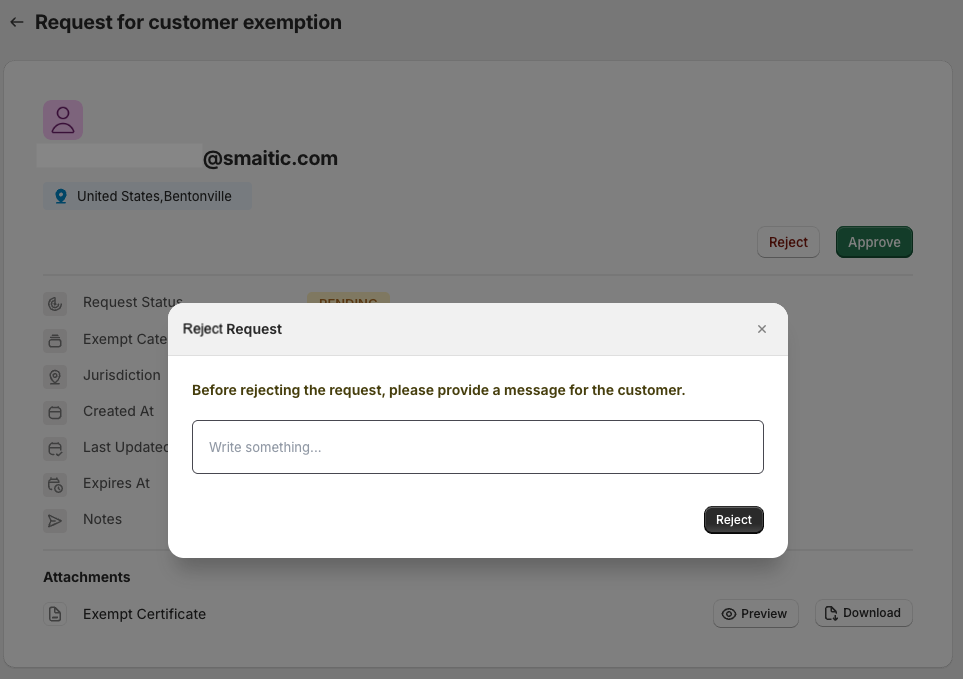
Once rejected:
- The customer's tax exemption request is marked as Rejected.
- The customer receives an email explaining the reason for the rejection.
- The rejection is recorded in the Tax Exemption Audit History.
If the customer provides updated information or uploads a valid exemption certificate later, they can submit a new exemption request or you can reassess the existing request where applicable.
Revoking Tax Exemptions
There may be situations where an approved exemption is no longer valid—for example, when a customer's exemption certificate has been withdrawn, becomes invalid, or no longer satisfies your business requirements.
To revoke an approved exemption:
- Navigate to the Approved tab.
- Open the customer's exemption request.
- Click Revoke.
- Provide the reason for revocation.
- Confirm the action.
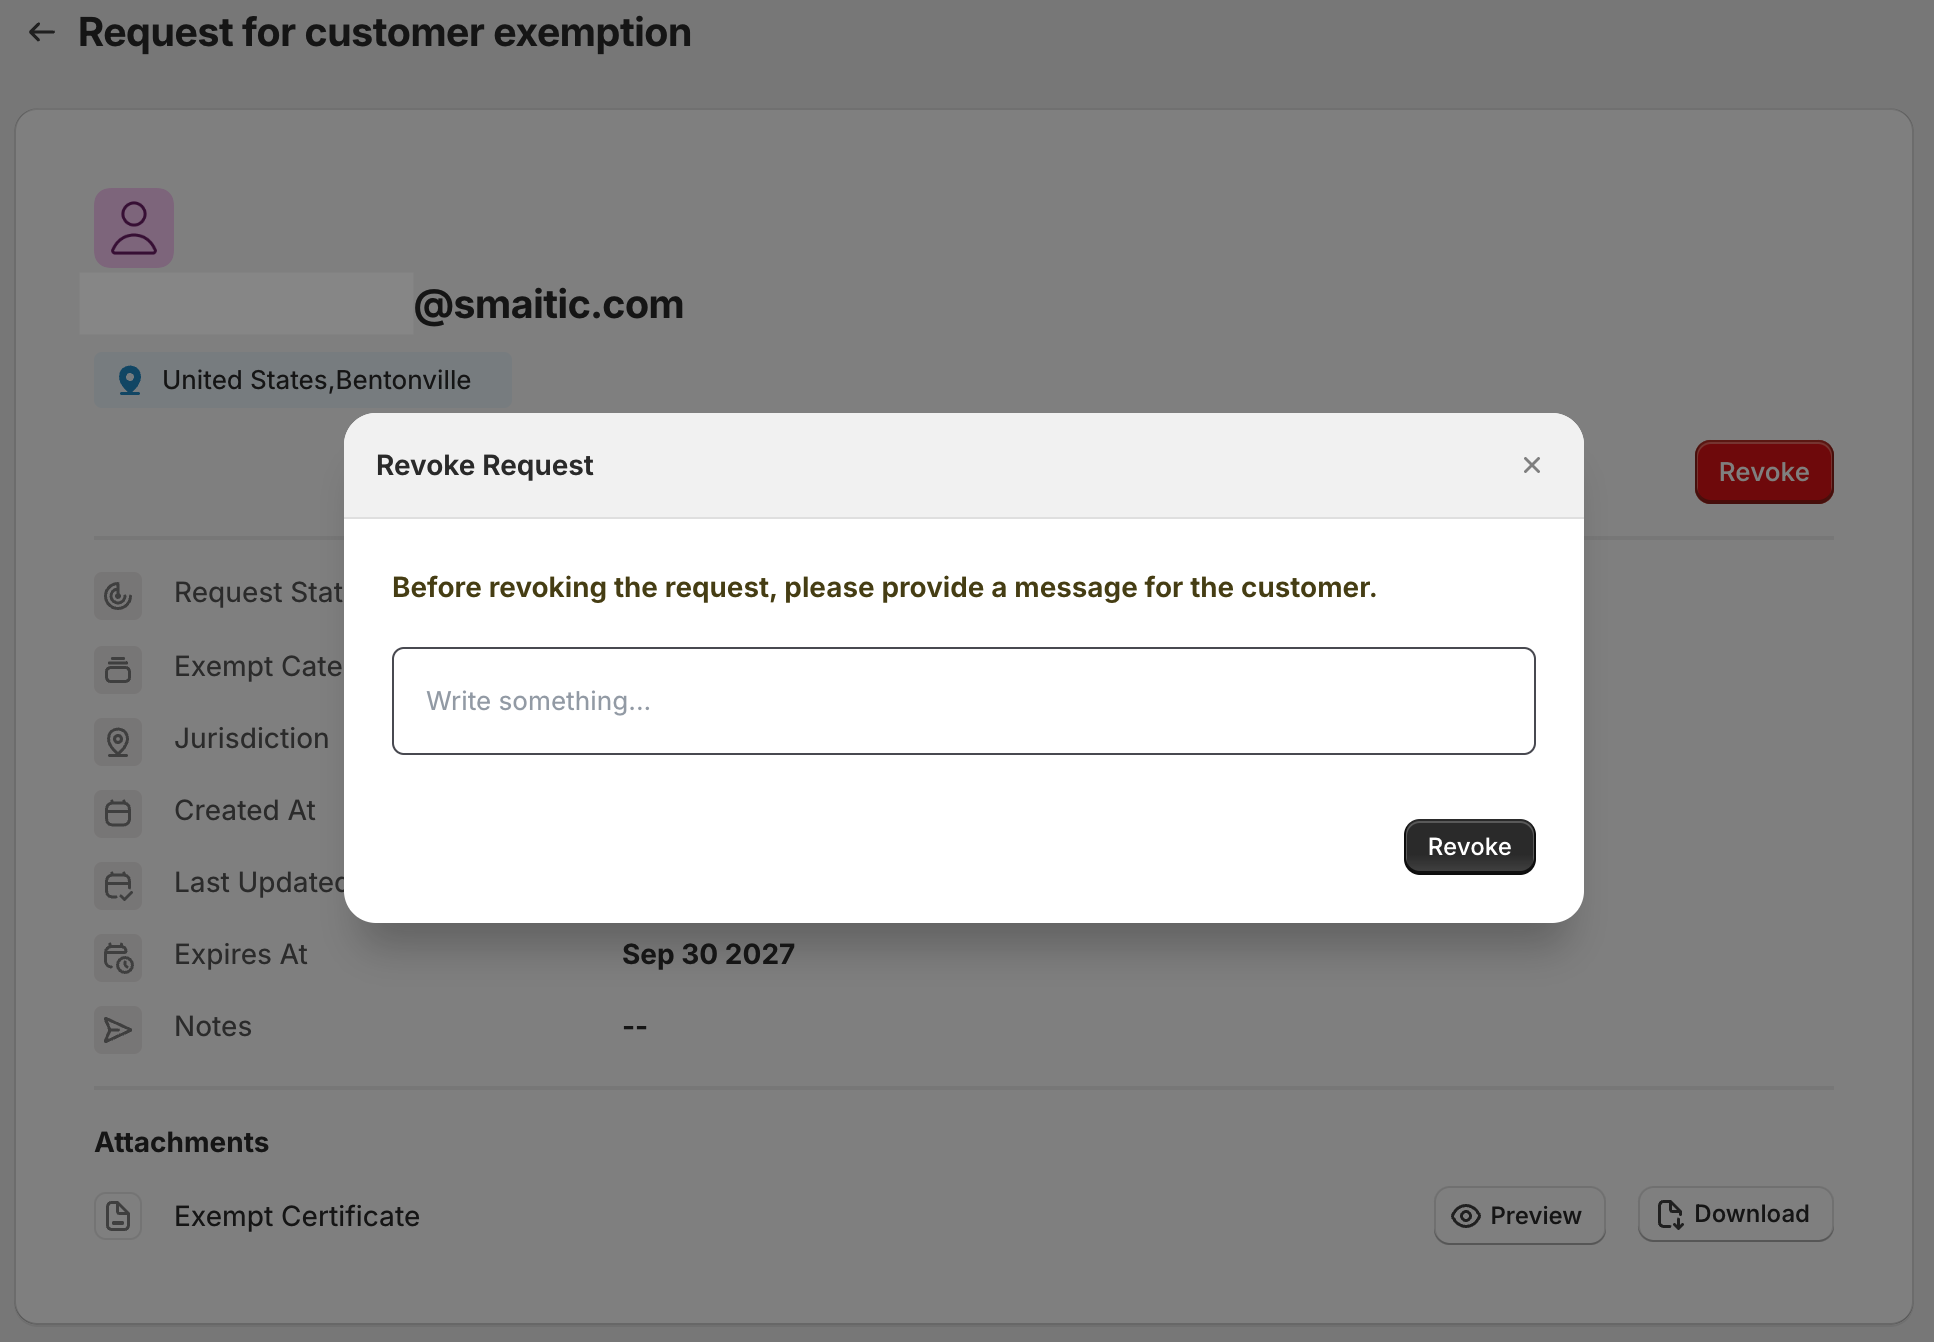
After revocation:
- The customer's tax-exempt status is removed.
- Future purchases will no longer receive tax exemption.
- The customer is notified via email.
- The revocation is recorded in the Tax Exemption Audit History.
Updating Exemption Expiry
TaxWisp allows you to update the expiry date of an approved exemption whenever necessary.
This is particularly useful when:
- A customer renews their exemption certificate.
- Your organization extends the validity period.
- The original expiry date needs to be corrected.
To update the expiry date:
- Navigate to the Expiring Soon tab.
- Open the customer's exemption request.
- Click the Edit icon next to the expiry date.
- Select the new expiry date.
- Save your changes.
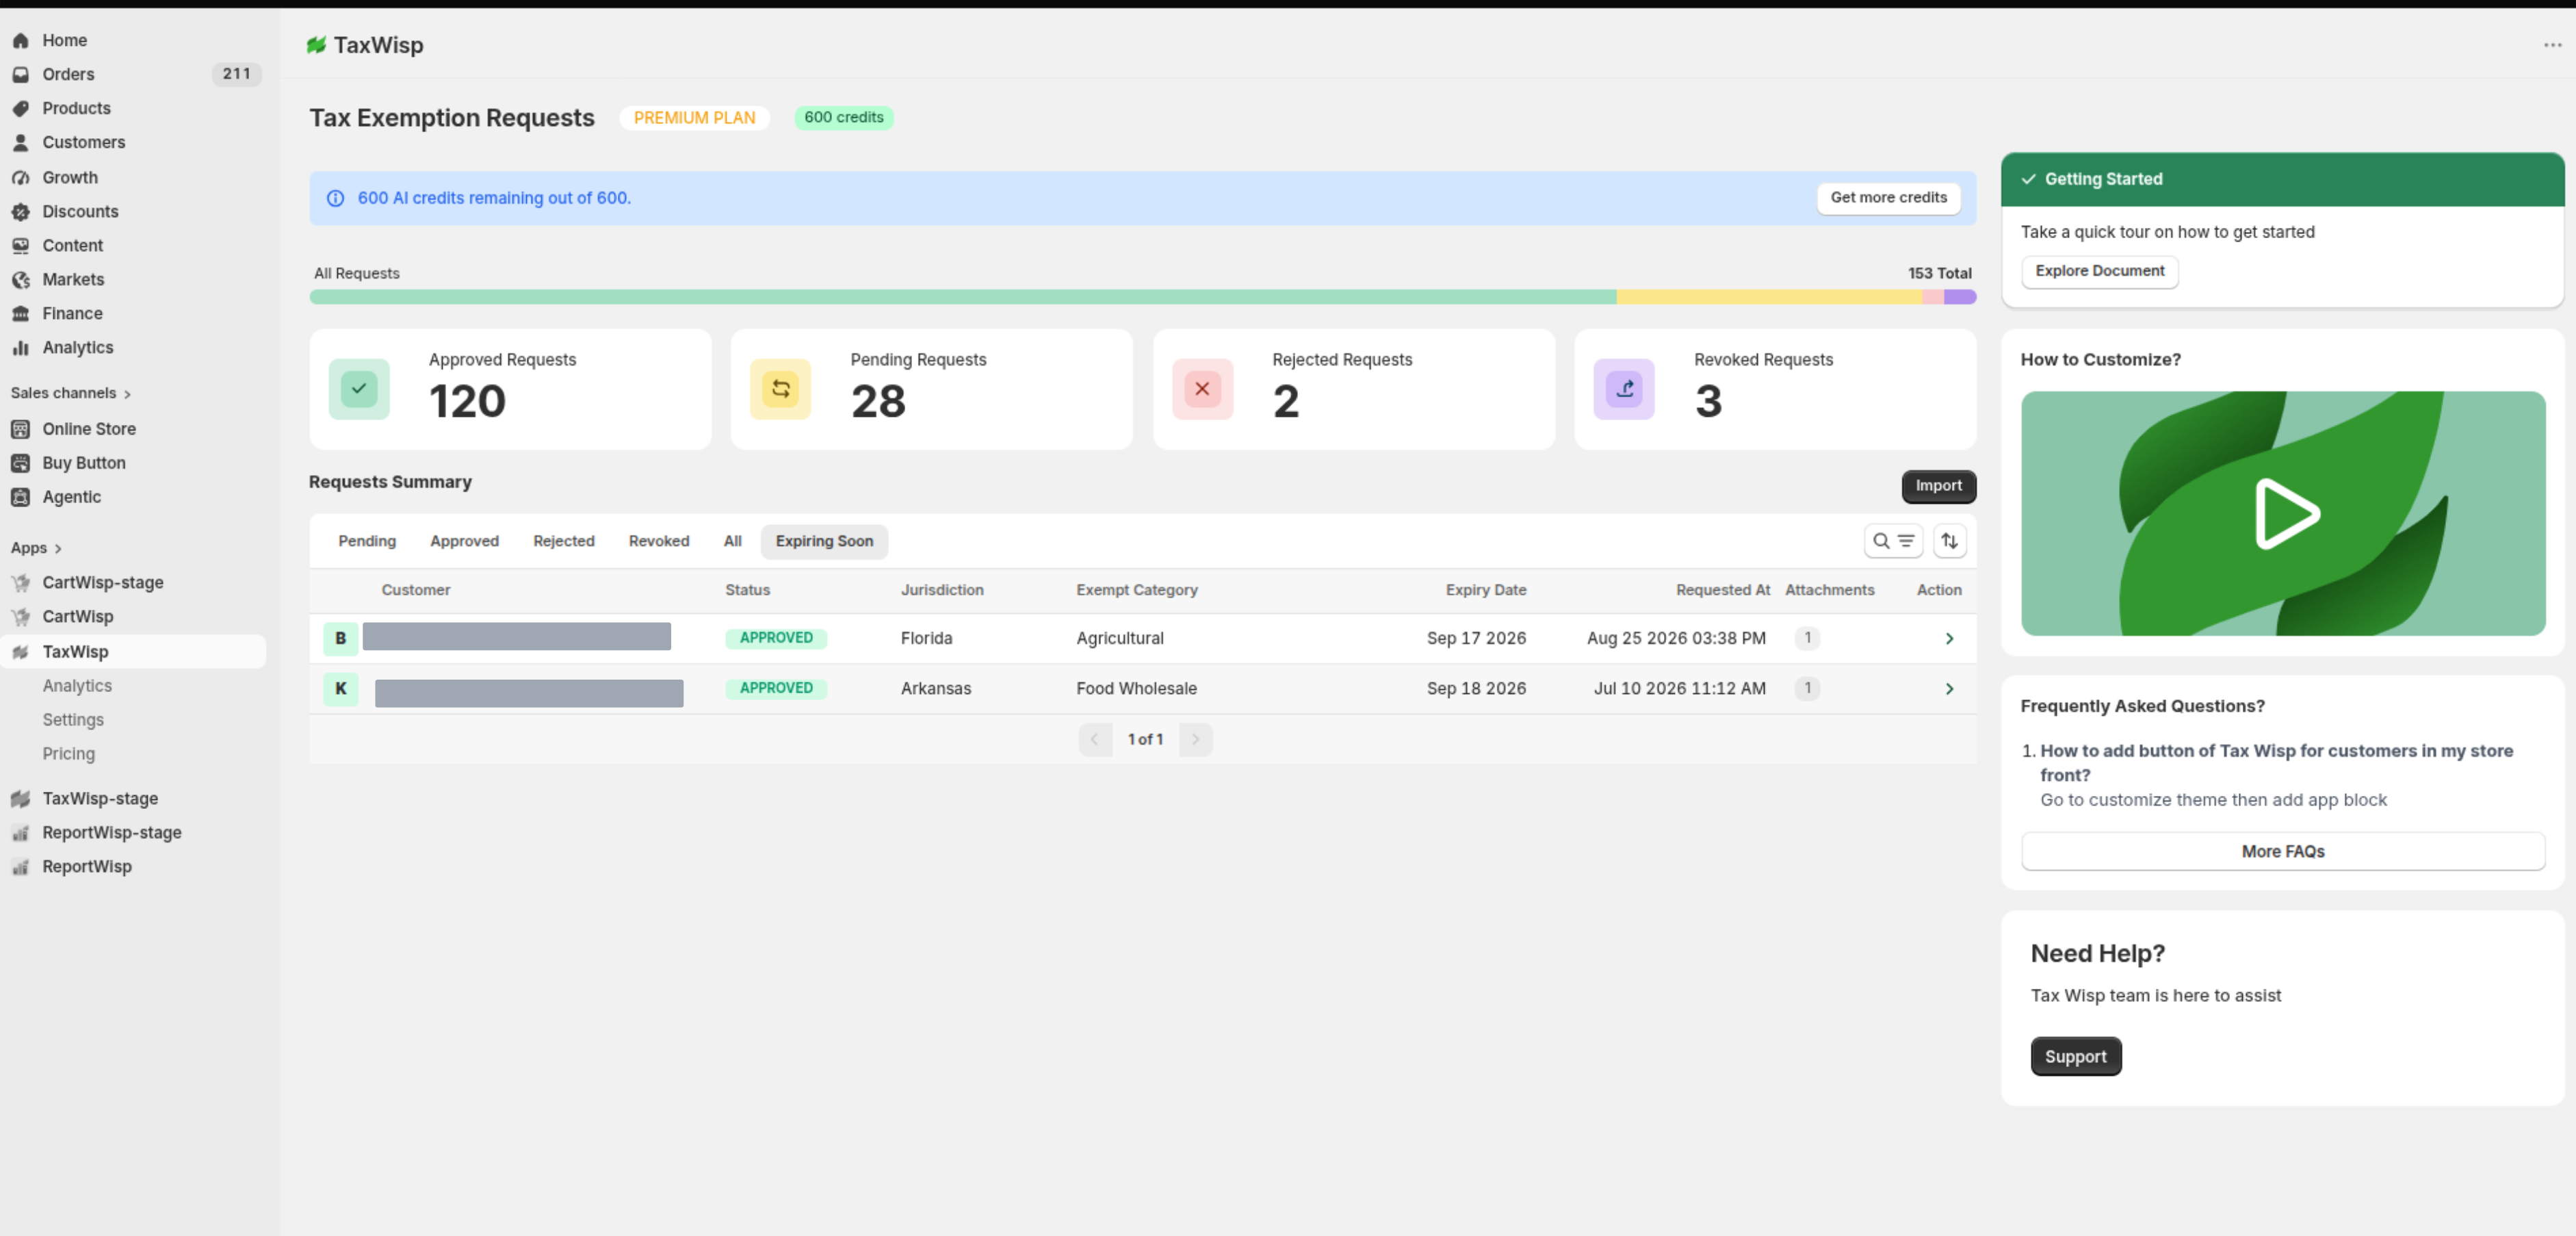
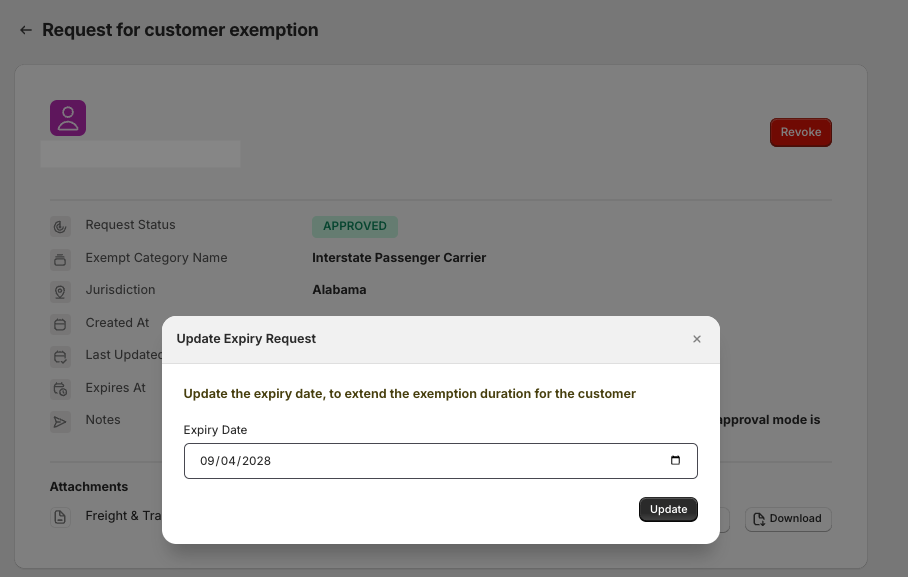
The updated expiry date takes effect immediately, allowing the customer to continue receiving tax-exempt checkout until the new expiry date is reached.
Re-Approving Revoked Exemptions
If a previously revoked exemption becomes valid again, you can restore the customer's tax-exempt status without requiring them to submit an entirely new exemption request.
To re-approve a revoked exemption:
- Open the exemption request from the Revoked tab.
- Review the exemption details and supporting documents.
- Confirm that the exemption is valid.
- Click Approve and specify a new expiry date if required.
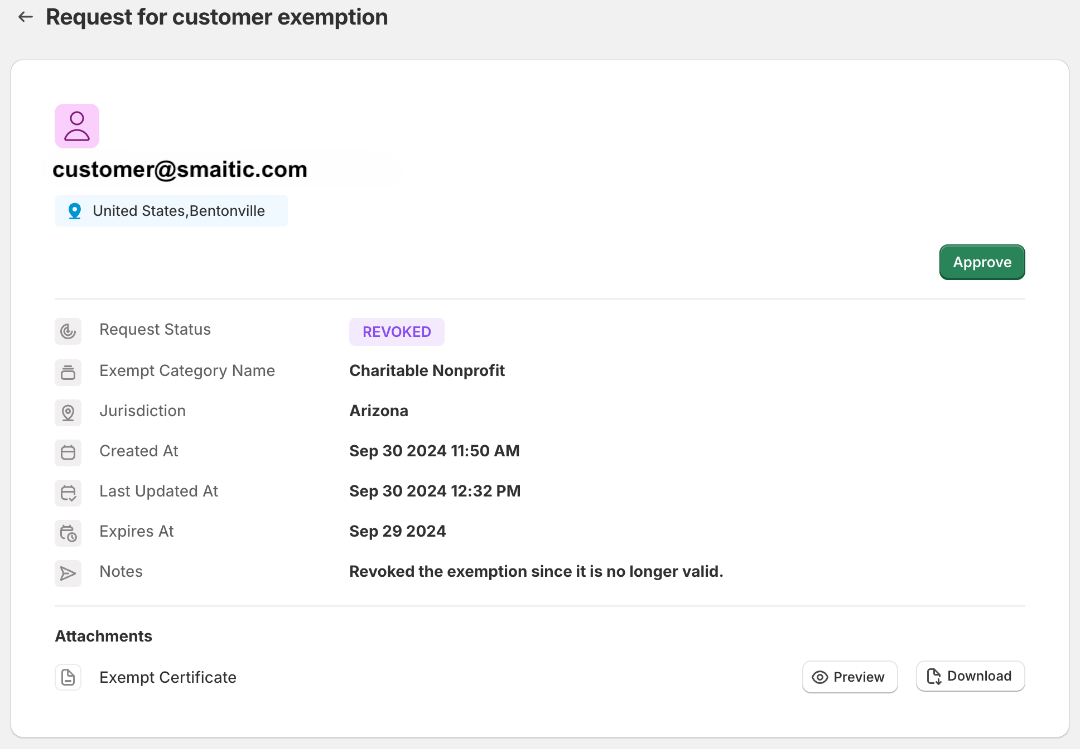
Once re-approved:
- The customer's tax-exempt status is restored.
- Future eligible purchases will again be processed without sales tax.
- The customer receives an approval notification.
- The activity is recorded in the Tax Exemption Audit History.
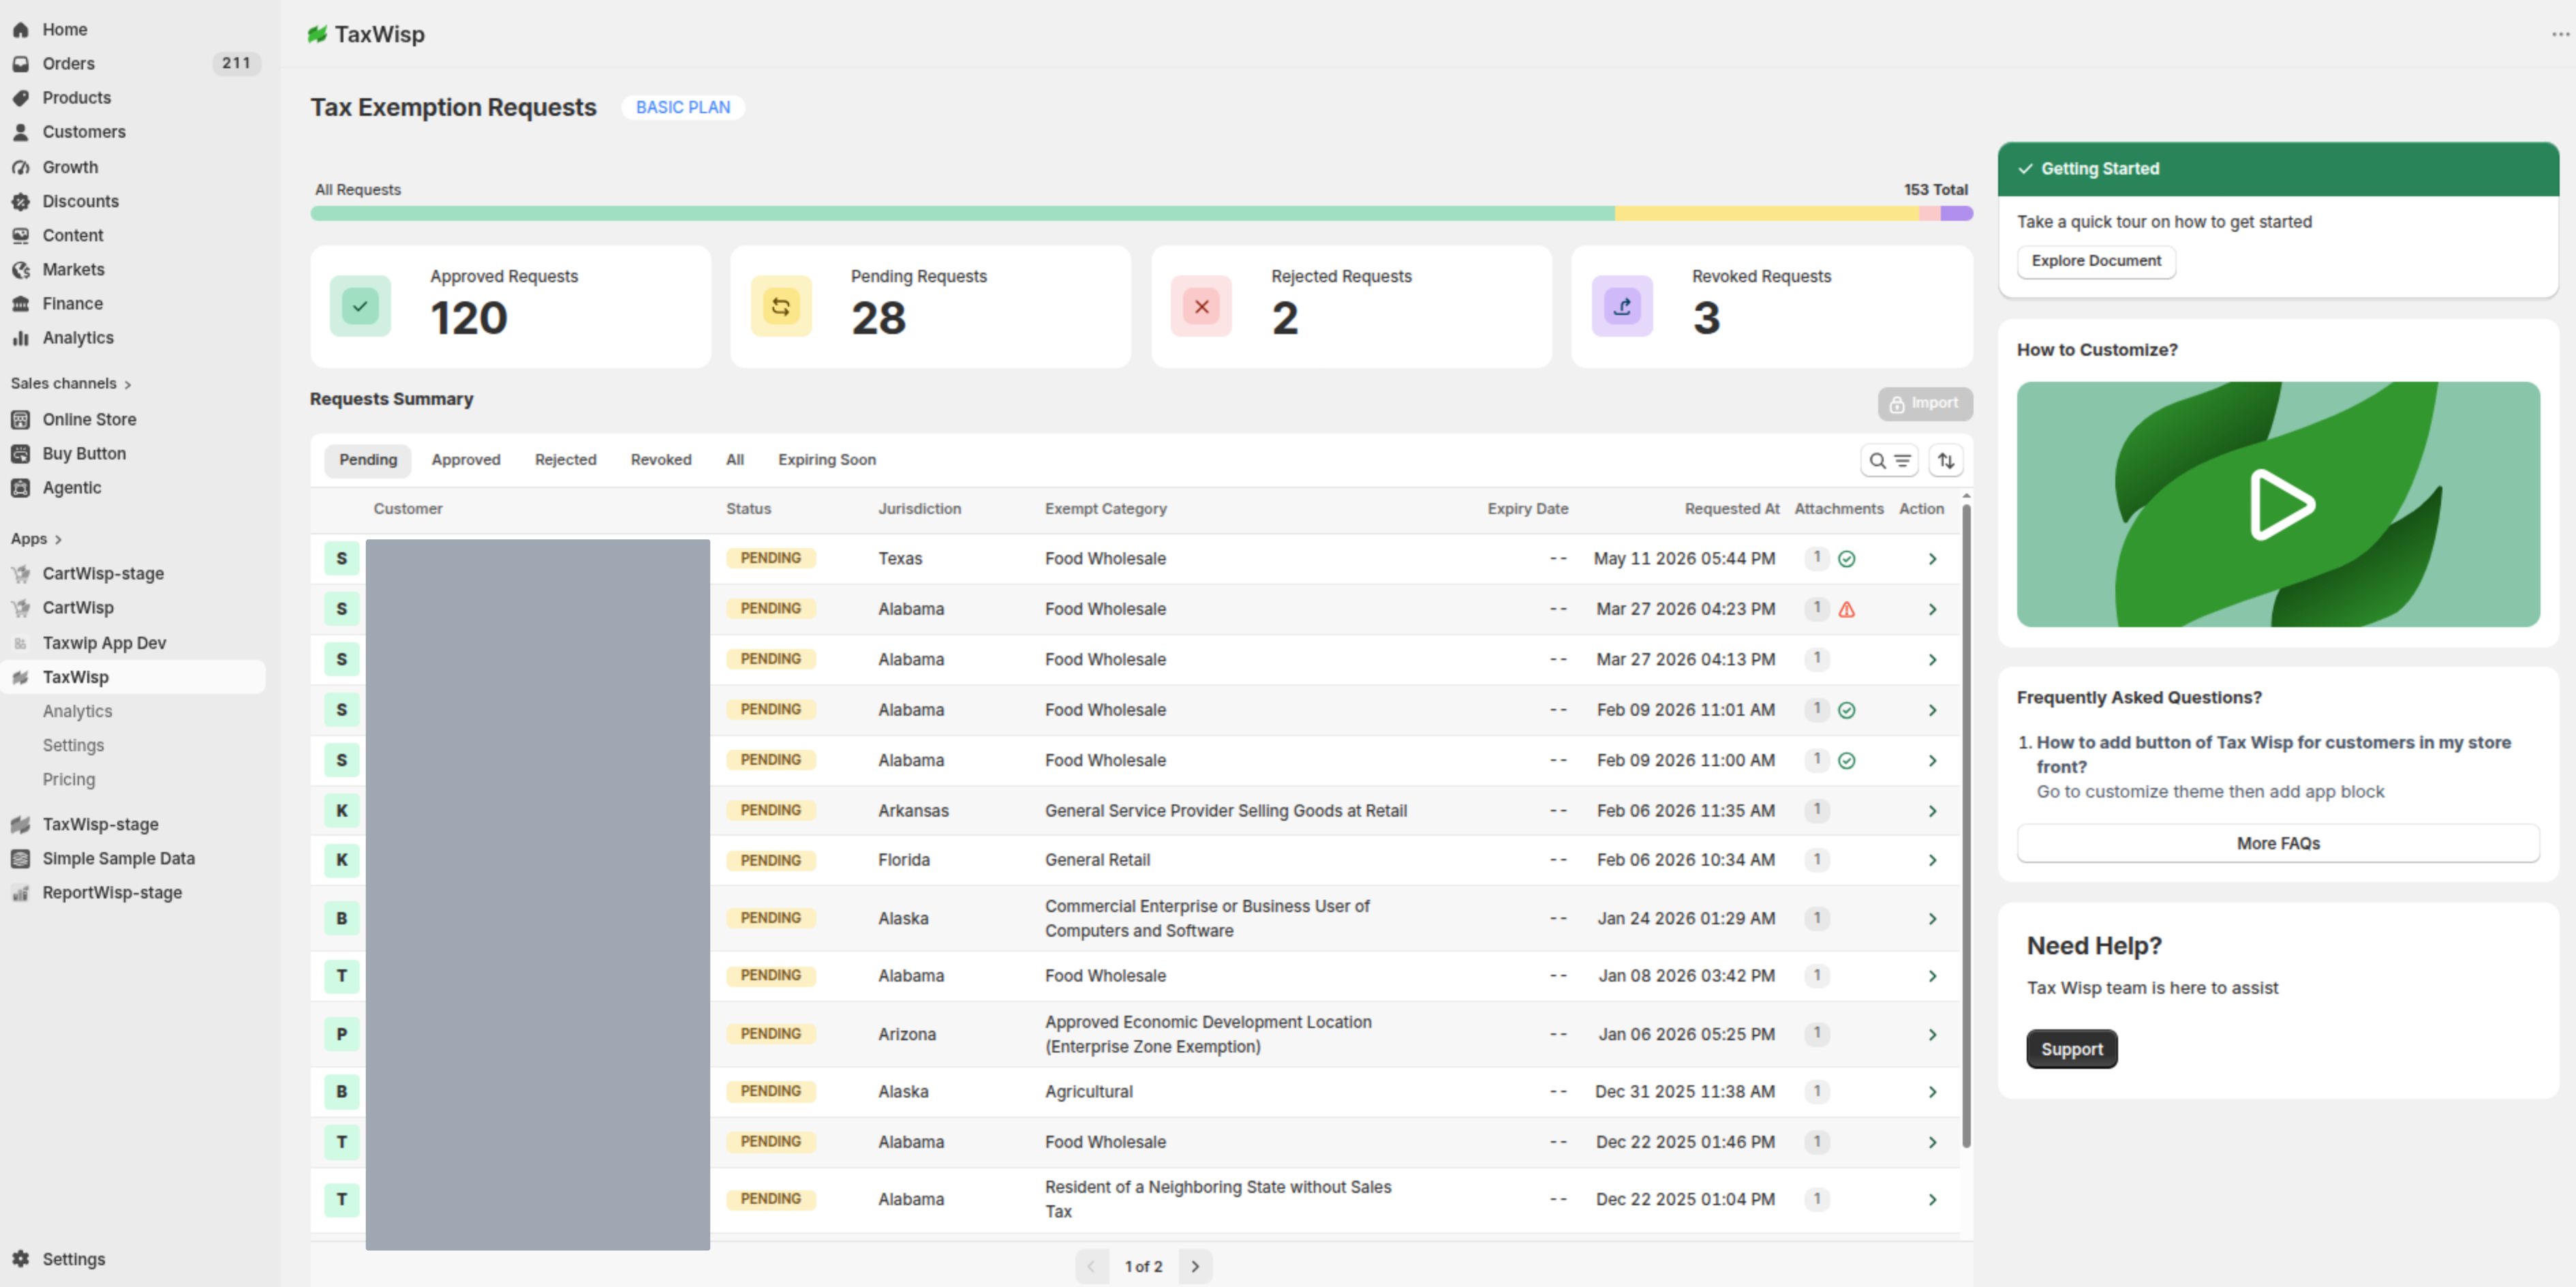
Tracking Tax Exemption Requests
The Exemption Requests page gives you complete visibility into every tax exemption request submitted to your store.
Requests are organized into dedicated tabs based on their current status, making it easy to monitor the exemption lifecycle.
Available request views include:
- Pending – Requests awaiting review or approval.
- Approved – Customers currently eligible for tax-exempt purchases.
- Rejected – Requests that were declined.
- Revoked – Previously approved exemptions that have been revoked.
- Expiring Soon – Approved exemptions approaching their expiry date.
- All – A consolidated view of every exemption request.
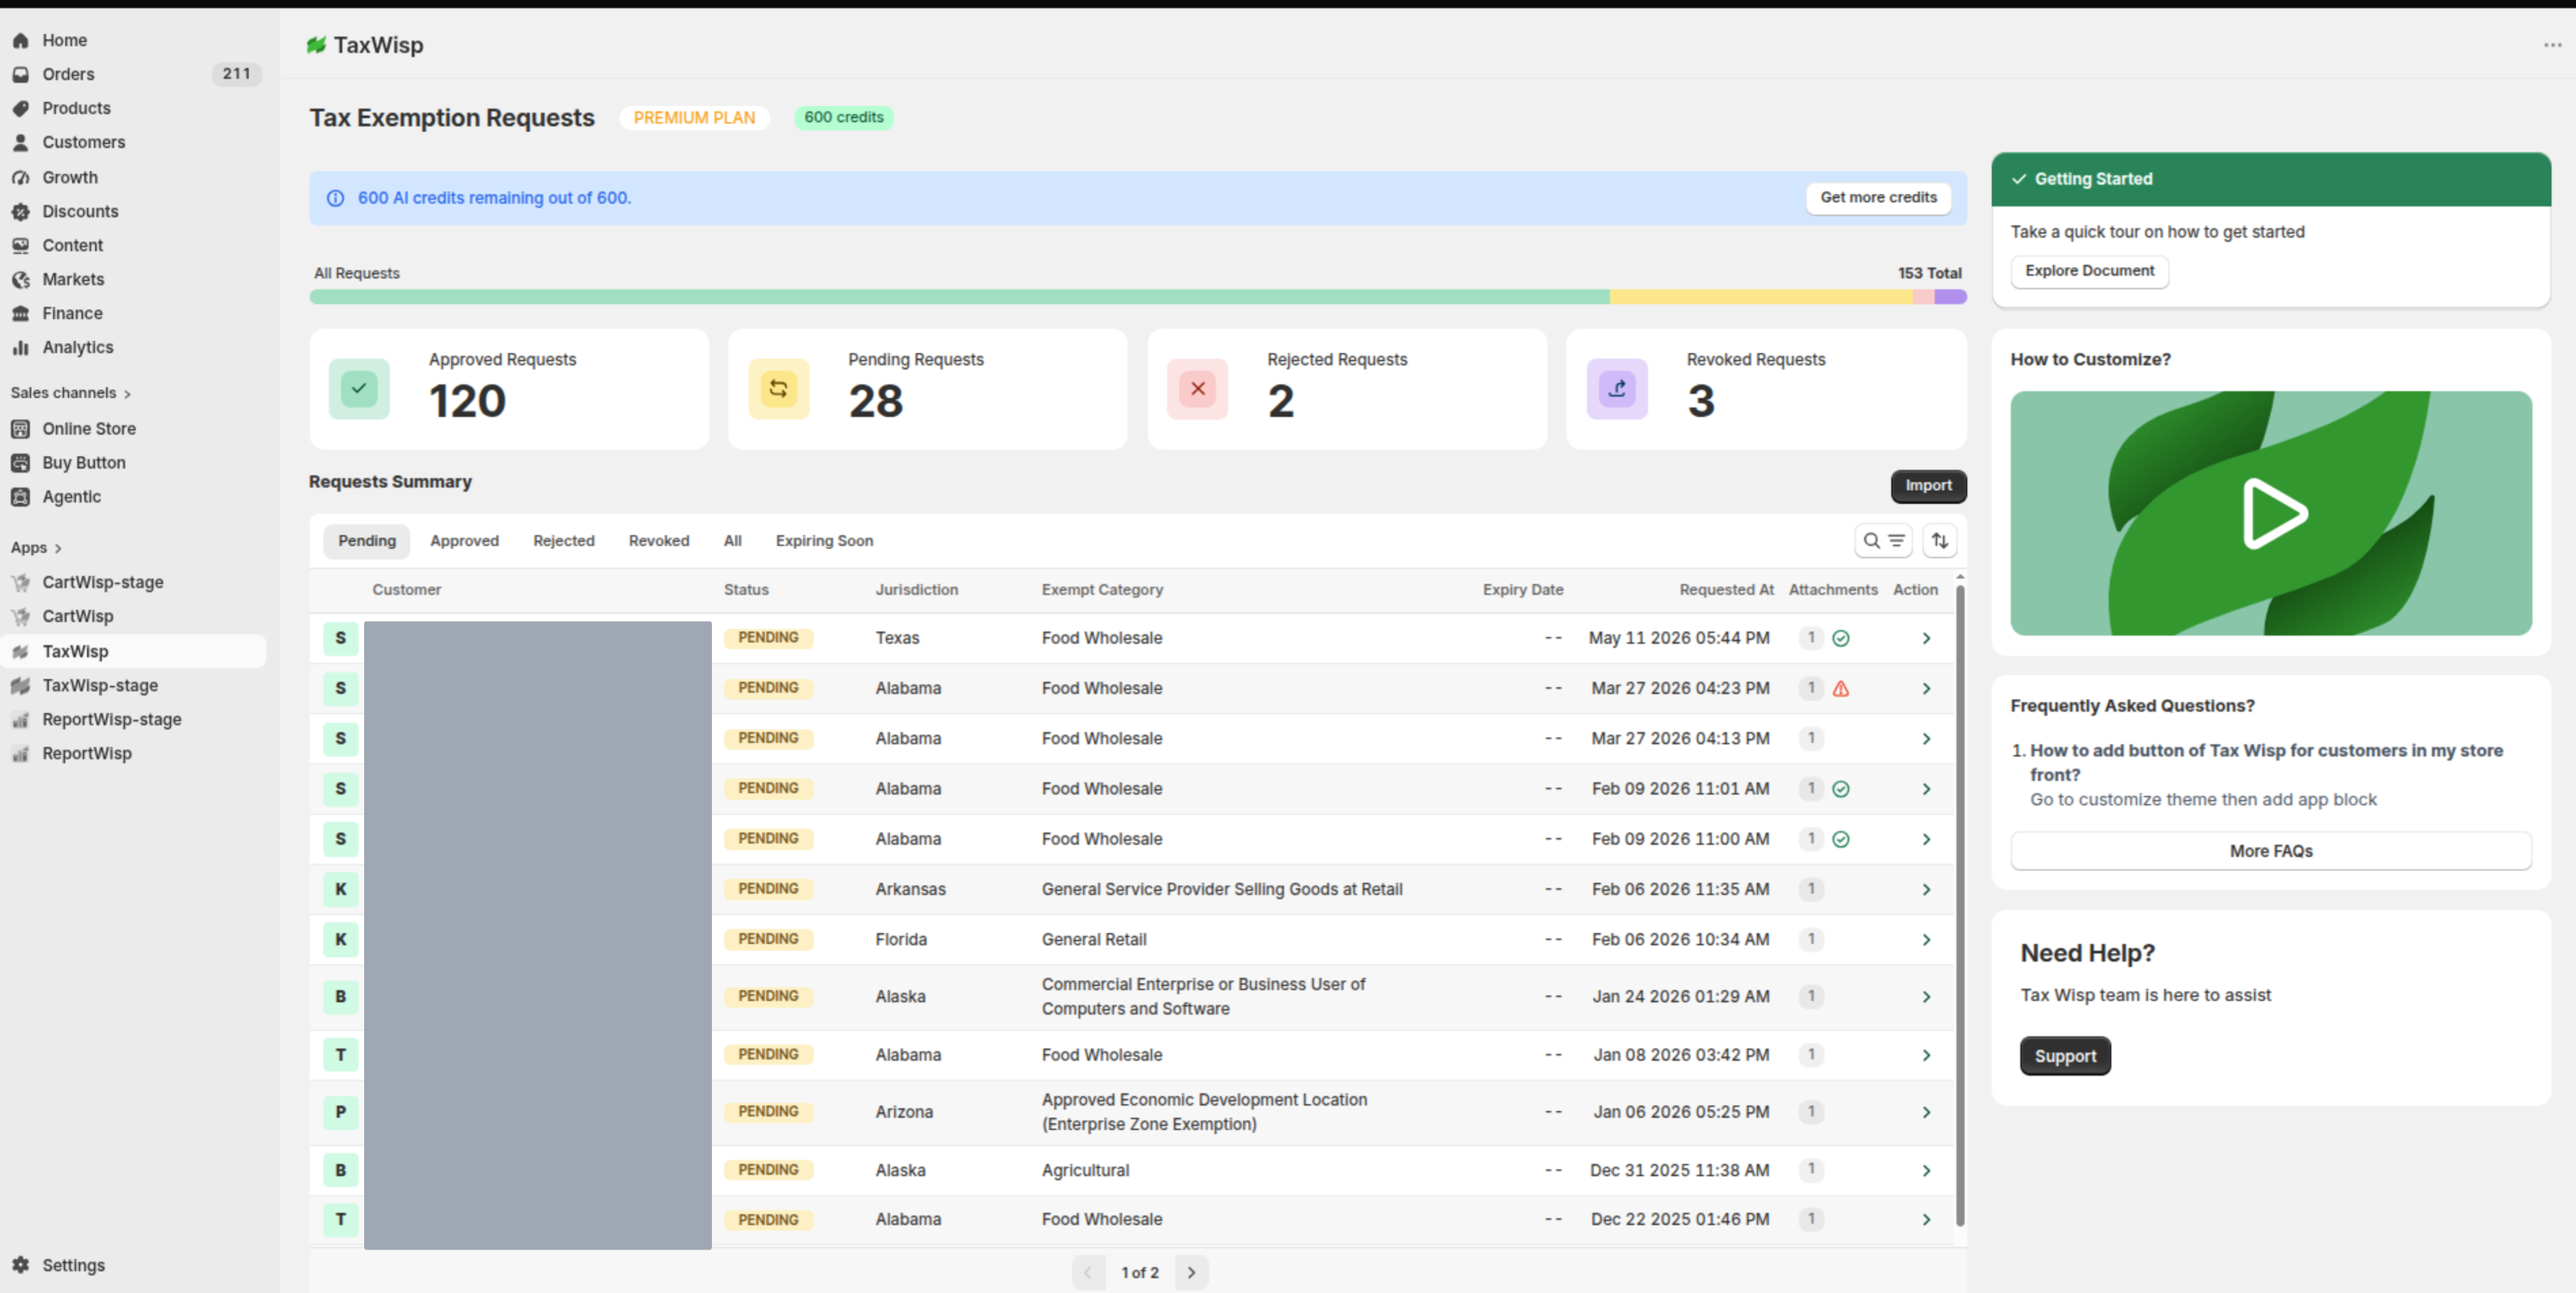
You can use the available search, filtering, and sorting options to quickly locate specific exemption requests and monitor customer activity. Selecting any request opens its detailed view, where you can review customer information, uploaded certificates, AI validation results (Premium Plan), status history, and perform the appropriate management actions.
Every significant action performed on an exemption request—including approvals, rejections, revocations, expiry updates, and automatic approvals—is recorded in the Tax Exemption Audit History, providing a complete audit trail for compliance and reporting purposes.
AI Co-Pilot & Intelligent Approval (Premium Plan)
TaxWisp AI Co-Pilot helps merchants validate sales tax exemption certificates more efficiently by automatically analyzing uploaded documents and comparing them against the information submitted by customers.
Instead of manually reviewing every exemption certificate, AI Co-Pilot extracts key information from the uploaded document, performs intelligent validation, and presents detailed insights to help you make faster and more informed approval decisions.
AI Co-Pilot can also power Criteria-Based Auto Approval, allowing TaxWisp to automatically approve exemption requests that satisfy the approval rules you define.
AI Co-Pilot, Intelligent Approval, and AI Validation Credits are available exclusively on the TaxWisp Premium Plan.
AI Document Validation
Whenever a customer uploads an exemption certificate as part of their tax exemption request, AI Co-Pilot automatically analyzes the document and extracts important information required for validation.
The AI engine identifies information such as:
- Exemption ID
- Tax Jurisdiction
- Organization or Business Name
- Certificate Type
- Certificate Validity (when available)
- Other relevant information available on the exemption certificate
The extracted information is then compared with the details submitted by the customer in the exemption request form.
This significantly reduces the amount of manual verification required while helping merchants identify inconsistencies between the submitted information and the uploaded certificate.
AI Validation Insights
Every exemption request includes an AI Validation panel that provides a detailed summary of the AI analysis.
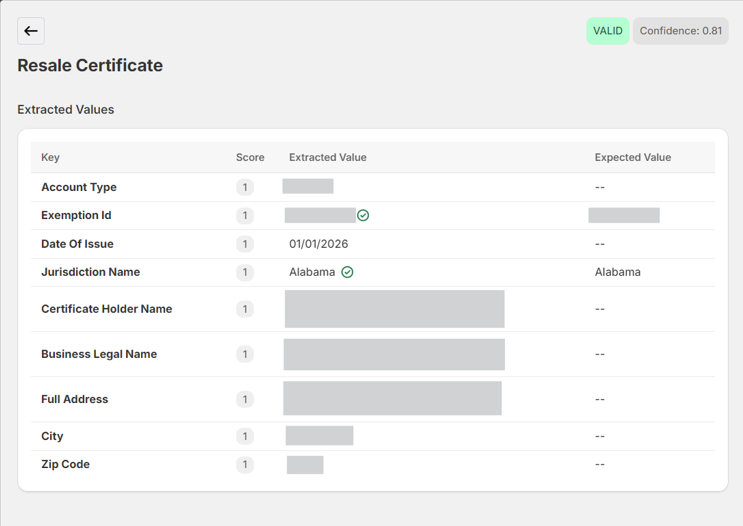
The validation panel displays:
- Validation Status – Indicates whether the uploaded document appears to be valid based on AI analysis.
- Confidence Score – Displays the AI's confidence level for the extracted information.
- Extracted Certificate Information – Shows the values identified from the uploaded certificate.
- Matching Analysis – Highlights whether the extracted values match the information submitted by the customer.
- Validation Summary – Provides an overall explanation of the validation results.
These insights help merchants review exemption requests more efficiently while improving consistency across approval decisions.
AI Co-Pilot is designed to assist with document validation. Merchants remain responsible for ensuring that approved exemptions comply with their organization's tax policies and applicable regulations.
Intelligent Approval (Criteria-Based Auto Approval)
AI Co-Pilot also enables Criteria-Based Auto Approval, allowing TaxWisp to automatically approve exemption requests when they satisfy the approval conditions configured by your organization.
Unlike Approve All Requests, Intelligent Approval validates the uploaded exemption certificate before making an approval decision.
The approval workflow is as follows:
- A customer submits a tax exemption request.
- The customer uploads an exemption certificate.
- AI Co-Pilot analyzes the uploaded document.
- Relevant certificate information is extracted.
- TaxWisp compares the extracted values with the information submitted in the exemption request.
- Your configured approval criteria are evaluated.
- If all configured criteria are satisfied, the request is automatically approved.
- If any criterion is not satisfied, the request remains Pending for manual review.
This workflow reduces manual effort while ensuring exemption requests are approved only when they satisfy your organization's validation requirements.
Configuring Approval Criteria
TaxWisp currently supports the following approval criteria:
Matches Exemption ID
Automatically approve the exemption request when the Exemption ID submitted by the customer matches the Exemption ID extracted from the uploaded exemption certificate.
Matches Jurisdiction
Automatically approve the exemption request when the Tax Jurisdiction selected by the customer matches the jurisdiction identified on the uploaded exemption certificate.
Multiple Approval Criteria
You may enable one or both approval criteria.
When multiple criteria are selected, all selected conditions must be satisfied before the exemption request is automatically approved.
If one or more conditions do not match, the exemption request remains in the Pending state for manual review by a store administrator.
AI Validation Credits
AI-powered document validation uses a credit-based system. The TaxWisp Premium Plan includes an initial allocation of AI validation credits that merchants can use with AI Co-Pilot.
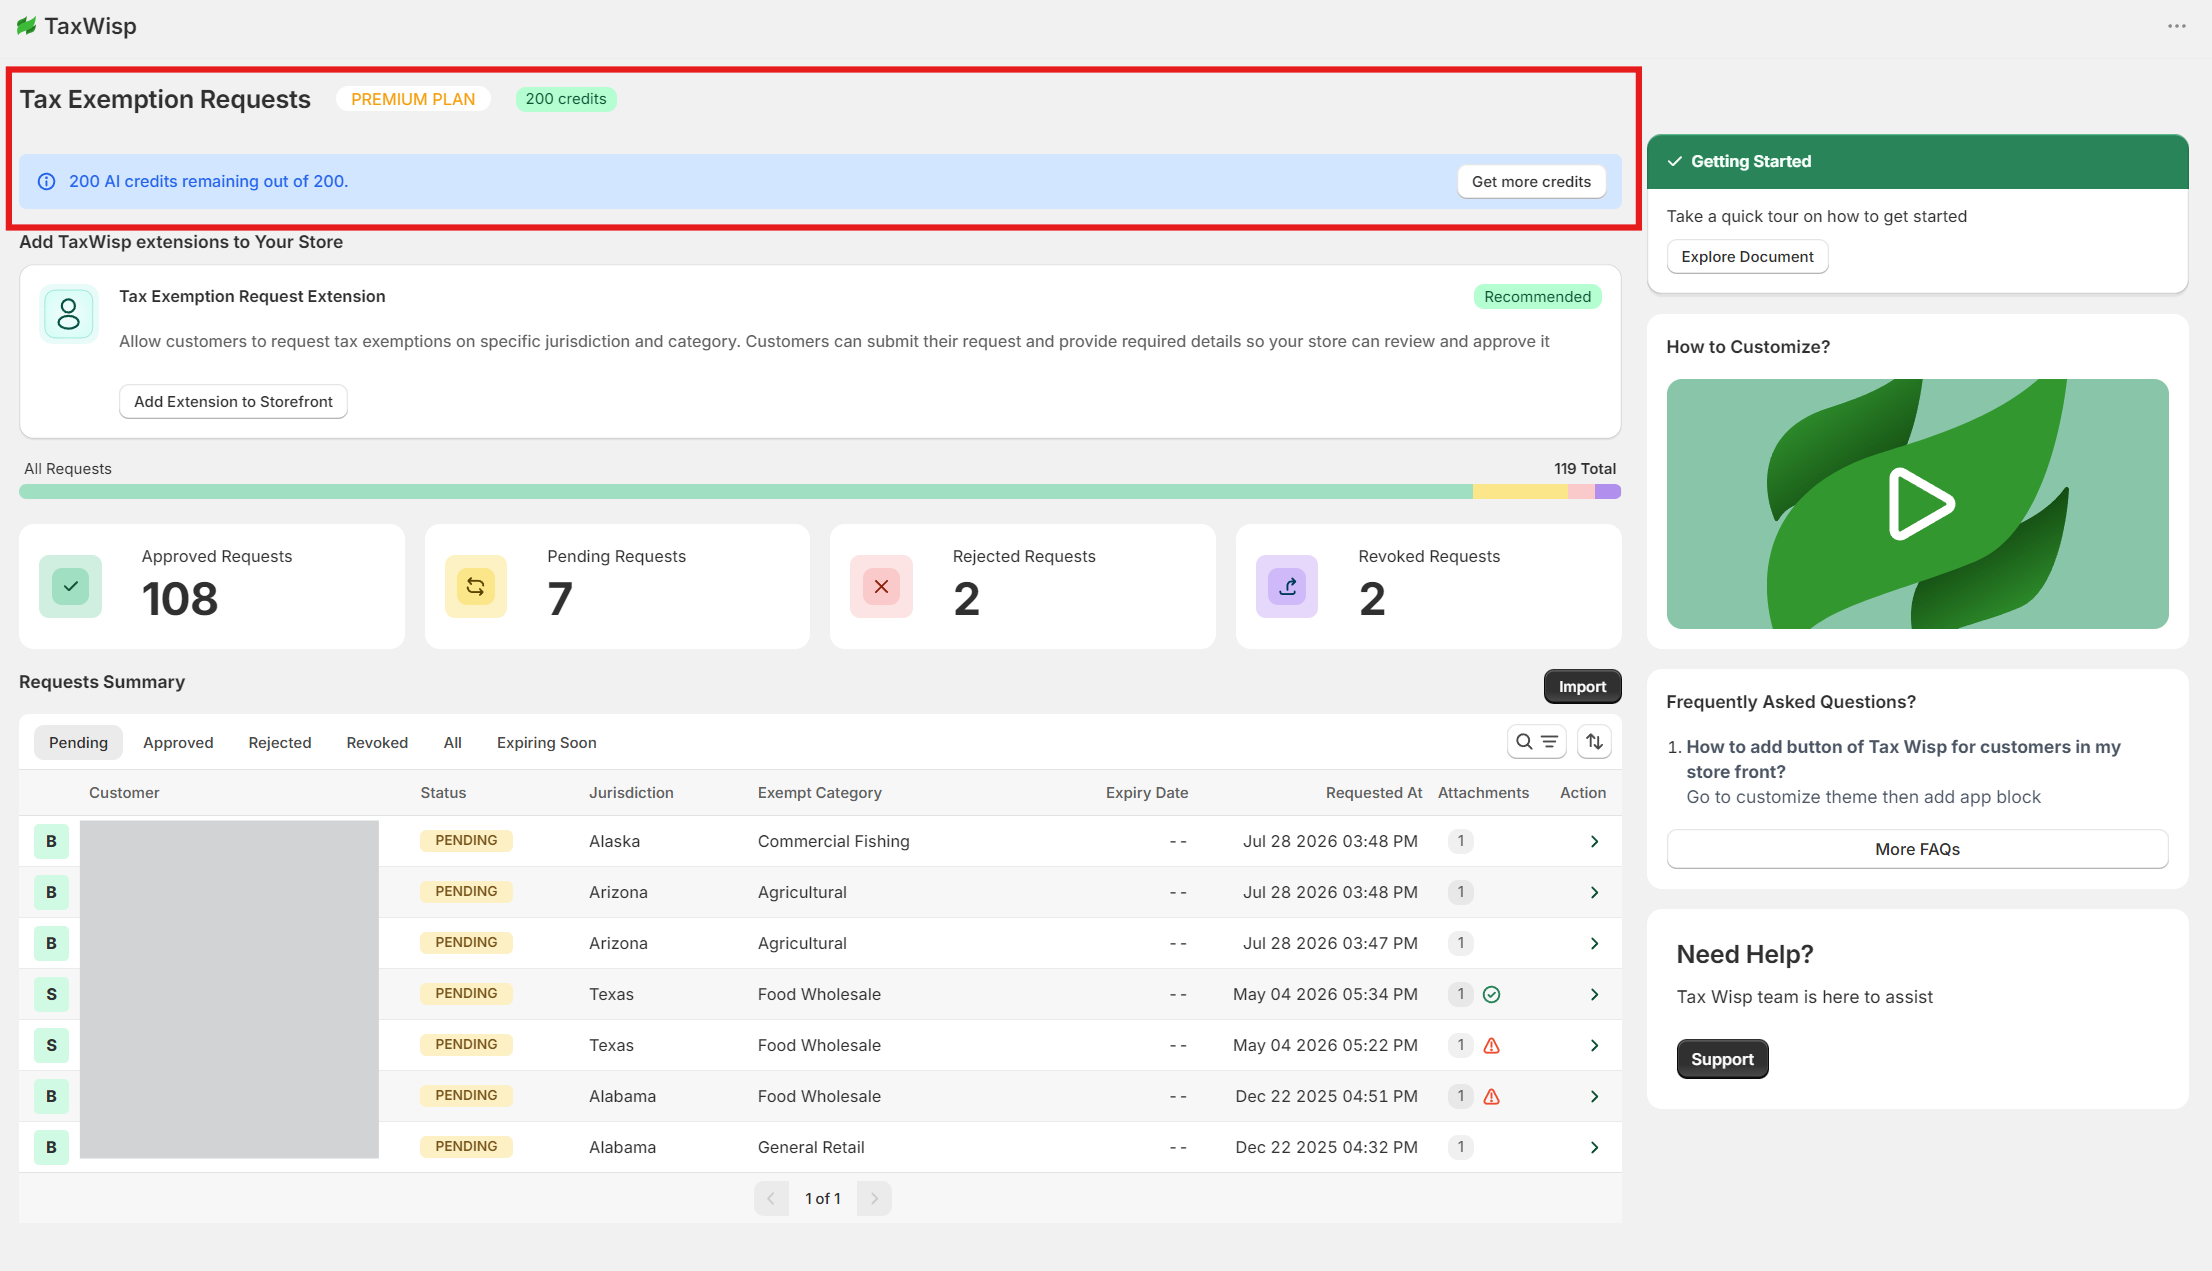
The Pricing page displays the number of AI credits included with the Premium Plan. Once subscribed, merchants can monitor their actual credit balance and usage directly from the TaxWisp Dashboard.
The Dashboard provides visibility into:
- Available AI credits
- Credits consumed
- AI credit usage
This makes it easy to monitor AI usage and determine when additional credits may be required.
How Credits Are Used
AI validation credits are consumed only after AI Co-Pilot successfully completes document validation.
Credits are not deducted simply because a customer submits a tax exemption request. This ensures that credits are consumed only when an AI-powered document validation is successfully performed.
What Happens When AI Credits Are Exhausted?
If your available AI validation credits are fully consumed:
- Customers can continue submitting tax exemption requests.
- Manual review and approval remain available.
- AI Co-Pilot document validation will be unavailable until additional credits are available.
- Criteria-Based Auto Approval that relies on AI document validation will also be unavailable.
To continue using AI-powered document validation, merchants can purchase additional AI credits from TaxWisp.
Running out of AI credits does not prevent customers from submitting exemption requests or merchants from reviewing them manually. It only affects features that depend on AI-powered document validation.
Viewing Credit Details and Purchasing Additional Credits
Your current AI credit balance and usage information are displayed directly on the TaxWisp Dashboard.
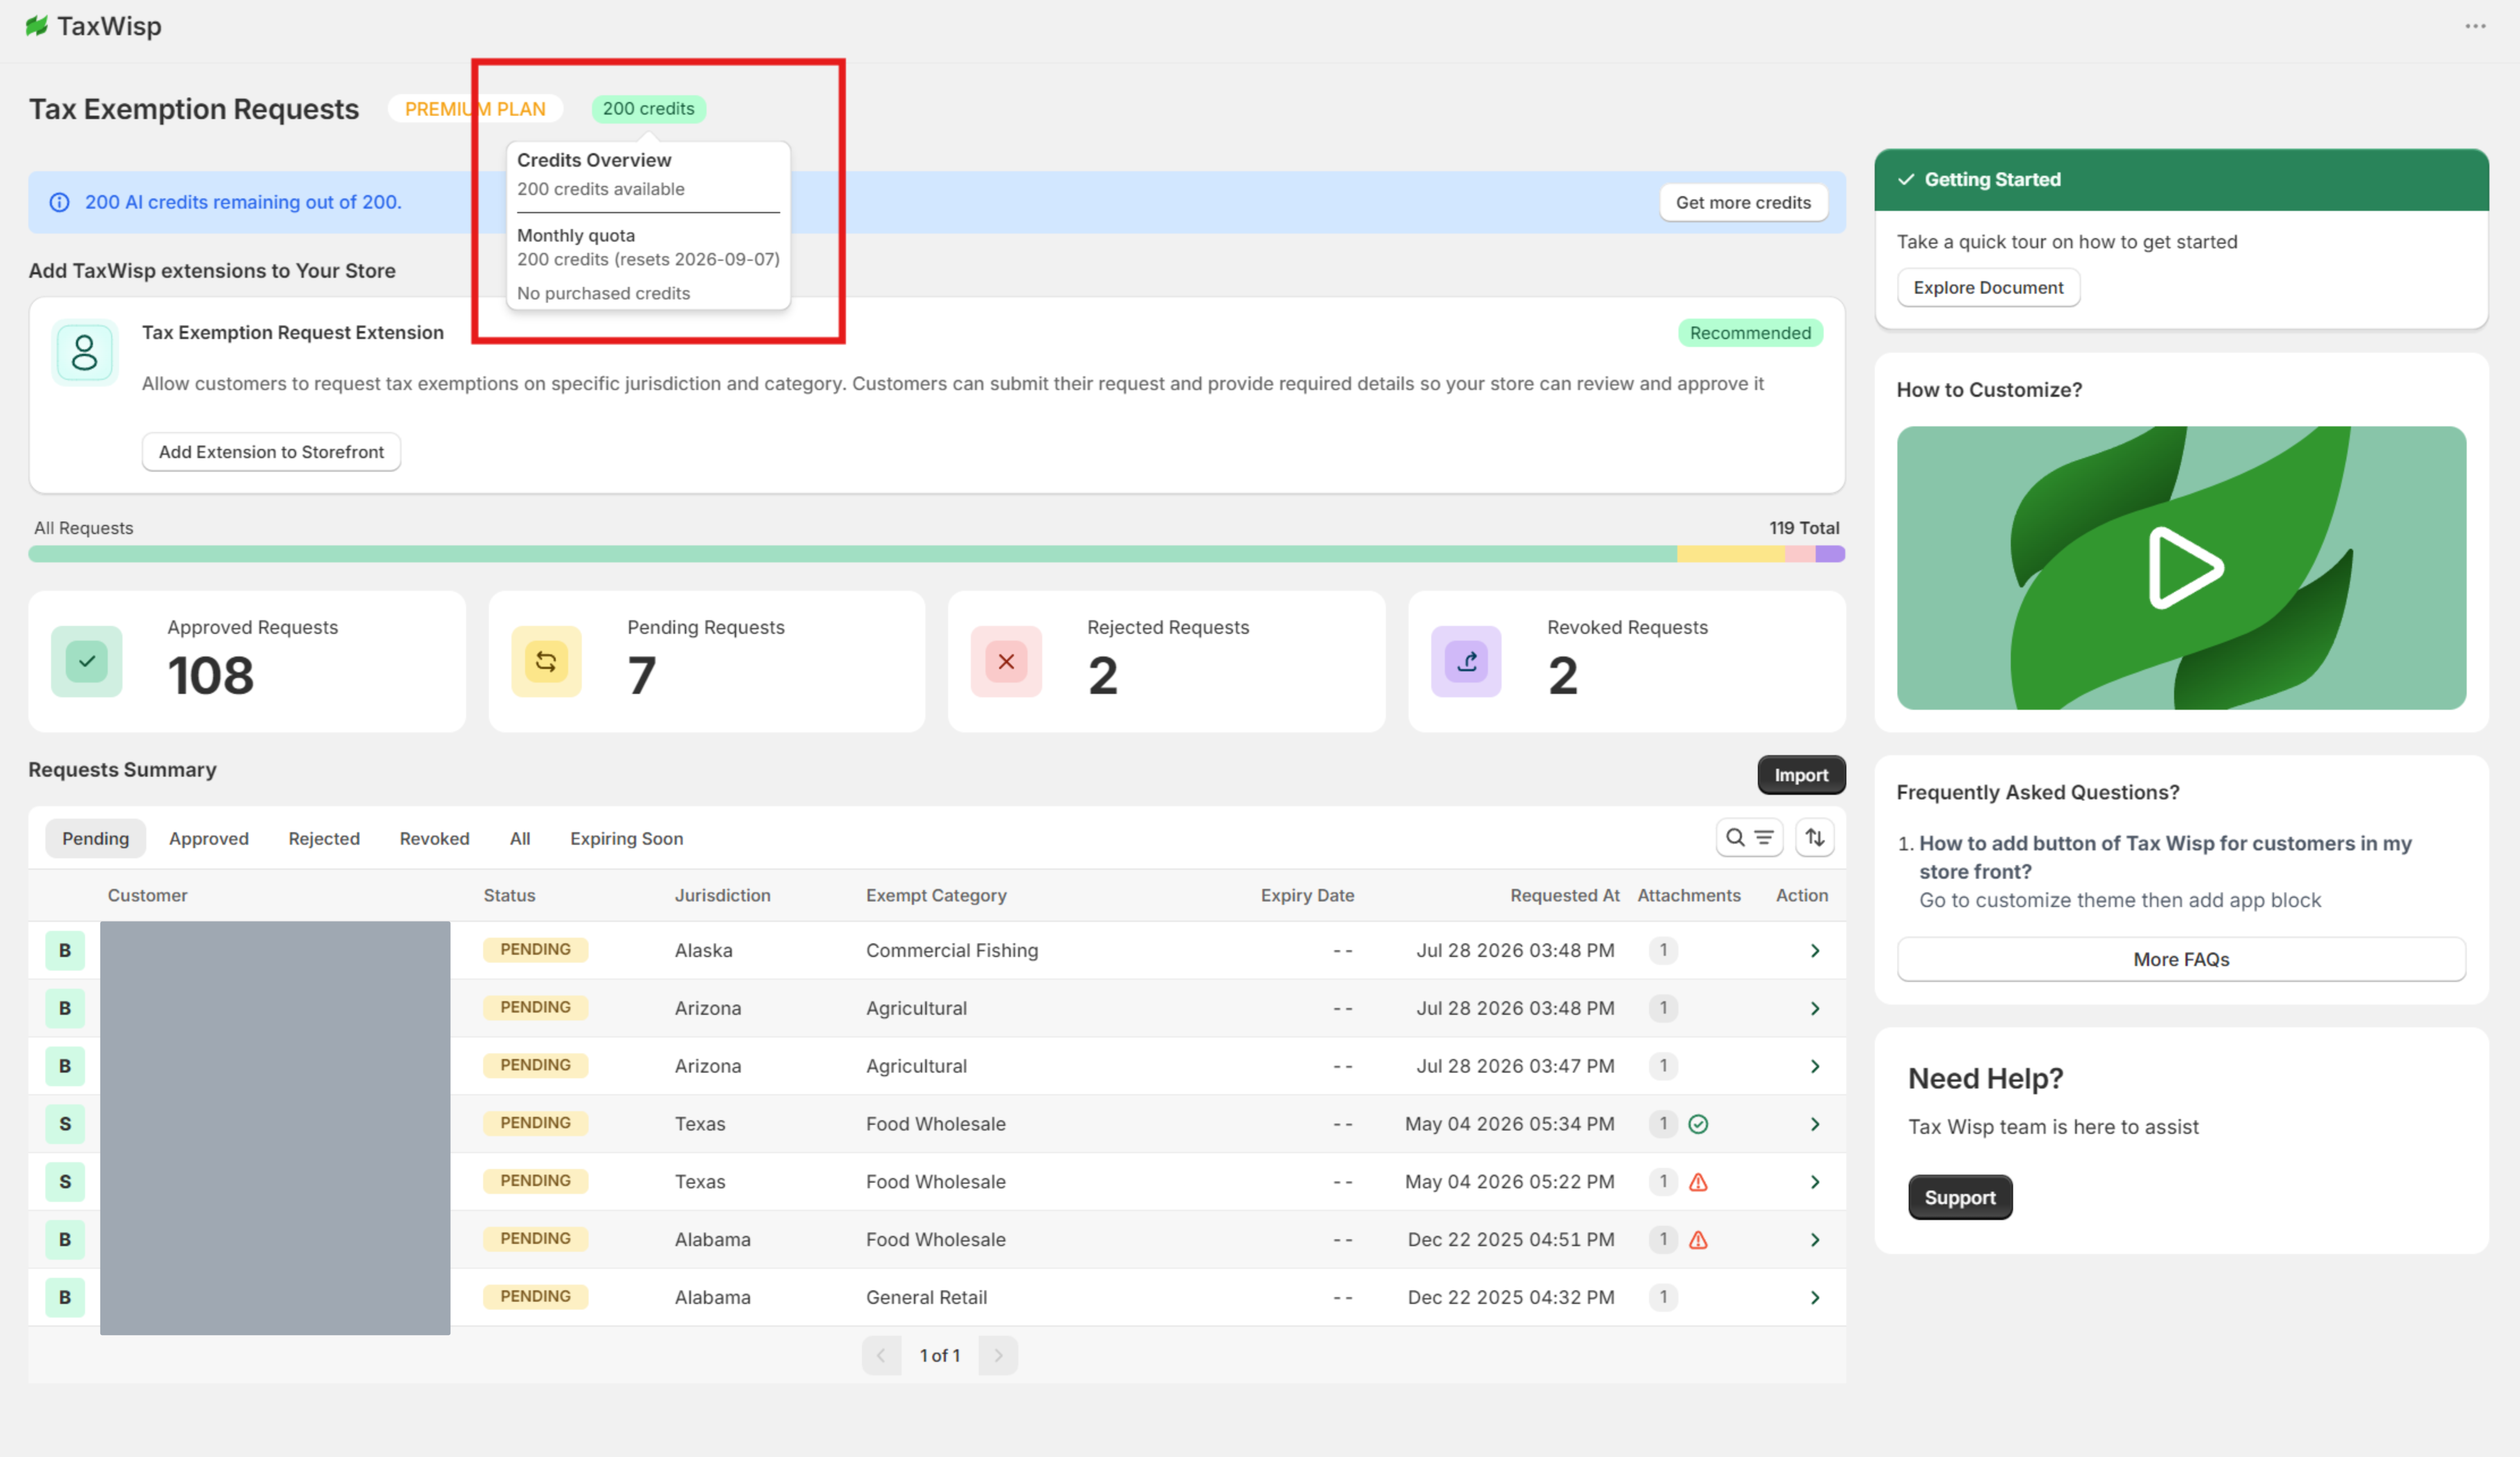
To view additional credit options, click the credit information on the Dashboard. This will take you to the credit details, where you can review the available credit bundles and purchase the bundle that best suits your requirements.
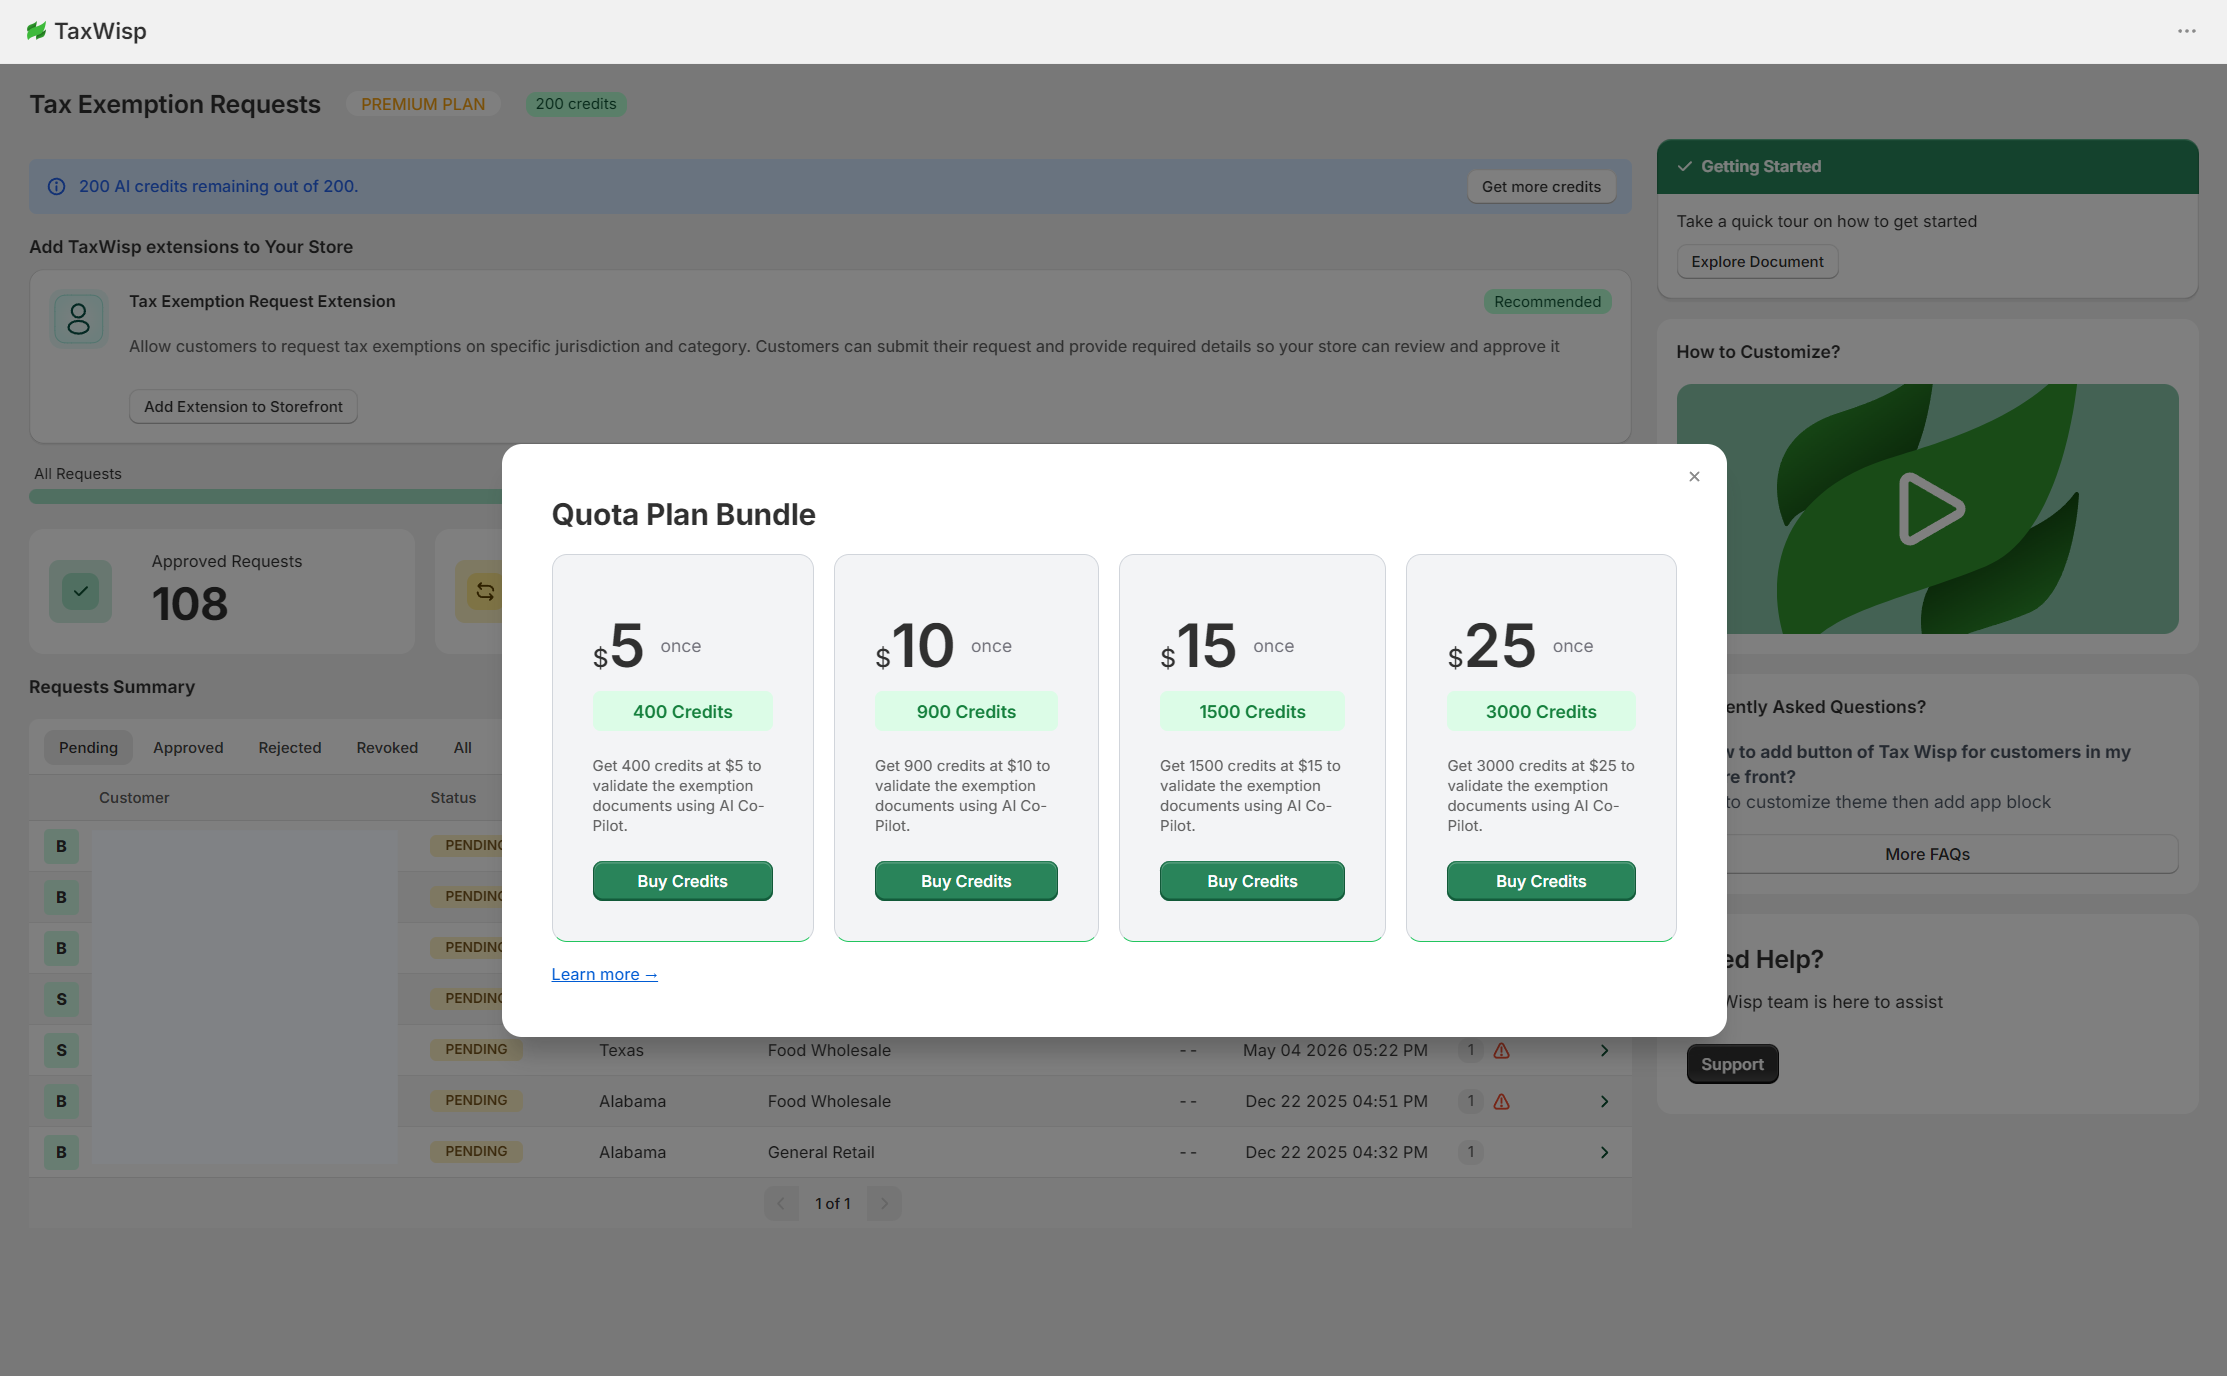
Available credit bundles include:
| Bundle | AI Credits |
|---|---|
| $5 | 400 Credits |
| $10 | 900 Credits |
| $15 | 1,500 Credits |
| $25 | 3,000 Credits |
After Shopify successfully processes the payment, the purchased credits are added to your TaxWisp account and become available for AI-powered document validation.
Managing Your AI Credits
If your store processes a high volume of exemption requests, we recommend monitoring your credit usage regularly from the TaxWisp Dashboard.
When your available balance begins running low, you can access the available credit bundles directly from the Dashboard and purchase additional credits as needed. This helps avoid interruptions to AI Co-Pilot Document Validation and Criteria-Based Auto Approval.
Billing Cycle & Credit Refresh
Your monthly AI validation credits automatically refresh at the beginning of each Shopify billing cycle.
This ensures that every new billing period starts with a fresh allocation of AI validation credits based on your Premium subscription.
If your business requires additional AI capacity during the month, you can purchase one-time credit bundles without changing your subscription plan.
Best Practices
To achieve the most accurate AI validation results, we recommend the following:
- Encourage customers to upload clear, high-quality exemption certificates.
- Ensure certificates are complete, legible, and contain all relevant exemption information.
- Configure Criteria-Based Auto Approval only after reviewing how AI Co-Pilot performs with the types of exemption certificates your organization commonly receives.
- Monitor your remaining AI credit balance regularly, especially if your store processes a high volume of exemption requests.
- Purchase additional AI credit bundles before your balance is exhausted to avoid interruptions to AI-powered validation.
Benefits of AI Co-Pilot
Using AI Co-Pilot helps merchants:
- Reduce the time required to review exemption certificates.
- Minimize manual document comparison and data entry.
- Improve consistency across approval decisions.
- Automate repetitive approval workflows.
- Scale tax exemption management as request volumes grow.
- Maintain greater operational efficiency while supporting compliance requirements.
Tax Exemption Preclaim Widget (Premium Plan)
One of the biggest challenges merchants face when selling to tax-exempt customers is the delay caused by collecting and approving exemption certificates before an order can be placed.
Many customers don't have their exemption certificates readily available when they're ready to purchase. In larger organizations, the person placing the order is often different from the person responsible for tax or accounting, making it difficult to complete the exemption process immediately.
As a result, customers either postpone their purchase, abandon their cart, or complete the order and later request a tax refund, creating additional work for both the customer and the merchant.
Tax Exemption Preclaim solves this problem by allowing eligible customers to claim tax exemption before providing their exemption certificate, while ensuring that fulfillment only proceeds after their exemption has been verified.
How Tax Exemption Preclaim Works
Unlike the traditional tax exemption workflow, customers are not required to upload their exemption certificate before placing an order.
Here’s how it works:
Stage 1: Customer Claims Tax Exemption
The customer clicks the Tax Exemption Preclaim widget available on your storefront and provides their email address. No exemption certificate is required at this stage. TaxWisp records the customer's intent to purchase as a tax-exempt customer and associates the email address with future orders.
Stage 2: Customer Places the Tax-Exempt Order
The customer continues shopping and places their order as usual.
The order is processed as a tax-exempt order, allowing the customer to complete their purchase without waiting for certificate approval.
However, the order is automatically marked as Pending Verification with the tag as tax-exemption-certificate-pending.
This means the order will not proceed to fulfillment until the customer's exemption eligibility has been verified.
Stage 3: Customer Gets Invitation & Completes the Exemption Request
After the order is placed, TaxWisp automatically sends an email inviting the customer to complete their exemption request. The customer follows the secure link provided in the email to:
- Submit their exemption details.
- Upload their exemption certificate.
- Provide any required supporting documents.
The request is then processed using the standard TaxWisp approval workflow.
Stage 4: Store Reviews the Request
Once the customer submits their tax exemption request and uploads the required documents, the request appears in the TaxWisp Dashboard, just like any standard tax exemption request.
Depending on your store's configuration, the request may be:
- Reviewed manually.
- Approved automatically.
- Validated using AI Co-Pilot and Criteria-Based Auto Approval.
After reviewing the request:
If Approved:
TaxWisp
- Marks the customer as tax-exempt for future eligible purchases,
- Applies the
tax-exemption-certificate-verifiedtag to the associated Shopify order, - Sends an approval notification to the customer.
If Rejected:
TaxWisp
- Sends an email notifying the customer that their exemption request was rejected (along with the reason),
- Applies the
tax-exemption-certificate-rejectedtag to the associated Shopify order.
If Resubmitted:
TaxWisp
- Applies the
tax-exemption-certificate-resubmittedtag to the associated Shopify order.
Stage 5: Order Fulfillment Decision
Tax Exemption Preclaim allows customers to place their order immediately, but the merchant remains responsible for deciding whether the order should proceed to fulfillment based on the verification status provided by TaxWisp.
TaxWisp communicates the verification outcome by applying tags to the Shopify order:
| Order Tag | Recommended Action |
|---|---|
tax-exemption-certificate-pending | The customer has not yet completed the exemption verification process. If this status remains for more than 48 hours after the order is placed, the order should be discarded according to your store's workflow. |
tax-exemption-certificate-submitted | The customer has submitted their tax exemption certificate for the first time. The request is pending review and requires merchant verification before the order can be fulfilled. |
tax-exemption-certificate-verified | The customer's exemption has been successfully verified. The order can proceed to fulfillment. |
tax-exemption-certificate-rejected | The exemption request was rejected. The order should not be fulfilled as a tax-exempt order and should be discarded according to your store's workflow. |
tax-exemption-certificate-resubmitted | The customer has resubmitted their tax exemption request with updated or corrected details after a rejection. The order tag is updated to notify the merchant that the request is ready for re-review. |
tax-exemption-claim-expired | The allowable time window for the customer to submit a valid exemption certificate for this order has passed. The order can no longer be processed as tax-exempt and should be discarded or collected as standard taxable sales per your store's policy. |
TaxWisp does not automatically fulfill or cancel Shopify orders. It only updates the order with the appropriate verification tag. Merchants are responsible for reviewing these tags or configuring their own fulfillment automation to determine whether an order should proceed to fulfillment or be discarded.
This workflow allows customers to complete their purchase without delaying checkout, while ensuring that only customers with verified tax exemption certificates receive tax-exempt orders.
How to Configure Tax Exemption Preclaim Widget
Step 1: Add the Widget to Your Store
You can add the Tax Claim Widget to your website using either of two simple methods:
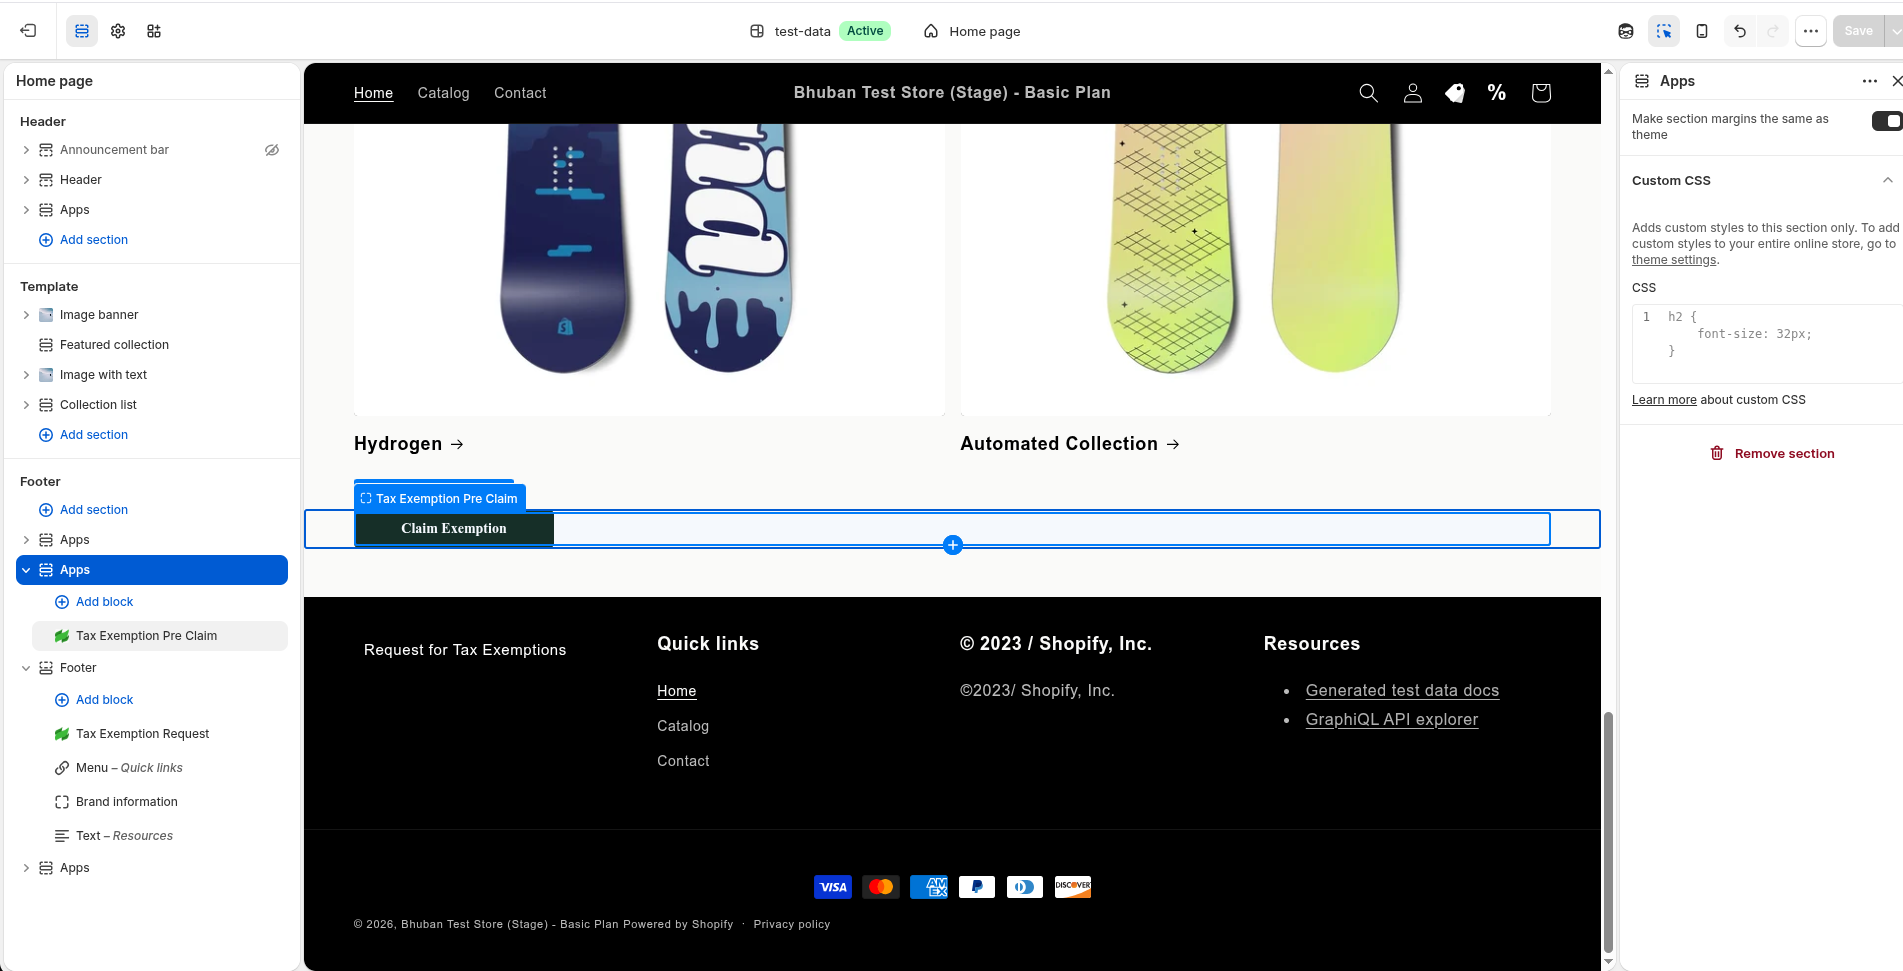
Option A: Add via Shopify Theme Editor (Recommended & Code-Free)
- Open your TaxWisp Dashboard in Shopify.
- Go to Settings → Tax Exemption Preclaim Widget.
- Click the Add Block (or Theme Extension) button.
- Your Shopify Theme Editor will open automatically. Drag and place the widget block wherever you want it to appear (e.g., Product Page, Cart Page, or Footer).
- Click Save in the top-right corner of your Shopify Theme Editor.
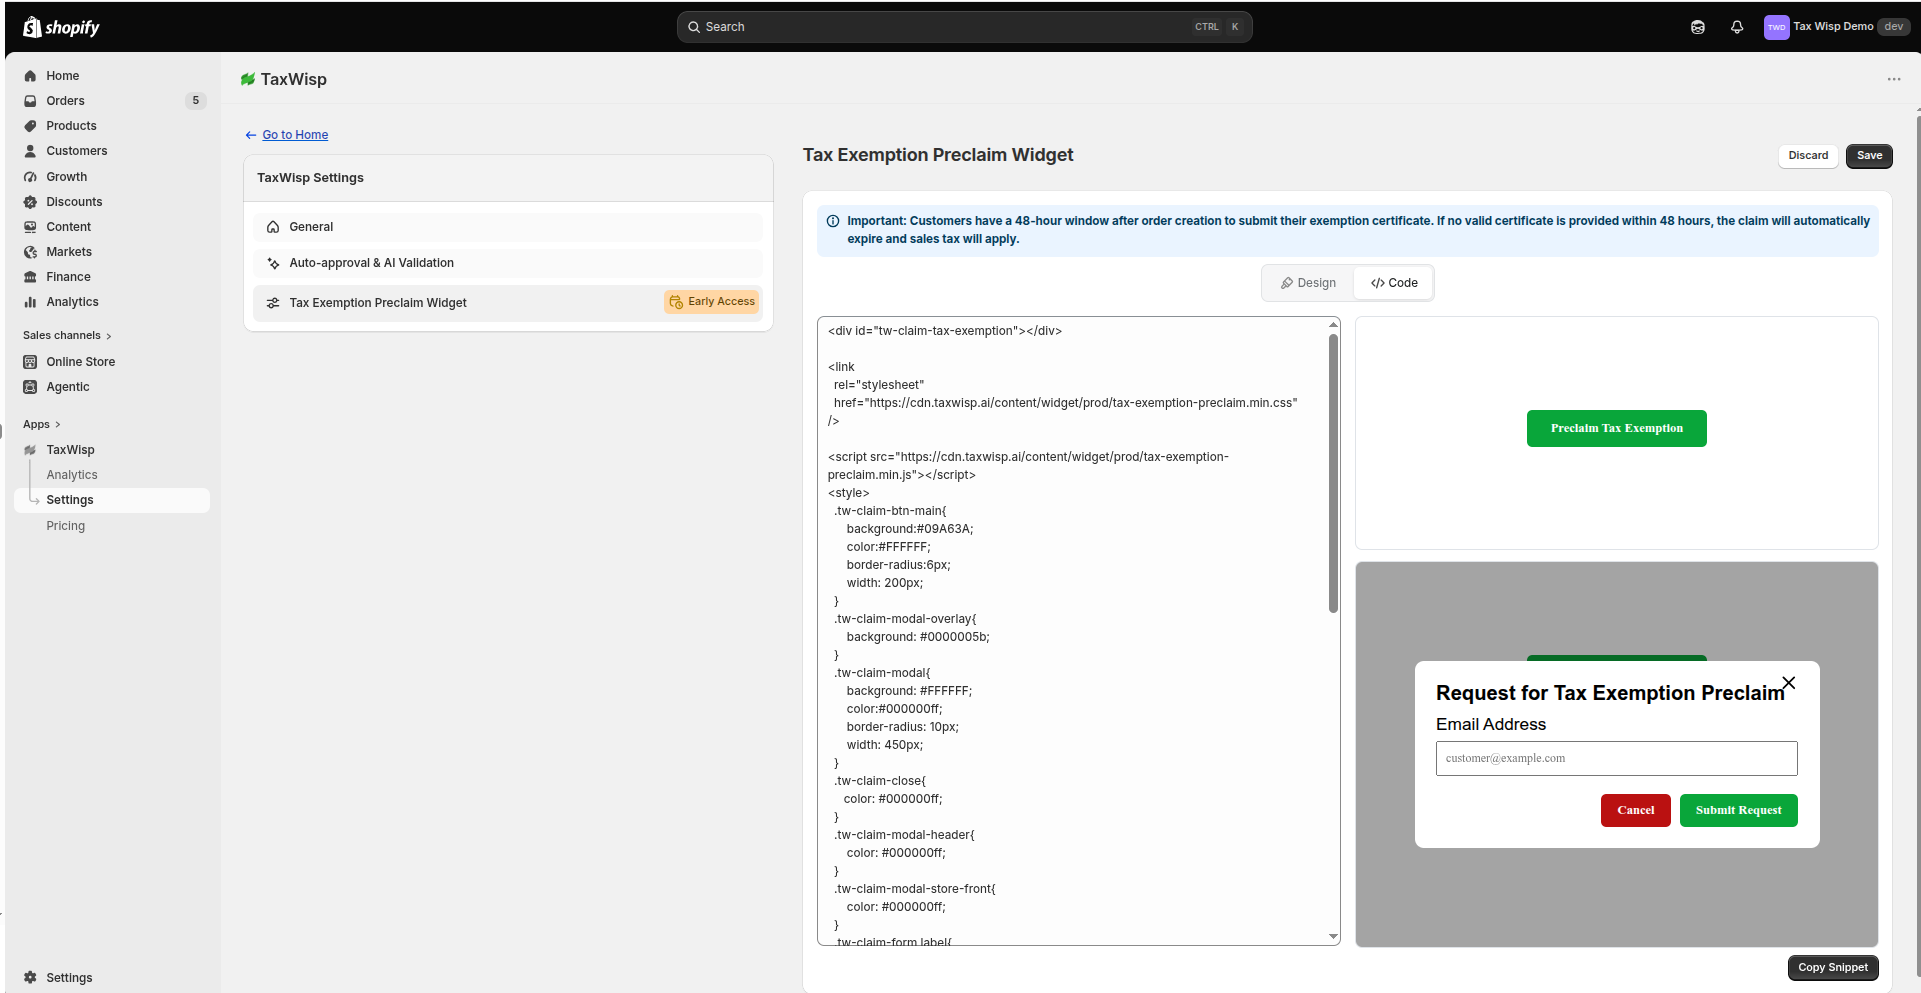
Option B: Copy & Paste Code Snippet (For Custom Pages)
If you prefer adding the widget to a custom HTML page or manual theme section:
- In TaxWisp, navigate to Settings → Tax Exemption Preclaim Widget.
- Click on the Code tab at the top of the page.
- Click the Copy Code button.
- Open your Shopify theme customizer or HTML editor and paste the copied snippet into your desired section.
- Click Save.
Step 2: Customize the Widget Look & Feel
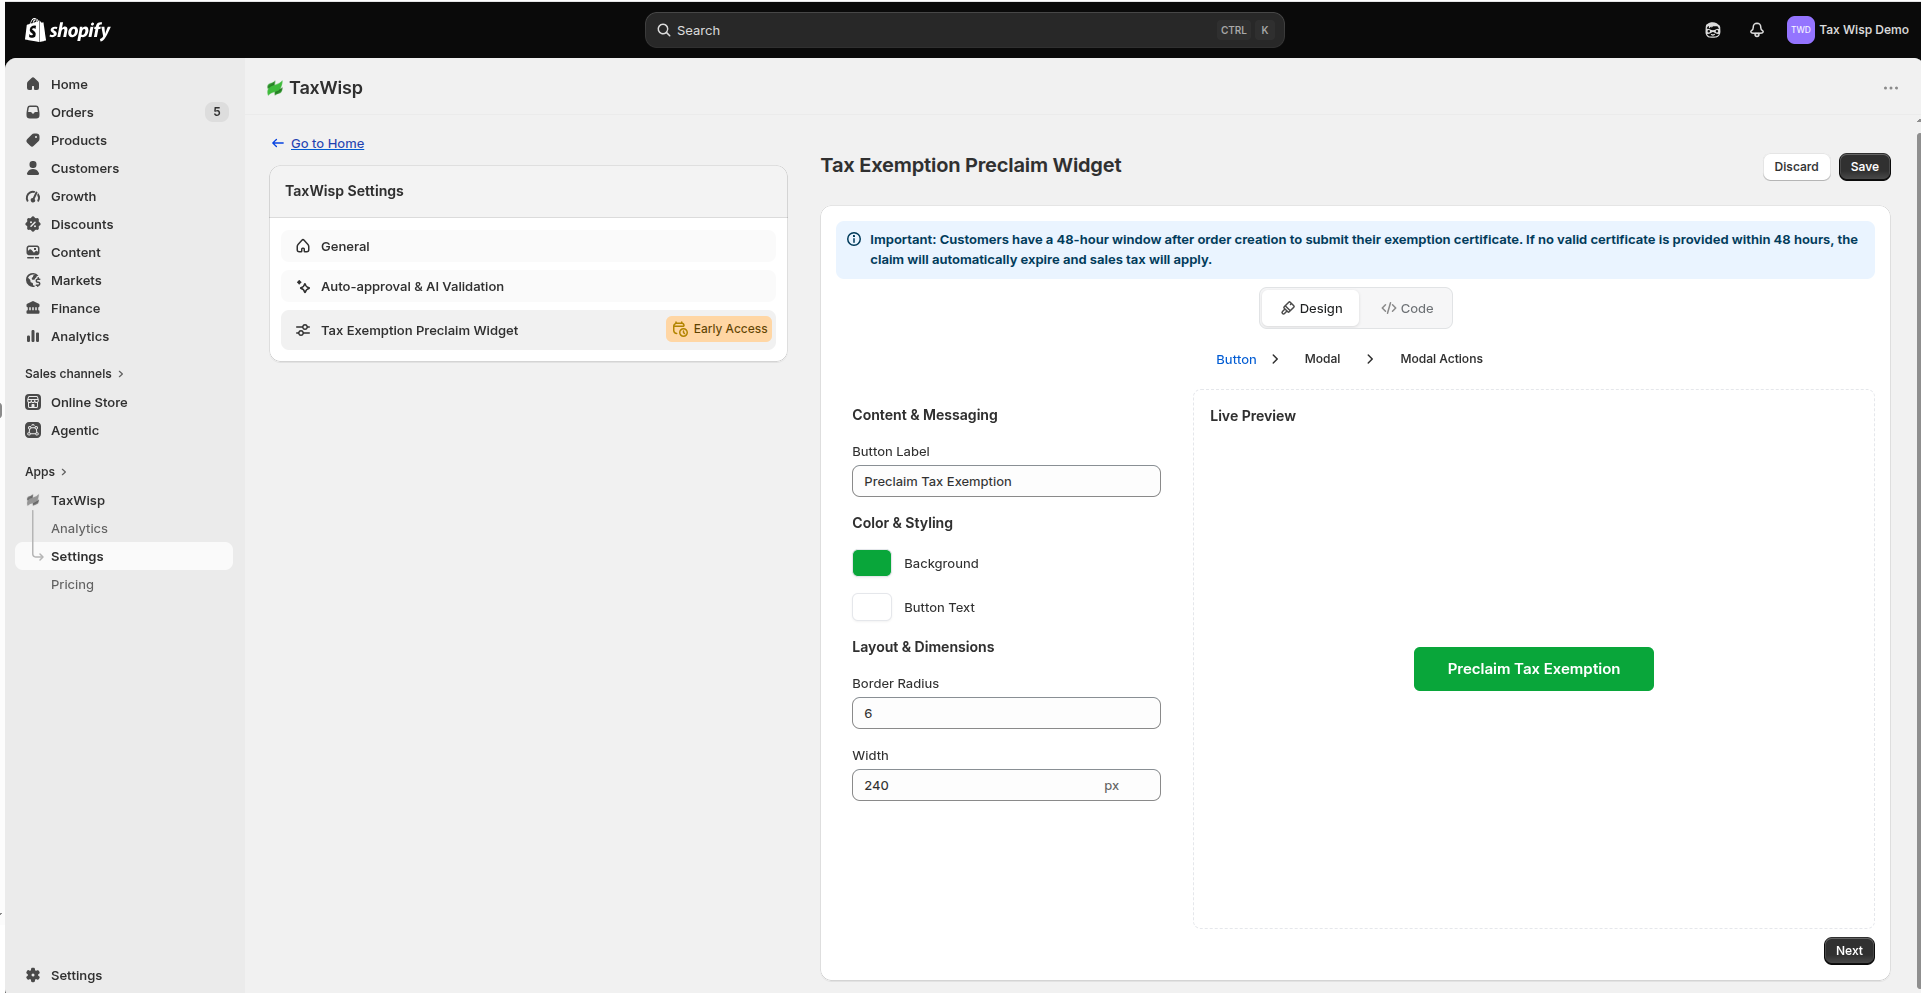
TaxWisp allows you to customize the Tax Exemption Preclaim Widget to match your store's branding and storefront design. You can use Design Mode for standard no-code customization or Code Mode when you need additional styling control through CSS.
- In TaxWisp, navigate to Settings → Tax Exemption Preclaim Widget.
- Click on the Design tab.
- Use the live preview to customize your widget settings:
| Customization Option | Description |
|---|---|
| Button Style | Customize the button label (e.g., "Claim Tax Exemption"), background color, text color, width, and rounded corners. |
| Popup Window (Modal) | Customize the header title, instruction text, input field labels, modal background, and border colors. |
| Action Messages | Customize the messages displayed to customers during the Preclaim experience, including the success message shown after a customer submits their email address. |
| Advanced CSS Customization | Switch to Code Mode to apply custom CSS for styling beyond the options available in Design Mode. This includes font family and font styling, along with other advanced CSS adjustments required to match your store's theme. |
- Click Save Settings.
Advanced Customization Using Code Mode
If the options available in Design Mode are not sufficient for your storefront, open the Code tab to customize the widget further using CSS. Code Mode provides greater control over elements such as:
- Font family and font styling
- Spacing and sizing
- Borders
- Element positioning
- Other CSS properties required to match your Shopify theme
For example, font styling is not available through Design Mode. If you want the widget to use a specific font or typography that matches your storefront, configure it through CSS in Code Mode.
Use Design Mode for standard visual customization and Code Mode when your store requires more advanced or theme-specific styling. Always verify custom CSS changes on both desktop and mobile after making modifications.
Adding the TaxWisp Tax Exemption Claim Order Block
If your store uses Tax Exemption Preclaim, we strongly recommend adding the TaxWisp Tax Exemption Claim Order Block to your Shopify Order page.
The Order Block displays the customer's current tax exemption verification status directly inside the Shopify order, allowing your team to quickly determine whether a tax-exempt order should proceed to fulfillment, requires further review, should be processed as a taxed order, or should not be fulfilled.
TaxWisp updates the information displayed in this block as the customer's exemption request progresses through the verification process.
TaxWisp does not automatically fulfill or cancel orders based on the customer's exemption verification status. Merchants are responsible for reviewing the status shown by TaxWisp and deciding how the order should be processed.
Adding the Order Block
To add the TaxWisp Order Block:
- Open an order from your Shopify Admin.
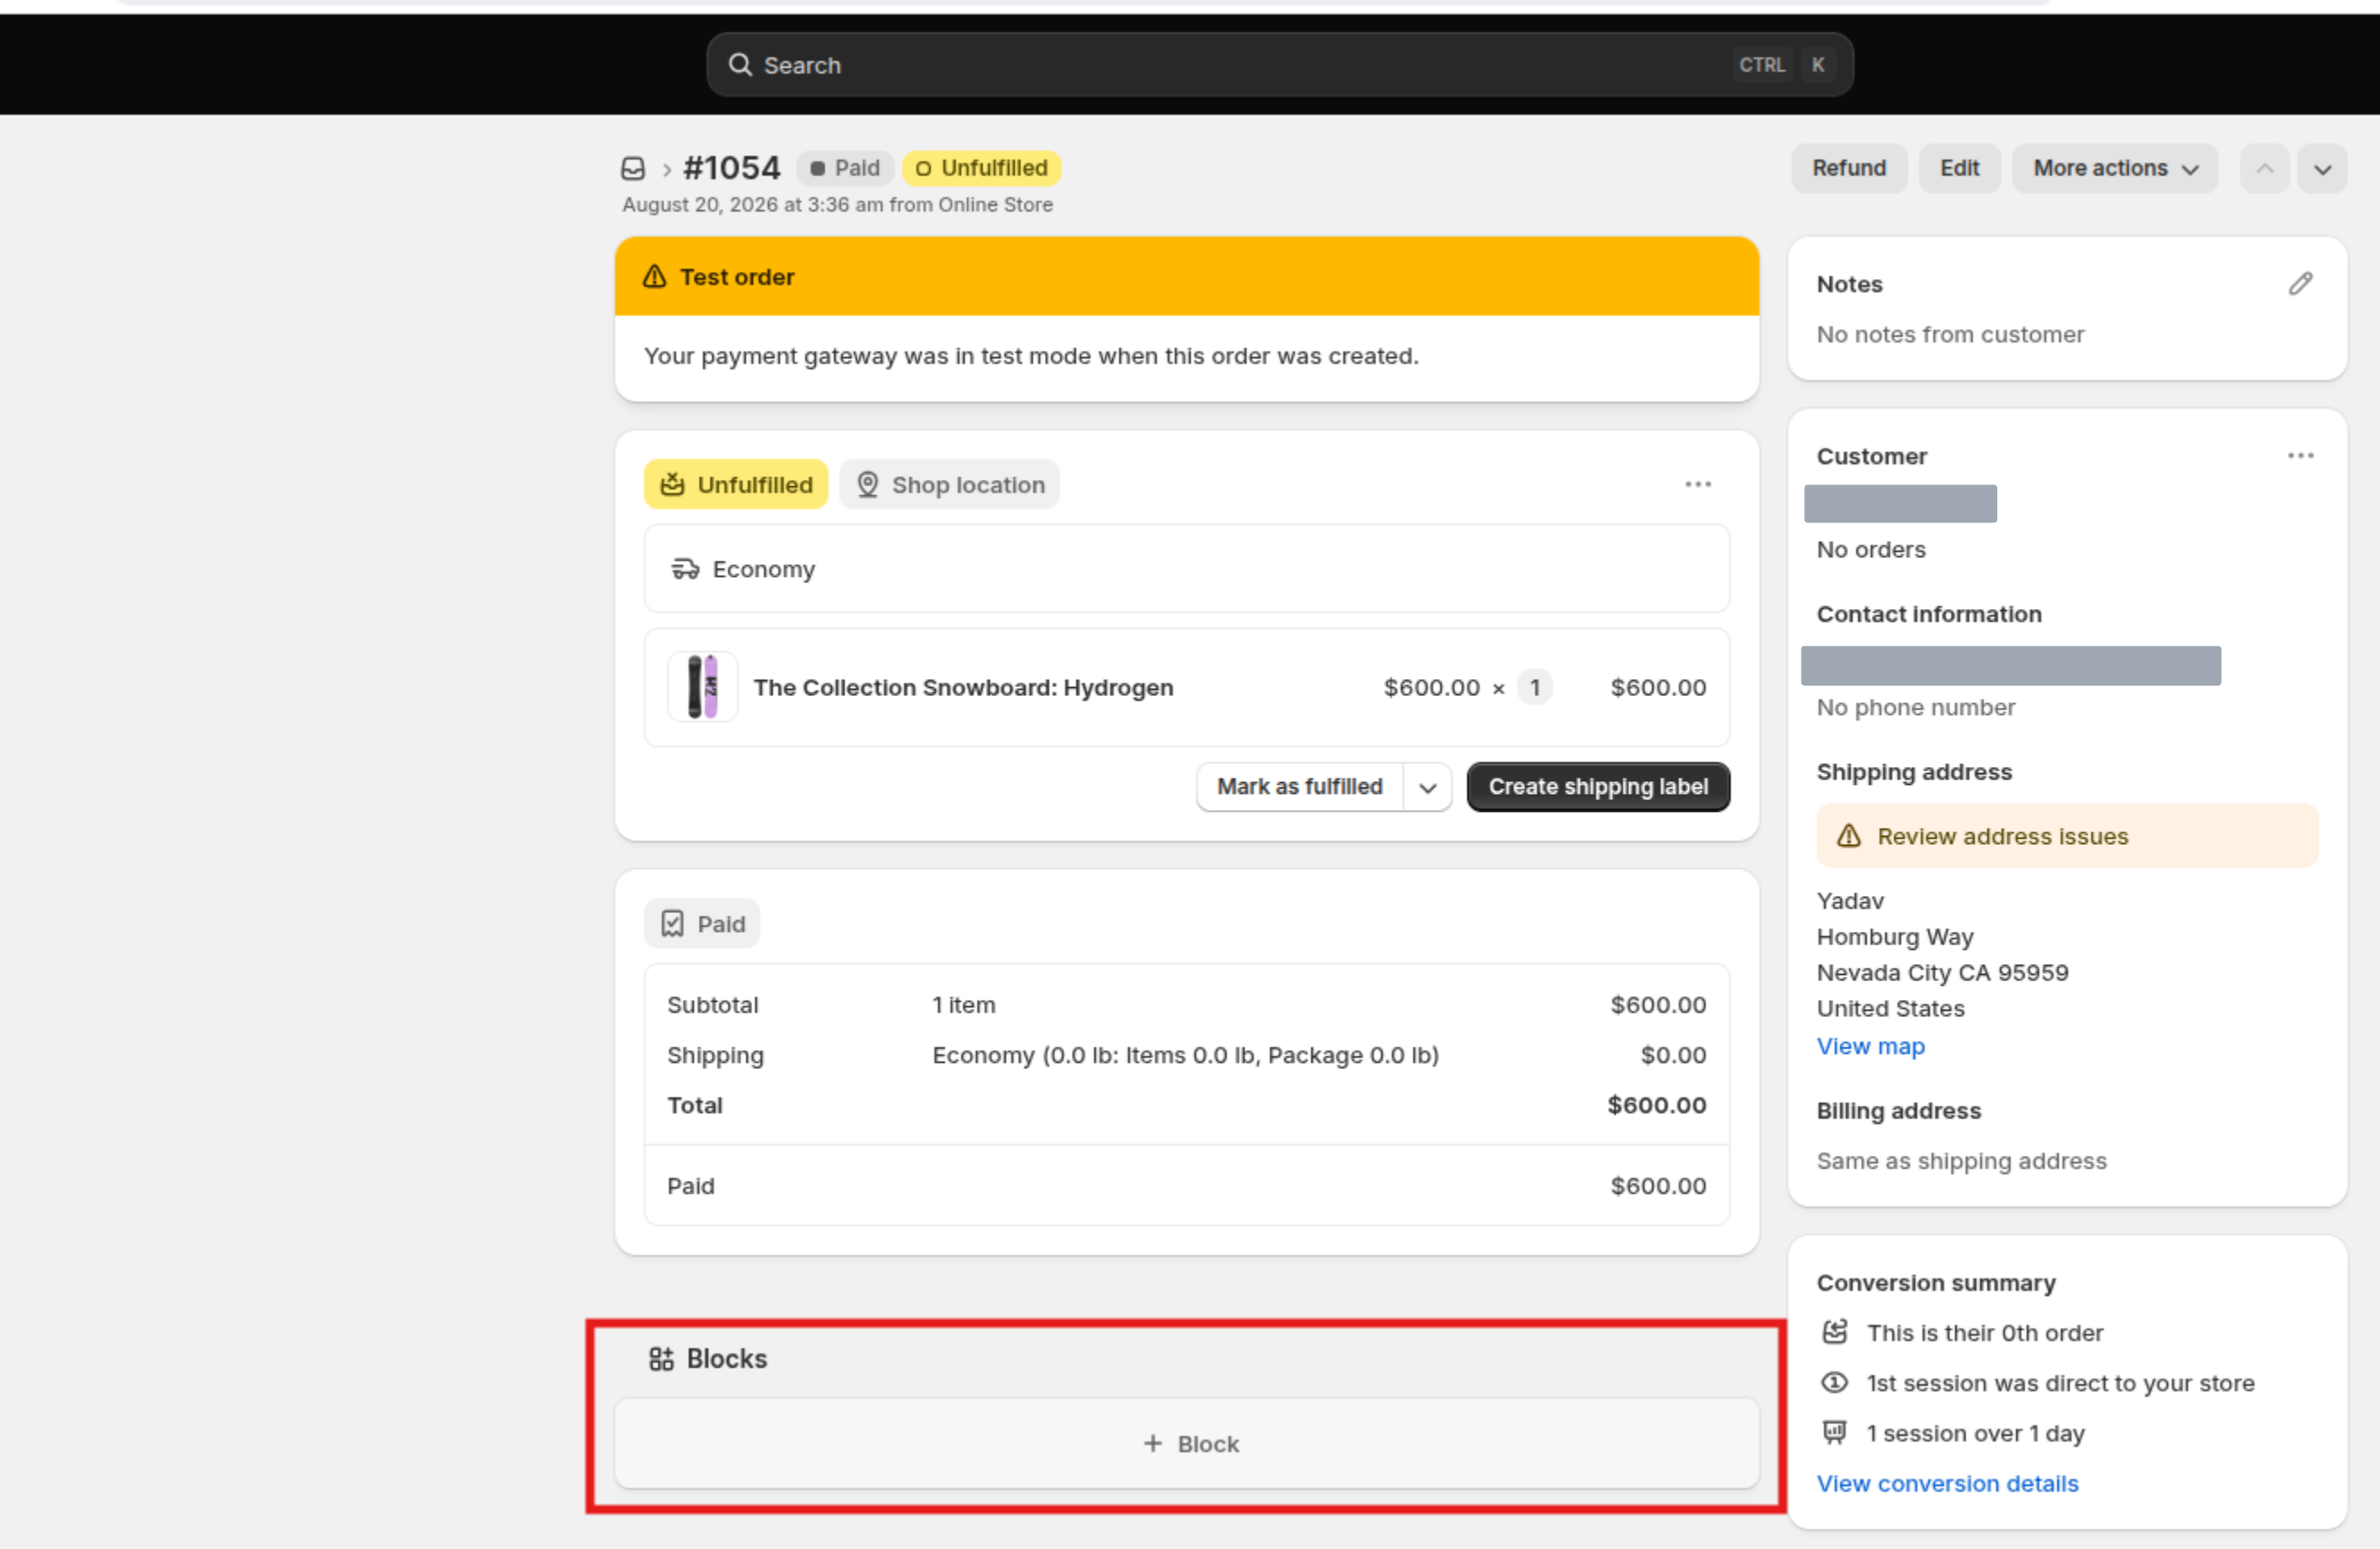
- Locate the Blocks section on the Order page.
- Click Add block.
- Select the TaxWisp Tax Exemption Claim Order Block from the available app blocks.
- The TaxWisp block will now appear within the order and display the customer's current tax exemption claim status.
Step-by-Step Setup Guide
-
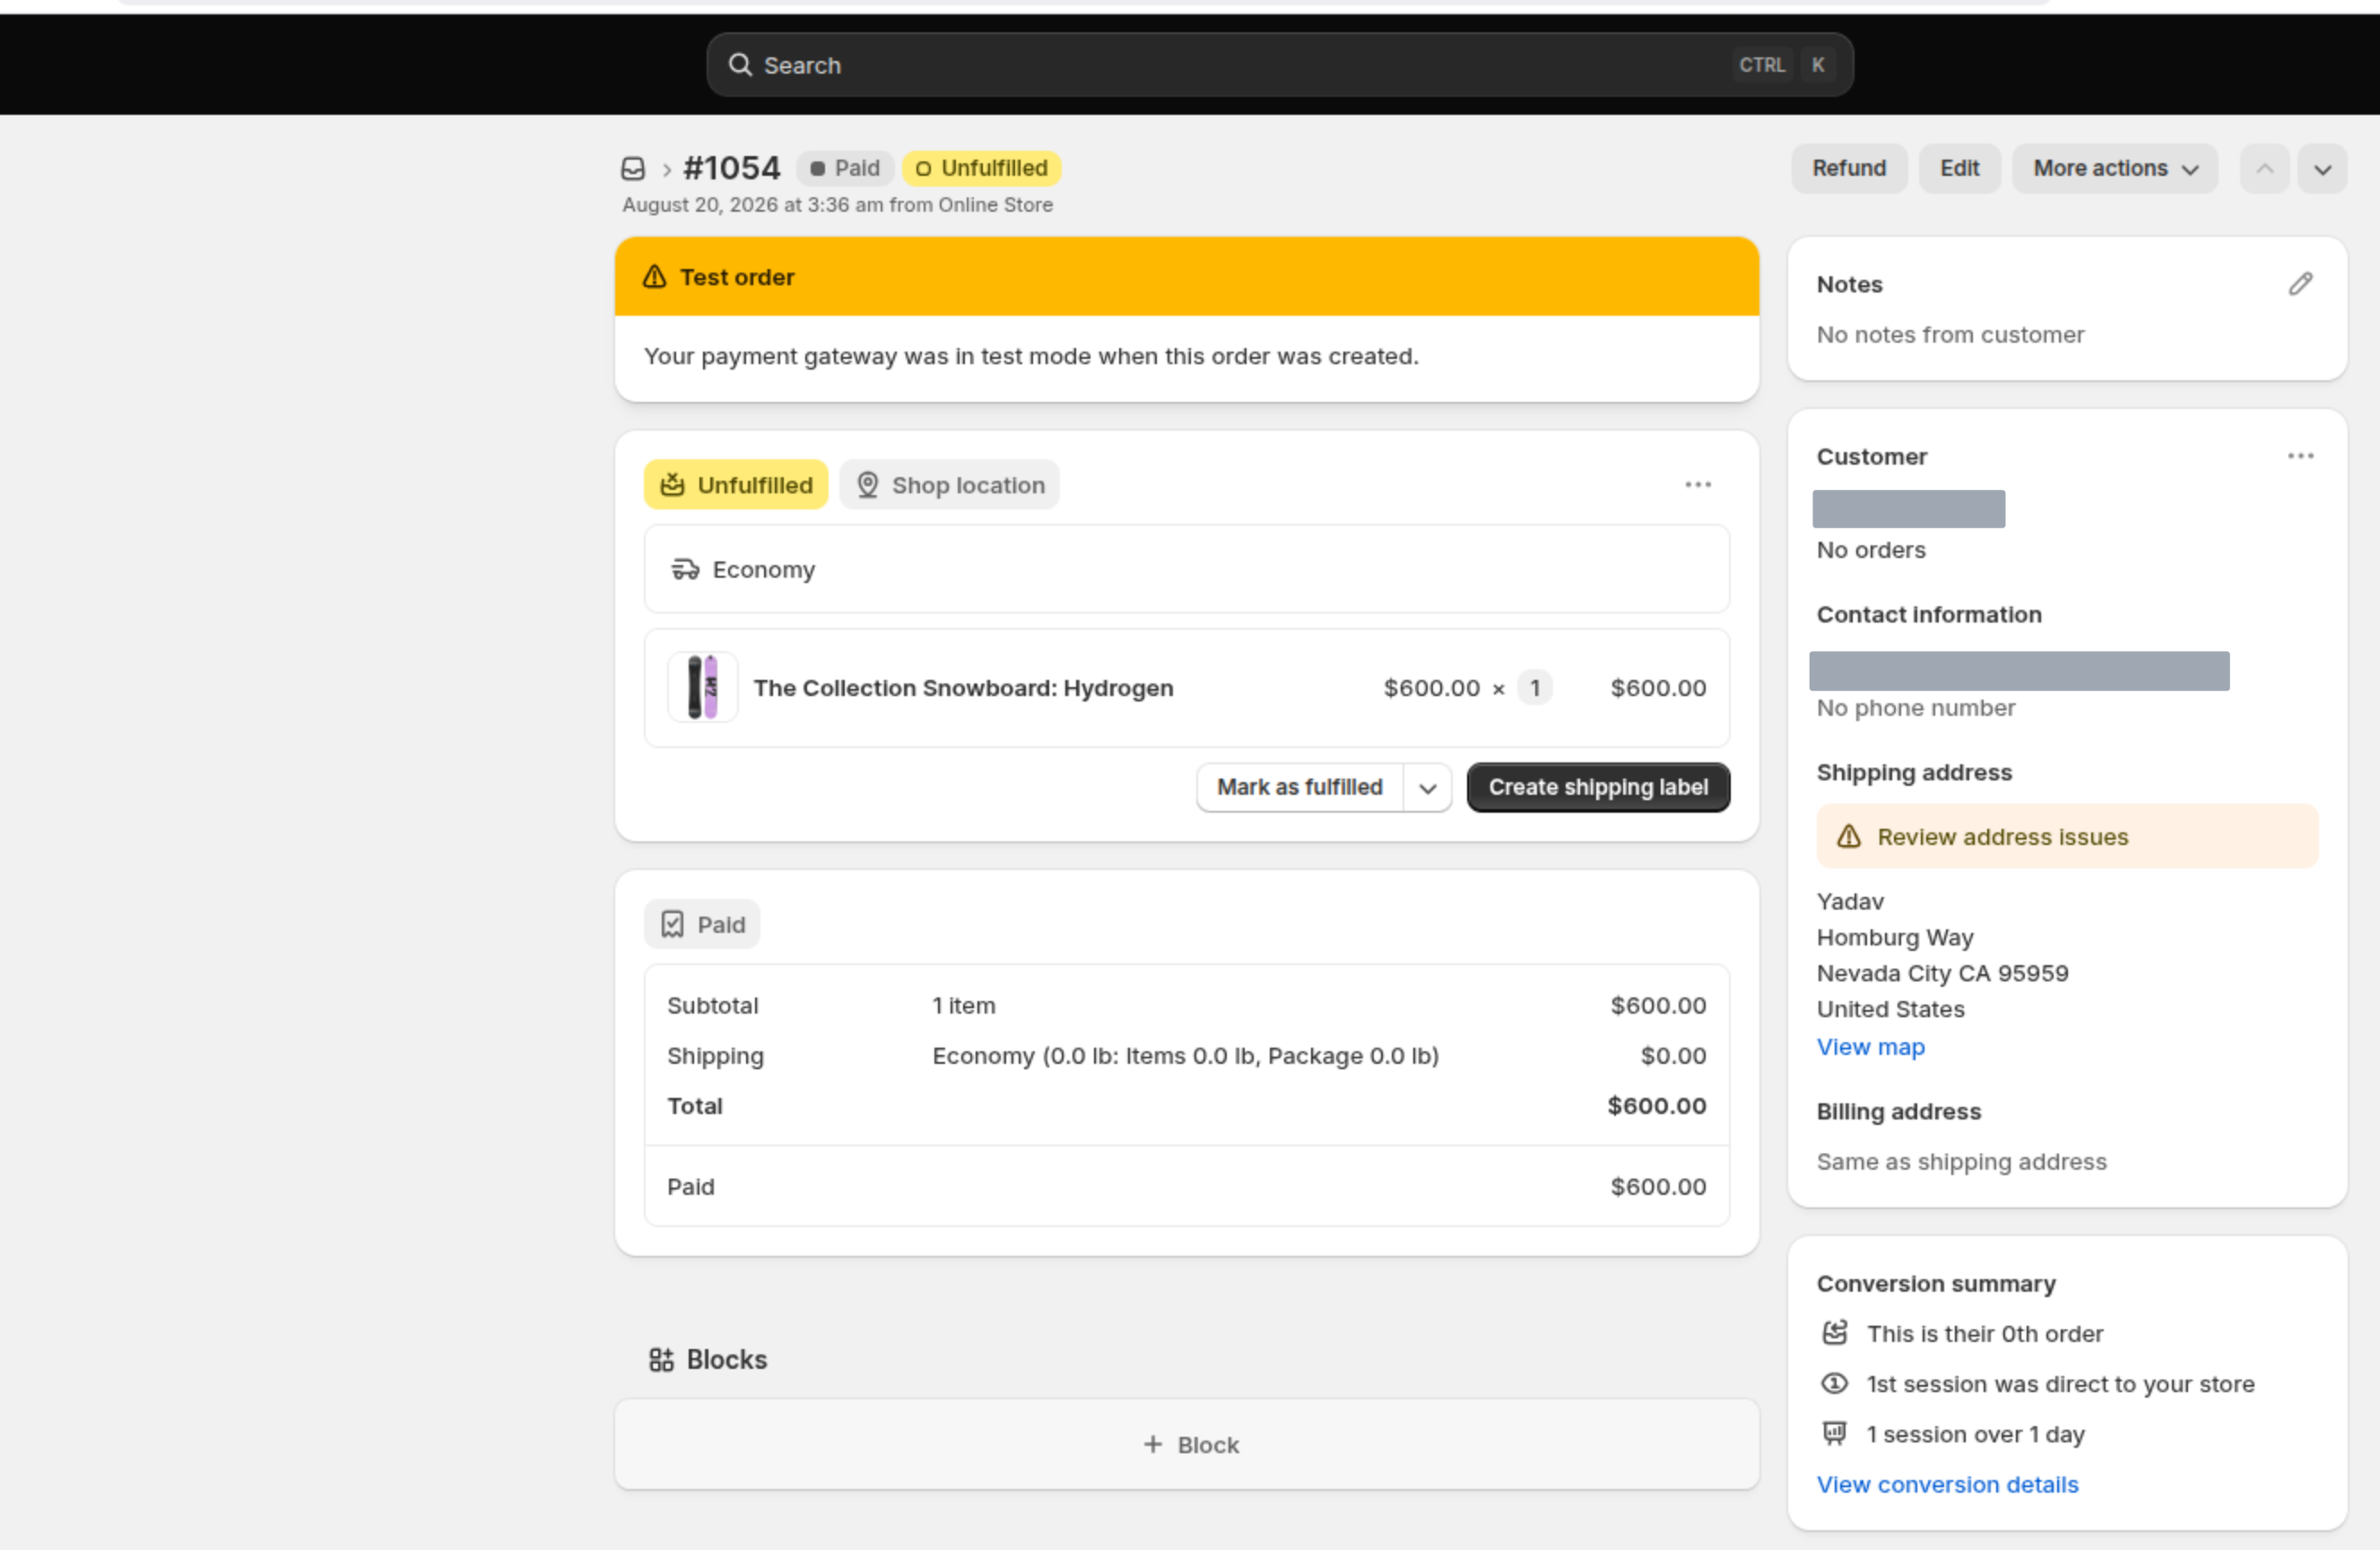
Log in to your Shopify Admin dashboard and navigate to Orders from the left-hand menu. Select any recent order to open its details page.
-
On the Order Details page, navigate to the bottom you will see blocks section.
-
From the list of available app extensions, select Tax Exemption Claim Order Block.
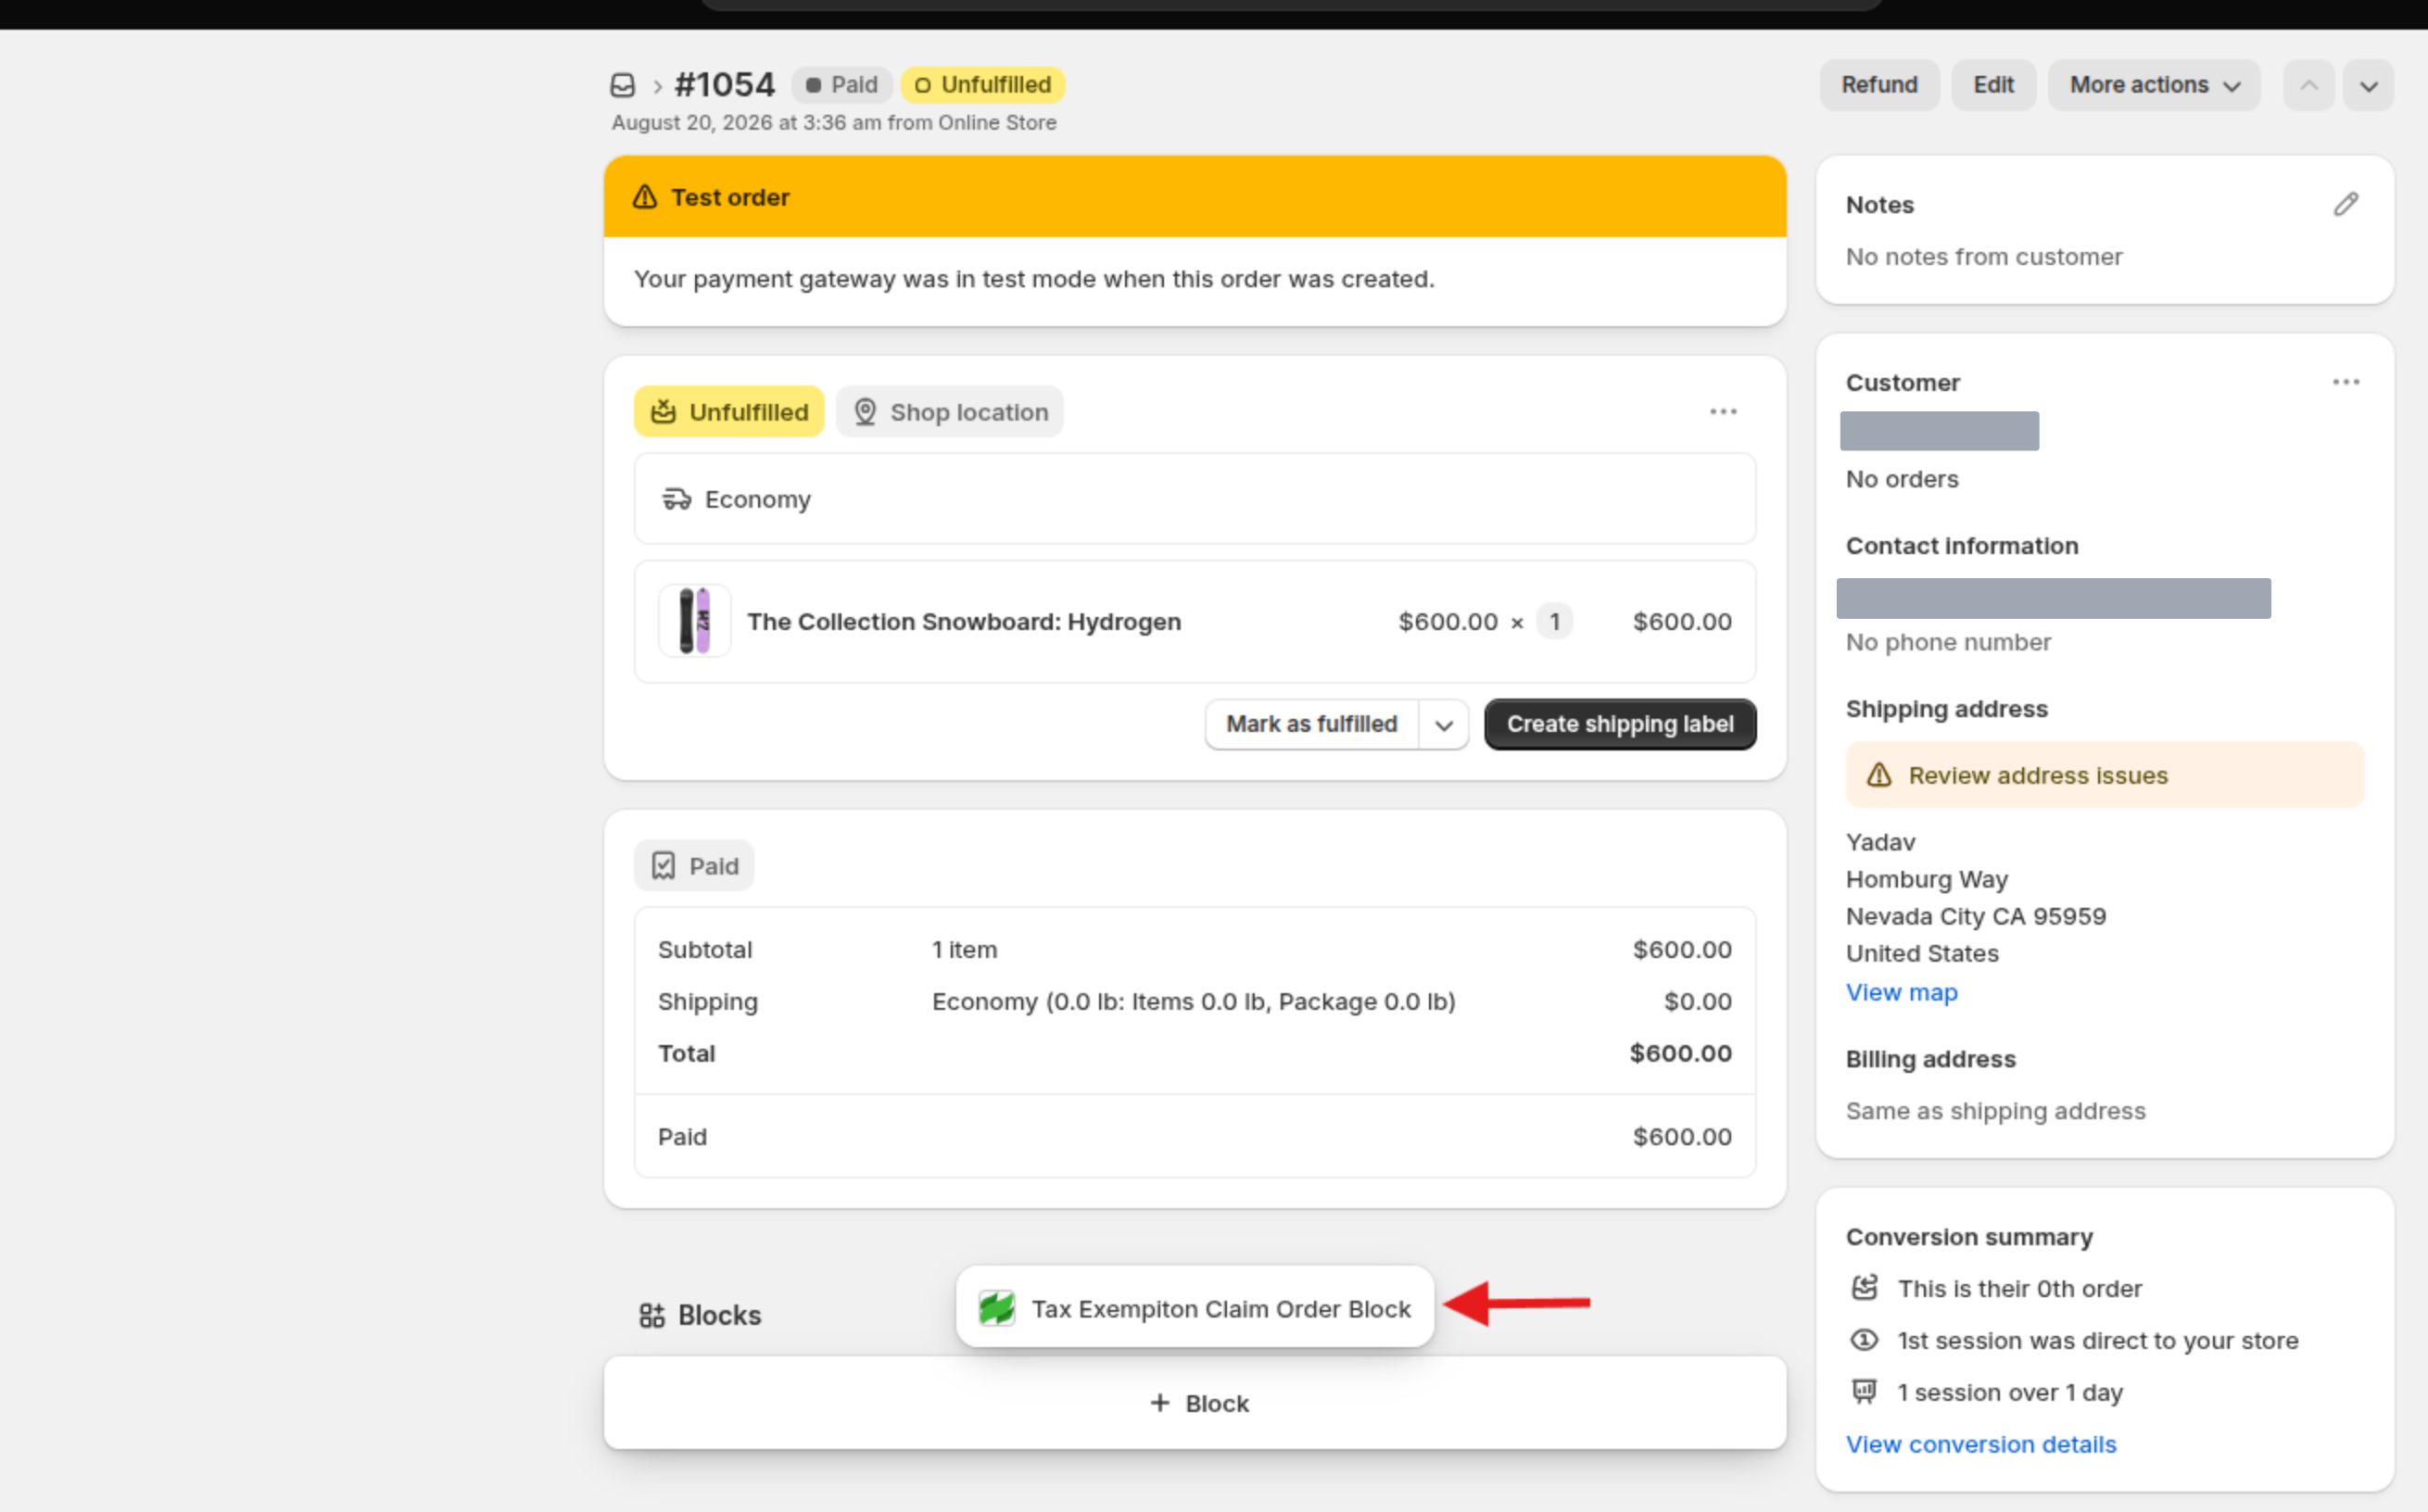
-
Hover over the top-right corner of the newly added TaxWisp block header and click the Pin (📌) icon.
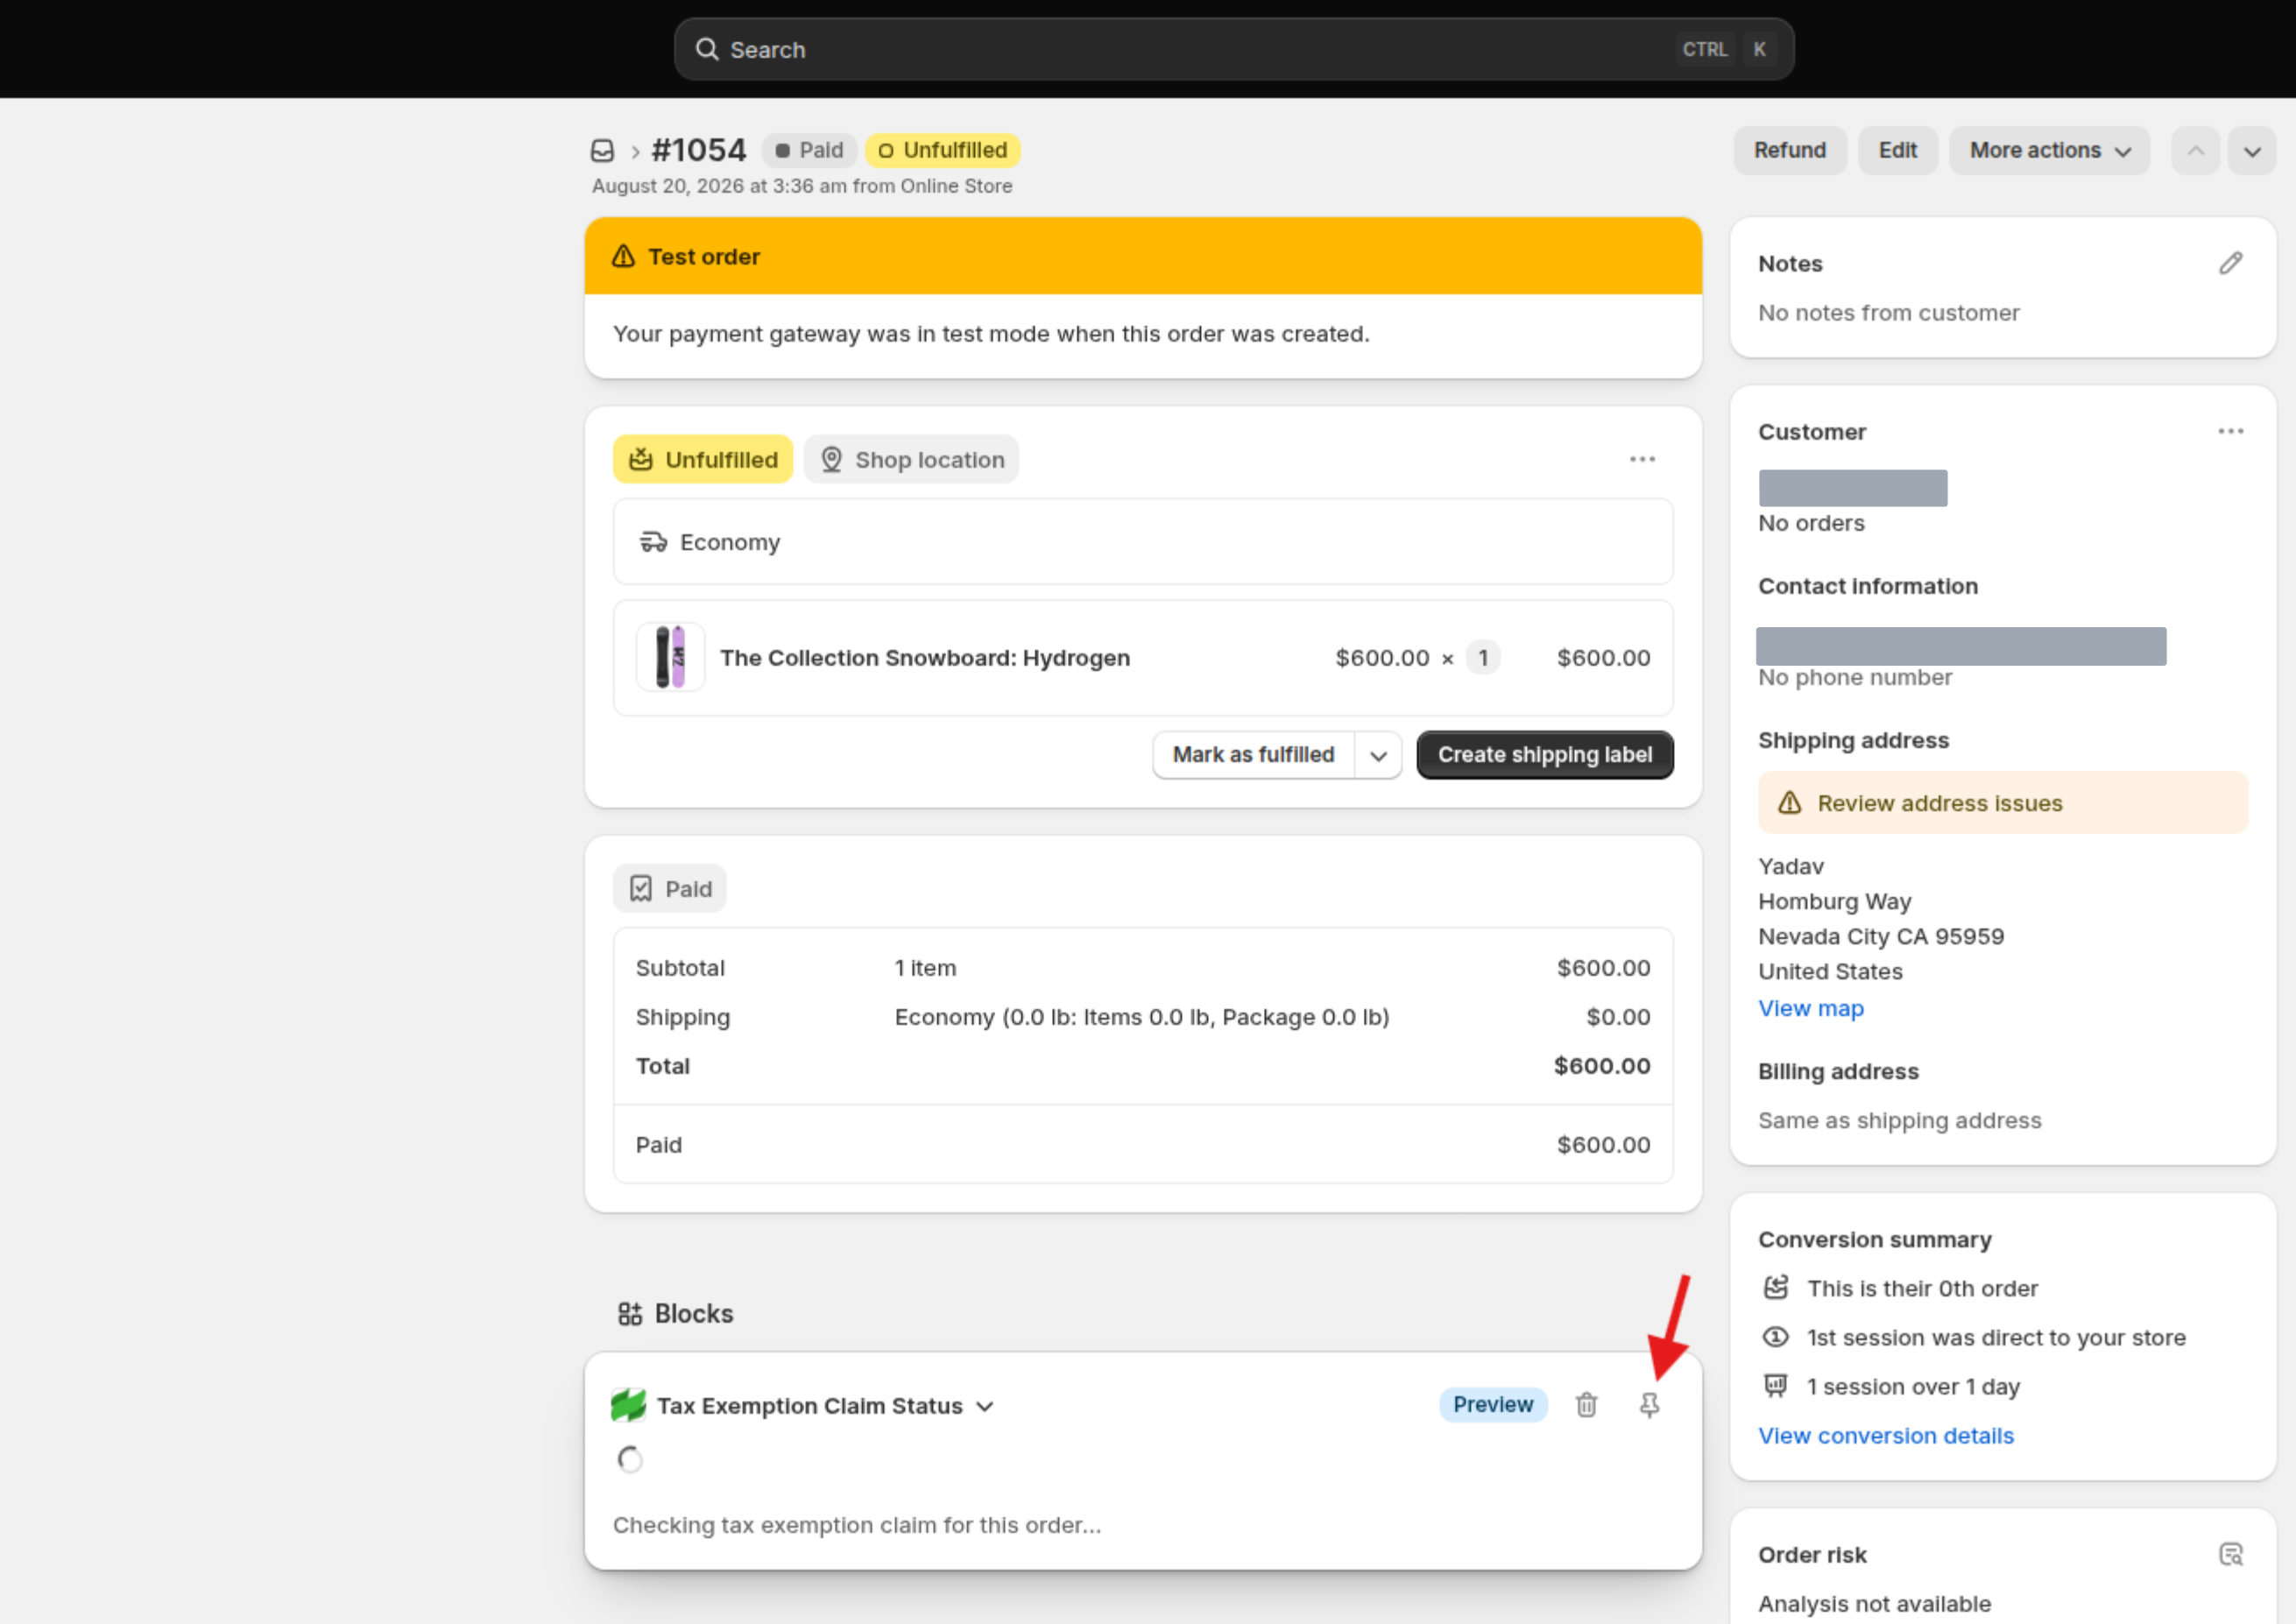
Once pinned, your fulfillment team can see the customer's exemption status directly from the Order page before deciding how to process the order.
Understanding the Tax Exemption Claim Status
The Order Block automatically reflects the current status of the customer's Tax Exemption Preclaim. Depending on where the customer is in the verification process, you may see different statuses.
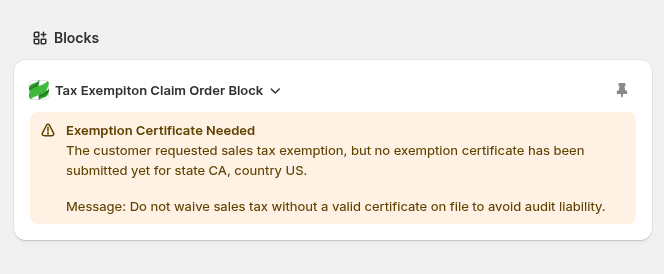
Exemption Certificate Needed
The customer has claimed sales tax exemption for the order but has not yet submitted an exemption certificate. The customer has up to 48 hours from order placement to submit the required exemption records. Do not proceed with tax-exempt fulfillment while the required certificate is still pending.
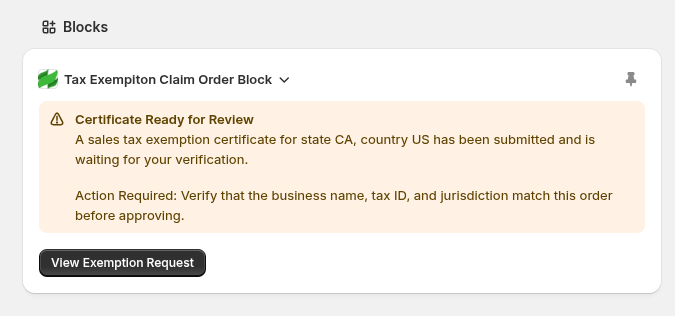
Certificate Ready for Review
The customer has submitted an exemption certificate and the exemption request is waiting for merchant verification. Click View Exemption Request to review the customer's submitted exemption details and supporting documents. The order should remain on hold until the exemption request has been reviewed and a decision has been made.
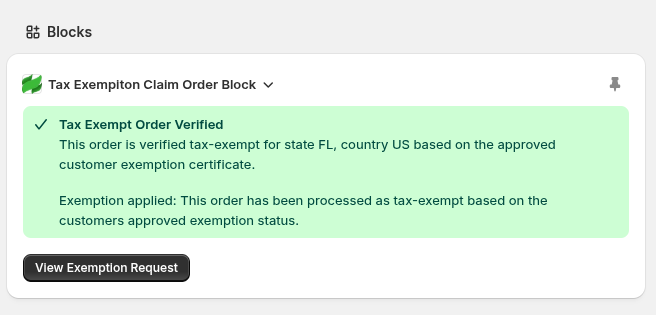
Tax Exempt Order Verified
The customer's exemption request has been approved and their exemption certificate has been verified. The order can proceed to fulfillment as a tax-exempt order. You can also click View Exemption Request to review the approved exemption information.
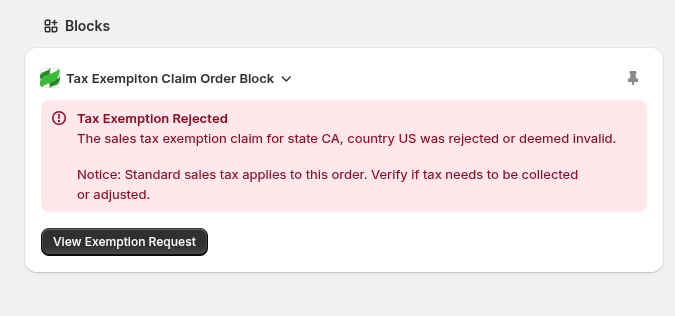
Tax Exemption Rejected
The customer's exemption request has been rejected or determined to be invalid. The order should not proceed as a verified tax-exempt order. Review the order and determine whether sales tax needs to be collected or adjusted, or whether the order should be cancelled according to your store's workflow.
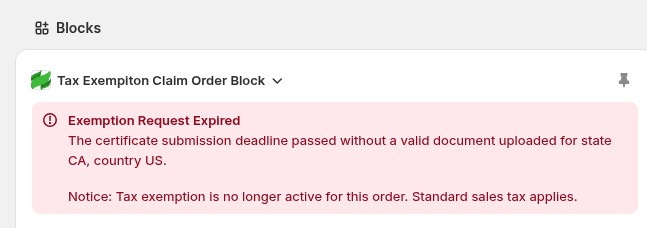
Exemption Request Expired
The customer did not provide valid exemption documentation within the required 48-hour period after placing the order. The order should not proceed as a verified tax-exempt order. Review the order and determine whether it should be processed with applicable sales tax or cancelled according to your store's workflow.
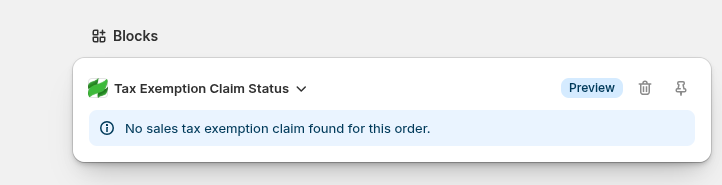
No Tax Exemption Claim Found
If the order is not associated with a Tax Exemption Preclaim, the block displays No sales tax exemption claim found for this order. No Tax Exemption Preclaim action is required for the order.
Before Fulfilling a Tax-Exempt Order
Always check the TaxWisp Tax Exemption Claim Order Block before fulfilling an order placed through Tax Exemption Preclaim. As a general rule:
- Tax Exempt Order Verified → The exemption has been verified and the order can proceed to tax-exempt fulfillment.
- Certificate Ready for Review → Review and approve or reject the exemption request before fulfillment.
- Exemption Certificate Needed → Wait for the customer to submit their exemption records within the 48-hour verification period.
- Tax Exemption Rejected → Do not fulfill the order as a verified tax-exempt order. Determine whether tax should be collected/adjusted or the order should be cancelled.
- Exemption Request Expired → The 48-hour submission period has passed. Determine whether the order should be processed with applicable tax or cancelled.
The Order Block provides visibility into the customer's Tax Exemption Preclaim status; it does not make the fulfillment decision for your store. Your team should always verify the status before fulfilling a tax-exempt order.
Pinning the TaxWisp Order Block ensures that this information remains readily available to your fulfillment team directly within Shopify Orders.
Why Use Tax Exemption Preclaim?
Tax Exemption Preclaim helps merchants reduce purchase friction while maintaining compliance.
Without Preclaim, customers must complete the entire exemption process before placing an order, which often delays purchasing decisions.
With Tax Exemption Preclaim:
- Customers can complete their purchase immediately.
- Tax documentation can be provided afterwards.
- Merchants retain full control over fulfillment.
- Compliance requirements remain unchanged.
This creates a significantly smoother purchasing experience for tax-exempt organizations.
Ideal Use Cases
Tax Exemption Preclaim is particularly valuable for organizations where purchasing and tax administration are handled by different people.
Common examples include:
- Large businesses
- Wholesale customers
- Educational institutions
- Government agencies
- Healthcare organizations
- Manufacturing companies
- Nonprofit organizations
For example, an employee may place an order on behalf of their organization while the finance or tax department later provides the required exemption certificate. Tax Exemption Preclaim allows these teams to complete the purchase without delaying the ordering process.
Merchant Workflow
From the merchant's perspective, Tax Exemption Preclaim integrates seamlessly with the existing TaxWisp workflow.
Once enabled:
- Customers initiate a Tax Exemption Preclaim from your storefront.
- Orders are created with a Pending Verification status.
- Customers receive an automated email requesting their exemption documentation.
- Exemption requests appear in the TaxWisp Dashboard.
- Requests are processed using your configured approval workflow.
- Approved orders proceed to fulfillment.
- Unverified or rejected requests result in automatic order cancellation.
No additional manual coordination is required.
Benefits
Using Tax Exemption Preclaim helps merchants:
- Reduce cart abandonment caused by lengthy exemption workflows.
- Eliminate delays while customers locate exemption certificates.
- Allow purchasing and finance teams to complete their respective tasks independently.
- Improve the purchasing experience for tax-exempt organizations.
- Maintain compliance without sacrificing operational efficiency.
- Continue using TaxWisp's existing approval, AI validation, and notification workflows.
Best Practices
To achieve the best results with Tax Exemption Preclaim, we recommend:
- Place the Tax Exemption Preclaim widget in a prominent location on your storefront.
- Clearly communicate that exemption documentation must still be submitted after the order is placed.
- Process incoming exemption requests promptly to avoid delaying fulfillment.
- Enable AI Co-Pilot and Criteria-Based Auto Approval to reduce review time for eligible requests.
- Monitor pending verification requests regularly to ensure customers complete the exemption process within the required timeframe.
Analytics & Insights
The Analytics & Insights page helps you better understand your tax-exempt customers, exemption trends, and sales performance. Instead of manually reviewing individual orders or customer records, TaxWisp automatically analyzes your store data and presents meaningful business insights through interactive dashboards and reports.
These insights help you identify your most valuable tax-exempt customers, understand purchasing behavior, monitor exemption trends, and make informed business decisions.
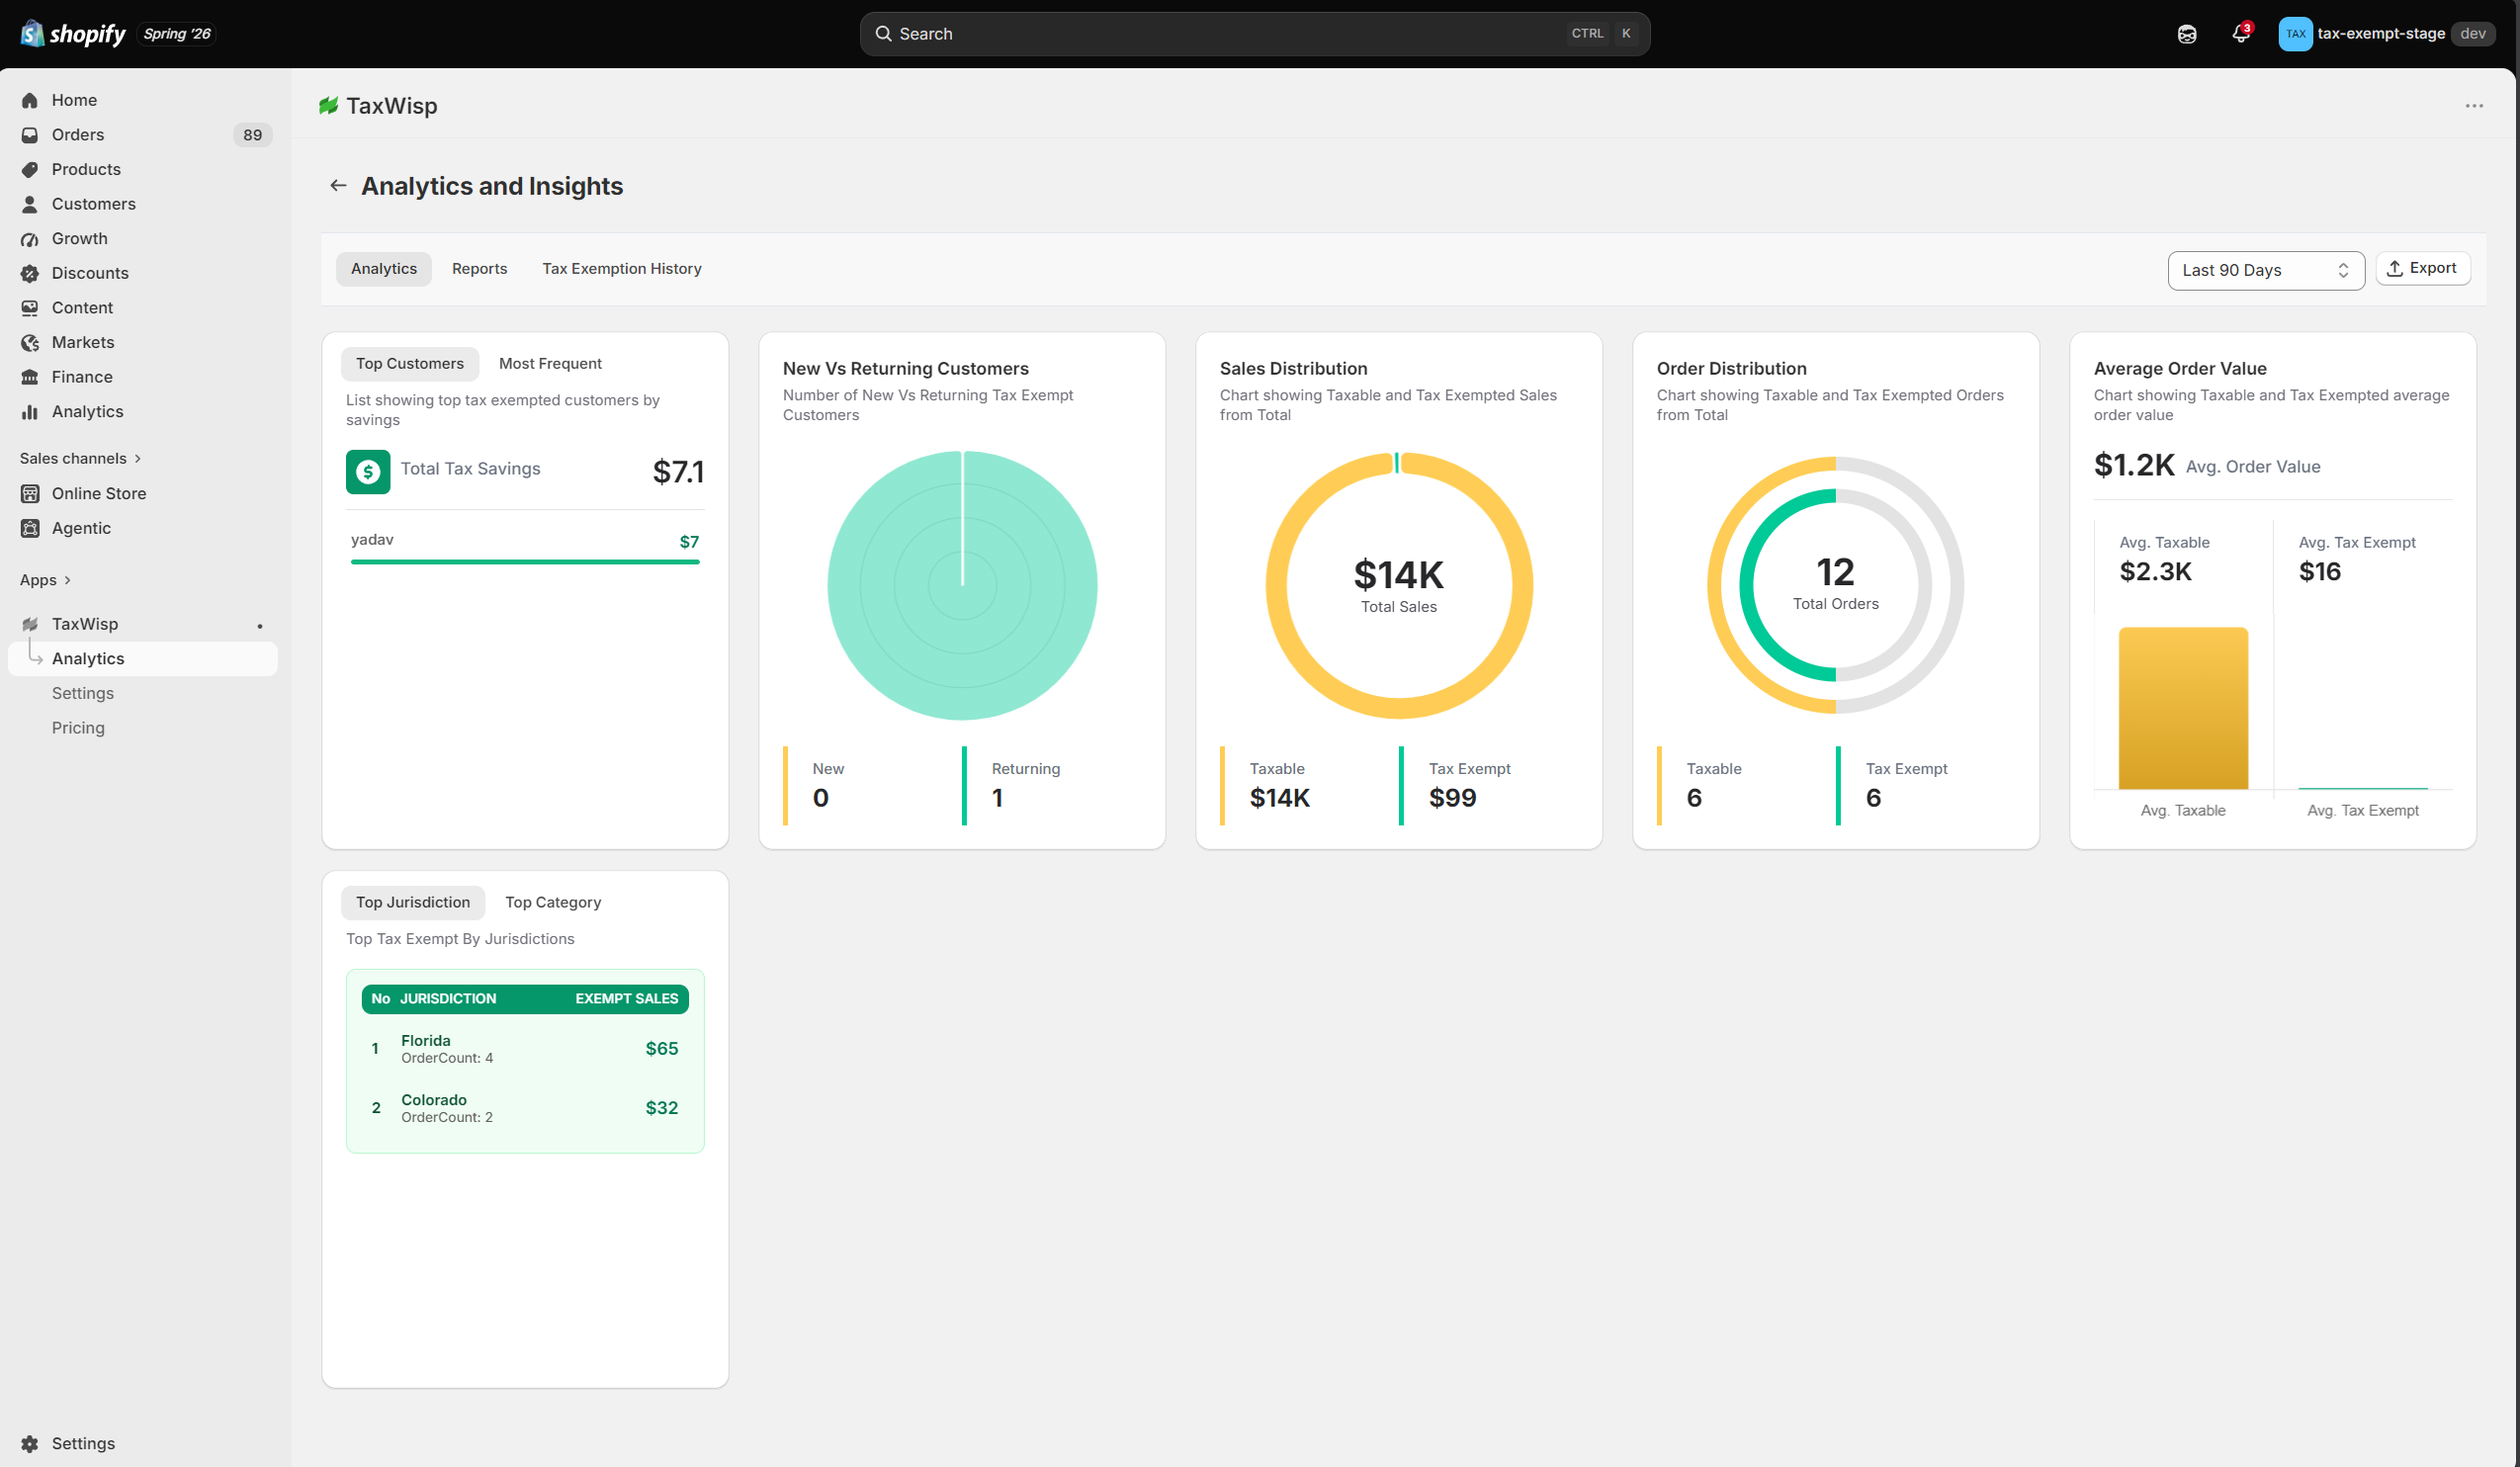
Analytics Dashboard
The Analytics Dashboard provides visual reports that summarize the performance of your tax-exempt customers and exemption program.
Available analytics include:
- Top Customers – Identify customers who generate the highest value through tax-exempt purchases. This helps you recognize your most valuable tax-exempt customers and strengthen relationships with key accounts.
- Most Frequent Customers – View the customers who place tax-exempt orders most frequently. This insight is useful for understanding customer loyalty and identifying businesses that regularly purchase from your store.
- New vs Returning Customers – Understand how your tax-exempt customer base is growing by comparing new customers against returning customers over time. This insight helps you evaluate customer retention and the effectiveness of your exemption enrollment process.
- Sales Distribution – Analyze the proportion of Taxable Sales versus Tax-Exempt Sales. This visualization provides a quick overview of how much of your business revenue comes from tax-exempt customers compared to taxable customers.
- Order Distribution – View the distribution of Taxable Orders and Tax-Exempt Orders placed in your store. This helps you understand how frequently tax exemption is being used across your overall order volume.
- Average Order Value (AOV) – Compare the Average Order Value of taxable orders against tax-exempt orders. This insight helps determine whether tax-exempt customers tend to place larger or smaller orders than taxable customers, supporting pricing, sales, and account management decisions.
- Top Jurisdictions – Identify the jurisdictions from which you receive the highest number of tax exemption requests. This information helps merchants understand where most tax-exempt customers are located and can assist with regional planning and compliance activities.
- Top Exemption Categories – View the exemption categories most commonly selected by your customers. Understanding the most frequently requested exemption categories can help you better understand your customer base and identify the industries or organizations your business serves most often.
Reports
The Reports tab provides a structured table view of your tax exemption data, making it easy to search, filter, and review exemption activity.
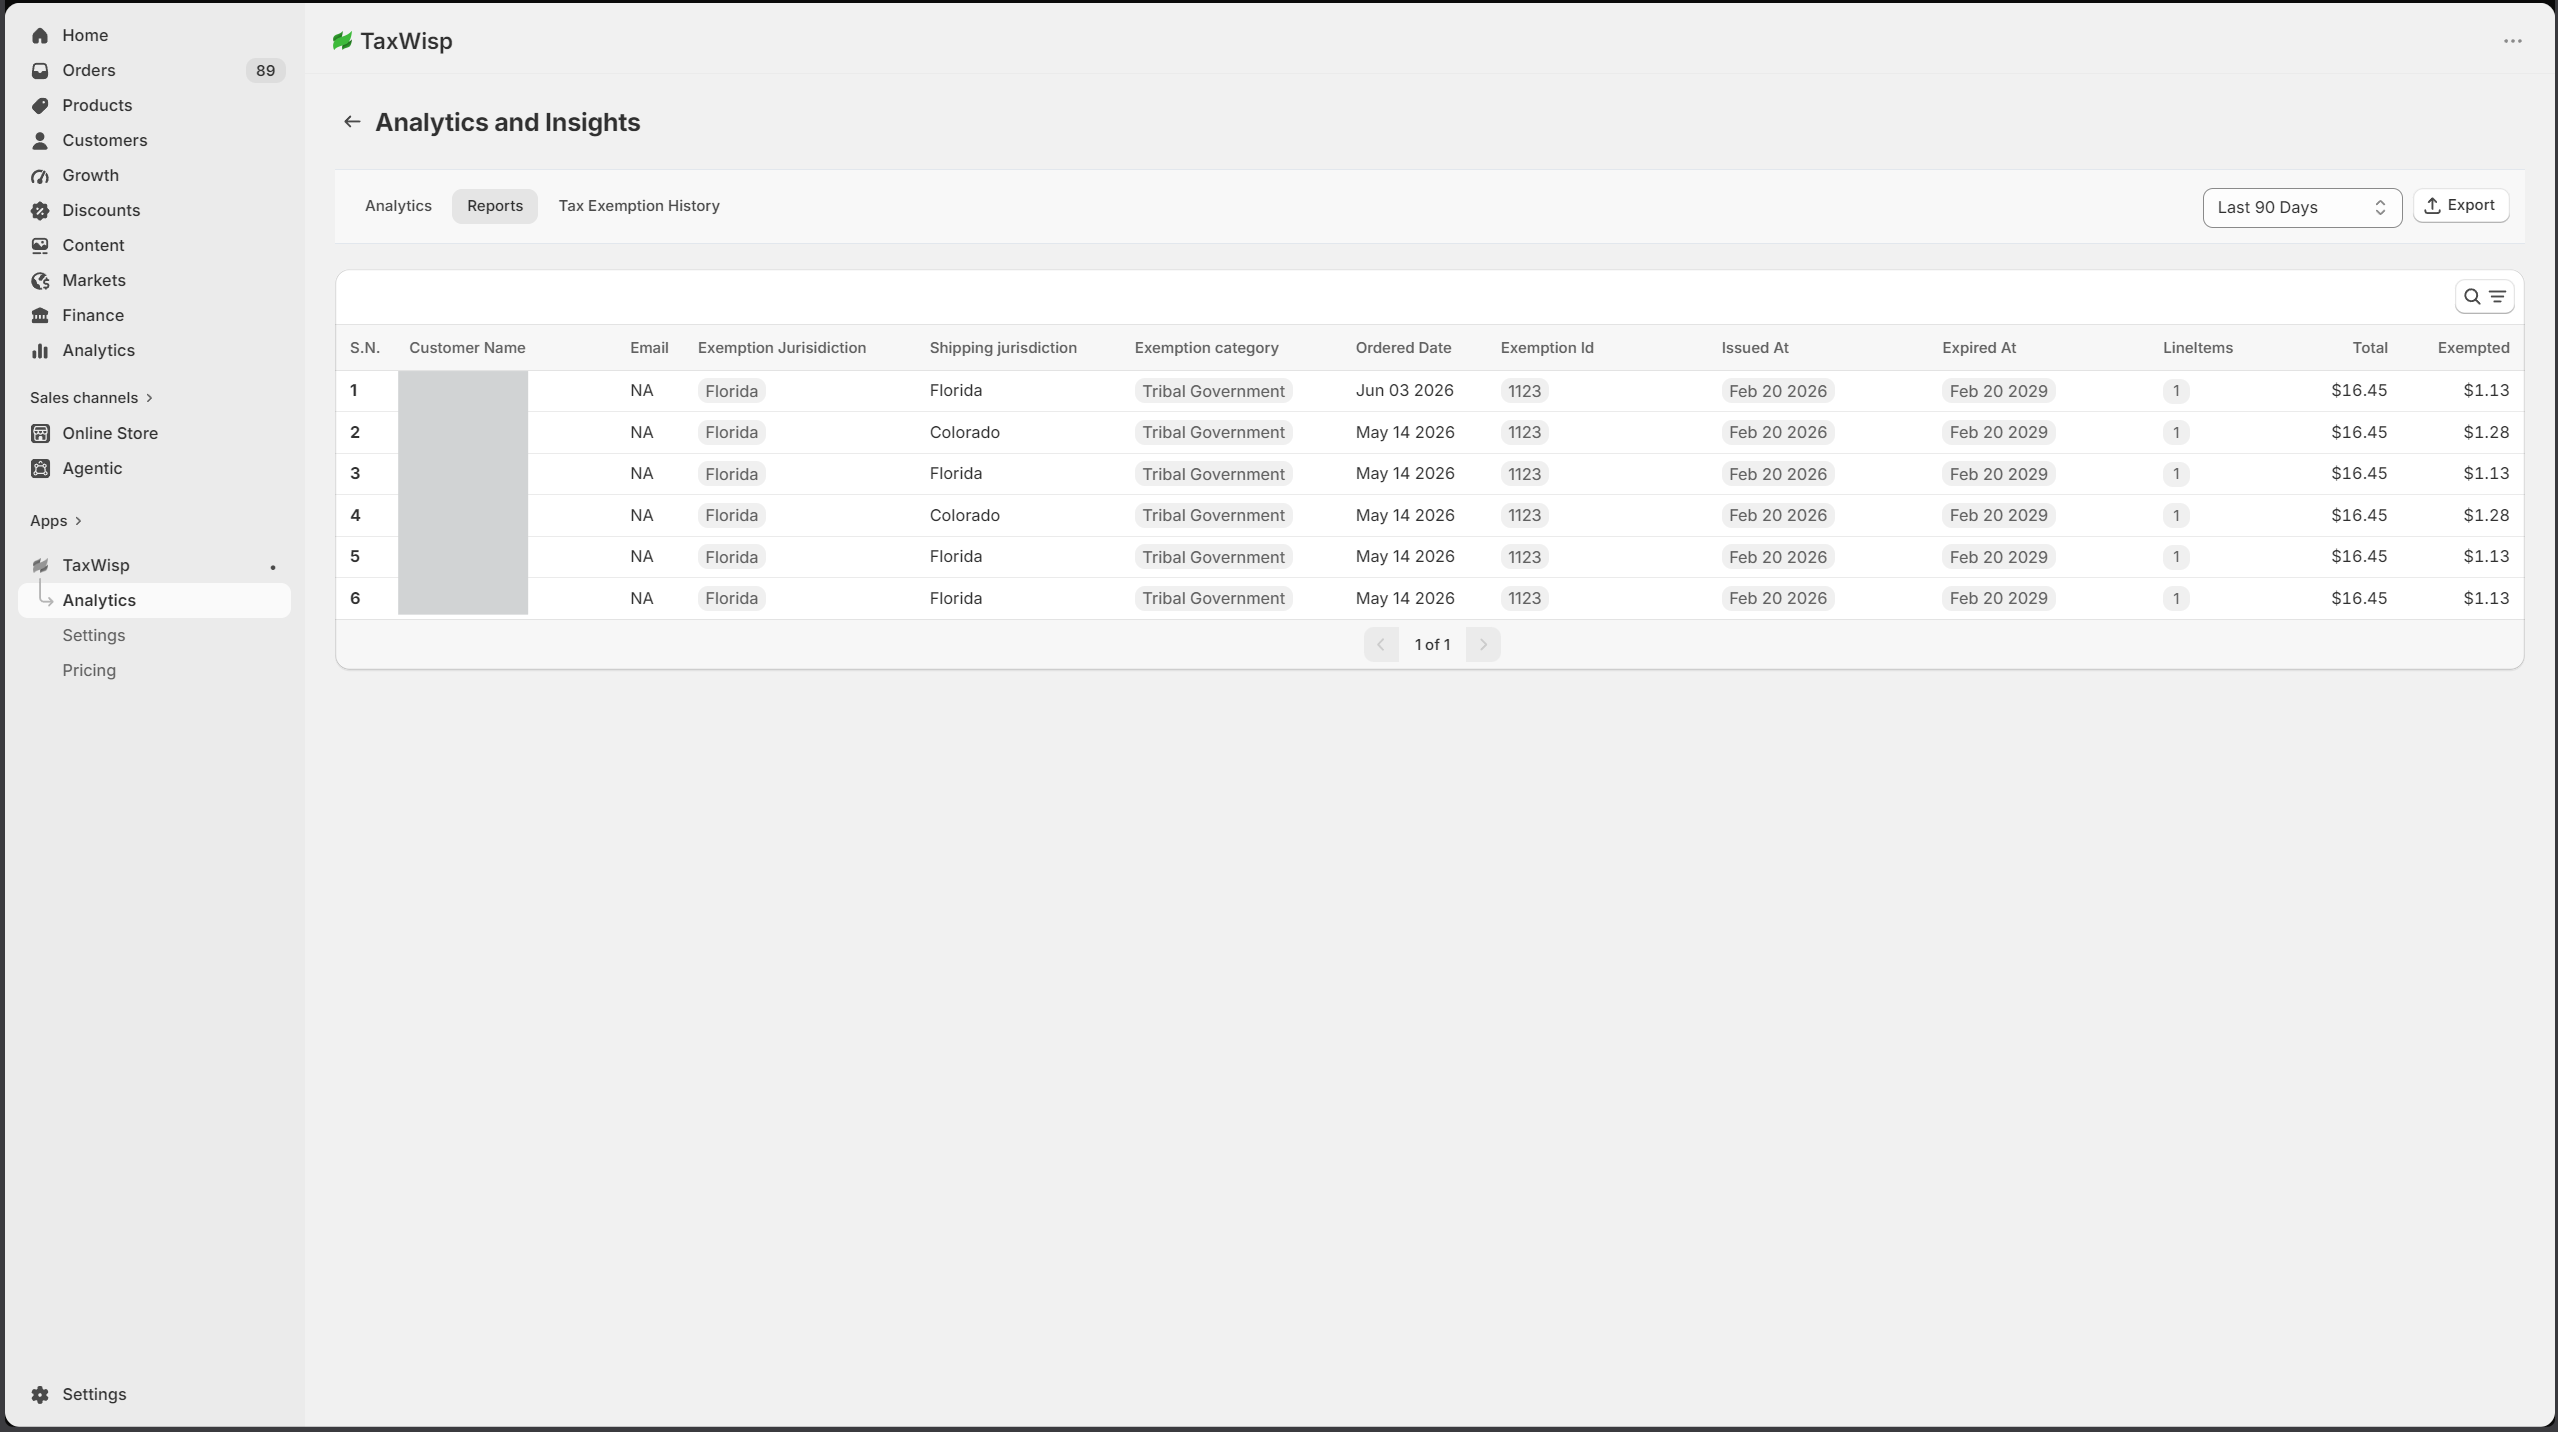
Reports allow you to:
- Review all exemption requests in one place.
- Search for customers and exemption records.
- Filter requests by status, jurisdiction, or exemption category.
- Review historical exemption activity.
- Monitor approved, rejected, revoked, and expiring exemptions.
- Prepare data for compliance reviews and internal reporting.
Unlike the Analytics Dashboard, which provides summarized business insights, the Reports tab allows you to work directly with individual exemption records.
Searching & Filtering Exemption Records
The Exemption Report includes powerful search and filtering capabilities, making it easy to locate specific exemption events.
You can quickly search by:
- Customer name
- Customer email
- Tax jurisdiction
- Exemption category
These capabilities are particularly useful when investigating customer inquiries, reviewing historical exemption activity, or preparing for compliance audits.
Export Reports (Premium Plan)
Merchants on the Premium Plan can export reports for use outside TaxWisp.
Reports can be exported for:
- Internal reporting
- Accounting and finance
- Compliance reviews
- Audit preparation
- Business analysis
- Record keeping
Exported reports allow your team to retain offline copies of exemption activity and share information with accounting, finance, compliance, or management teams when required.
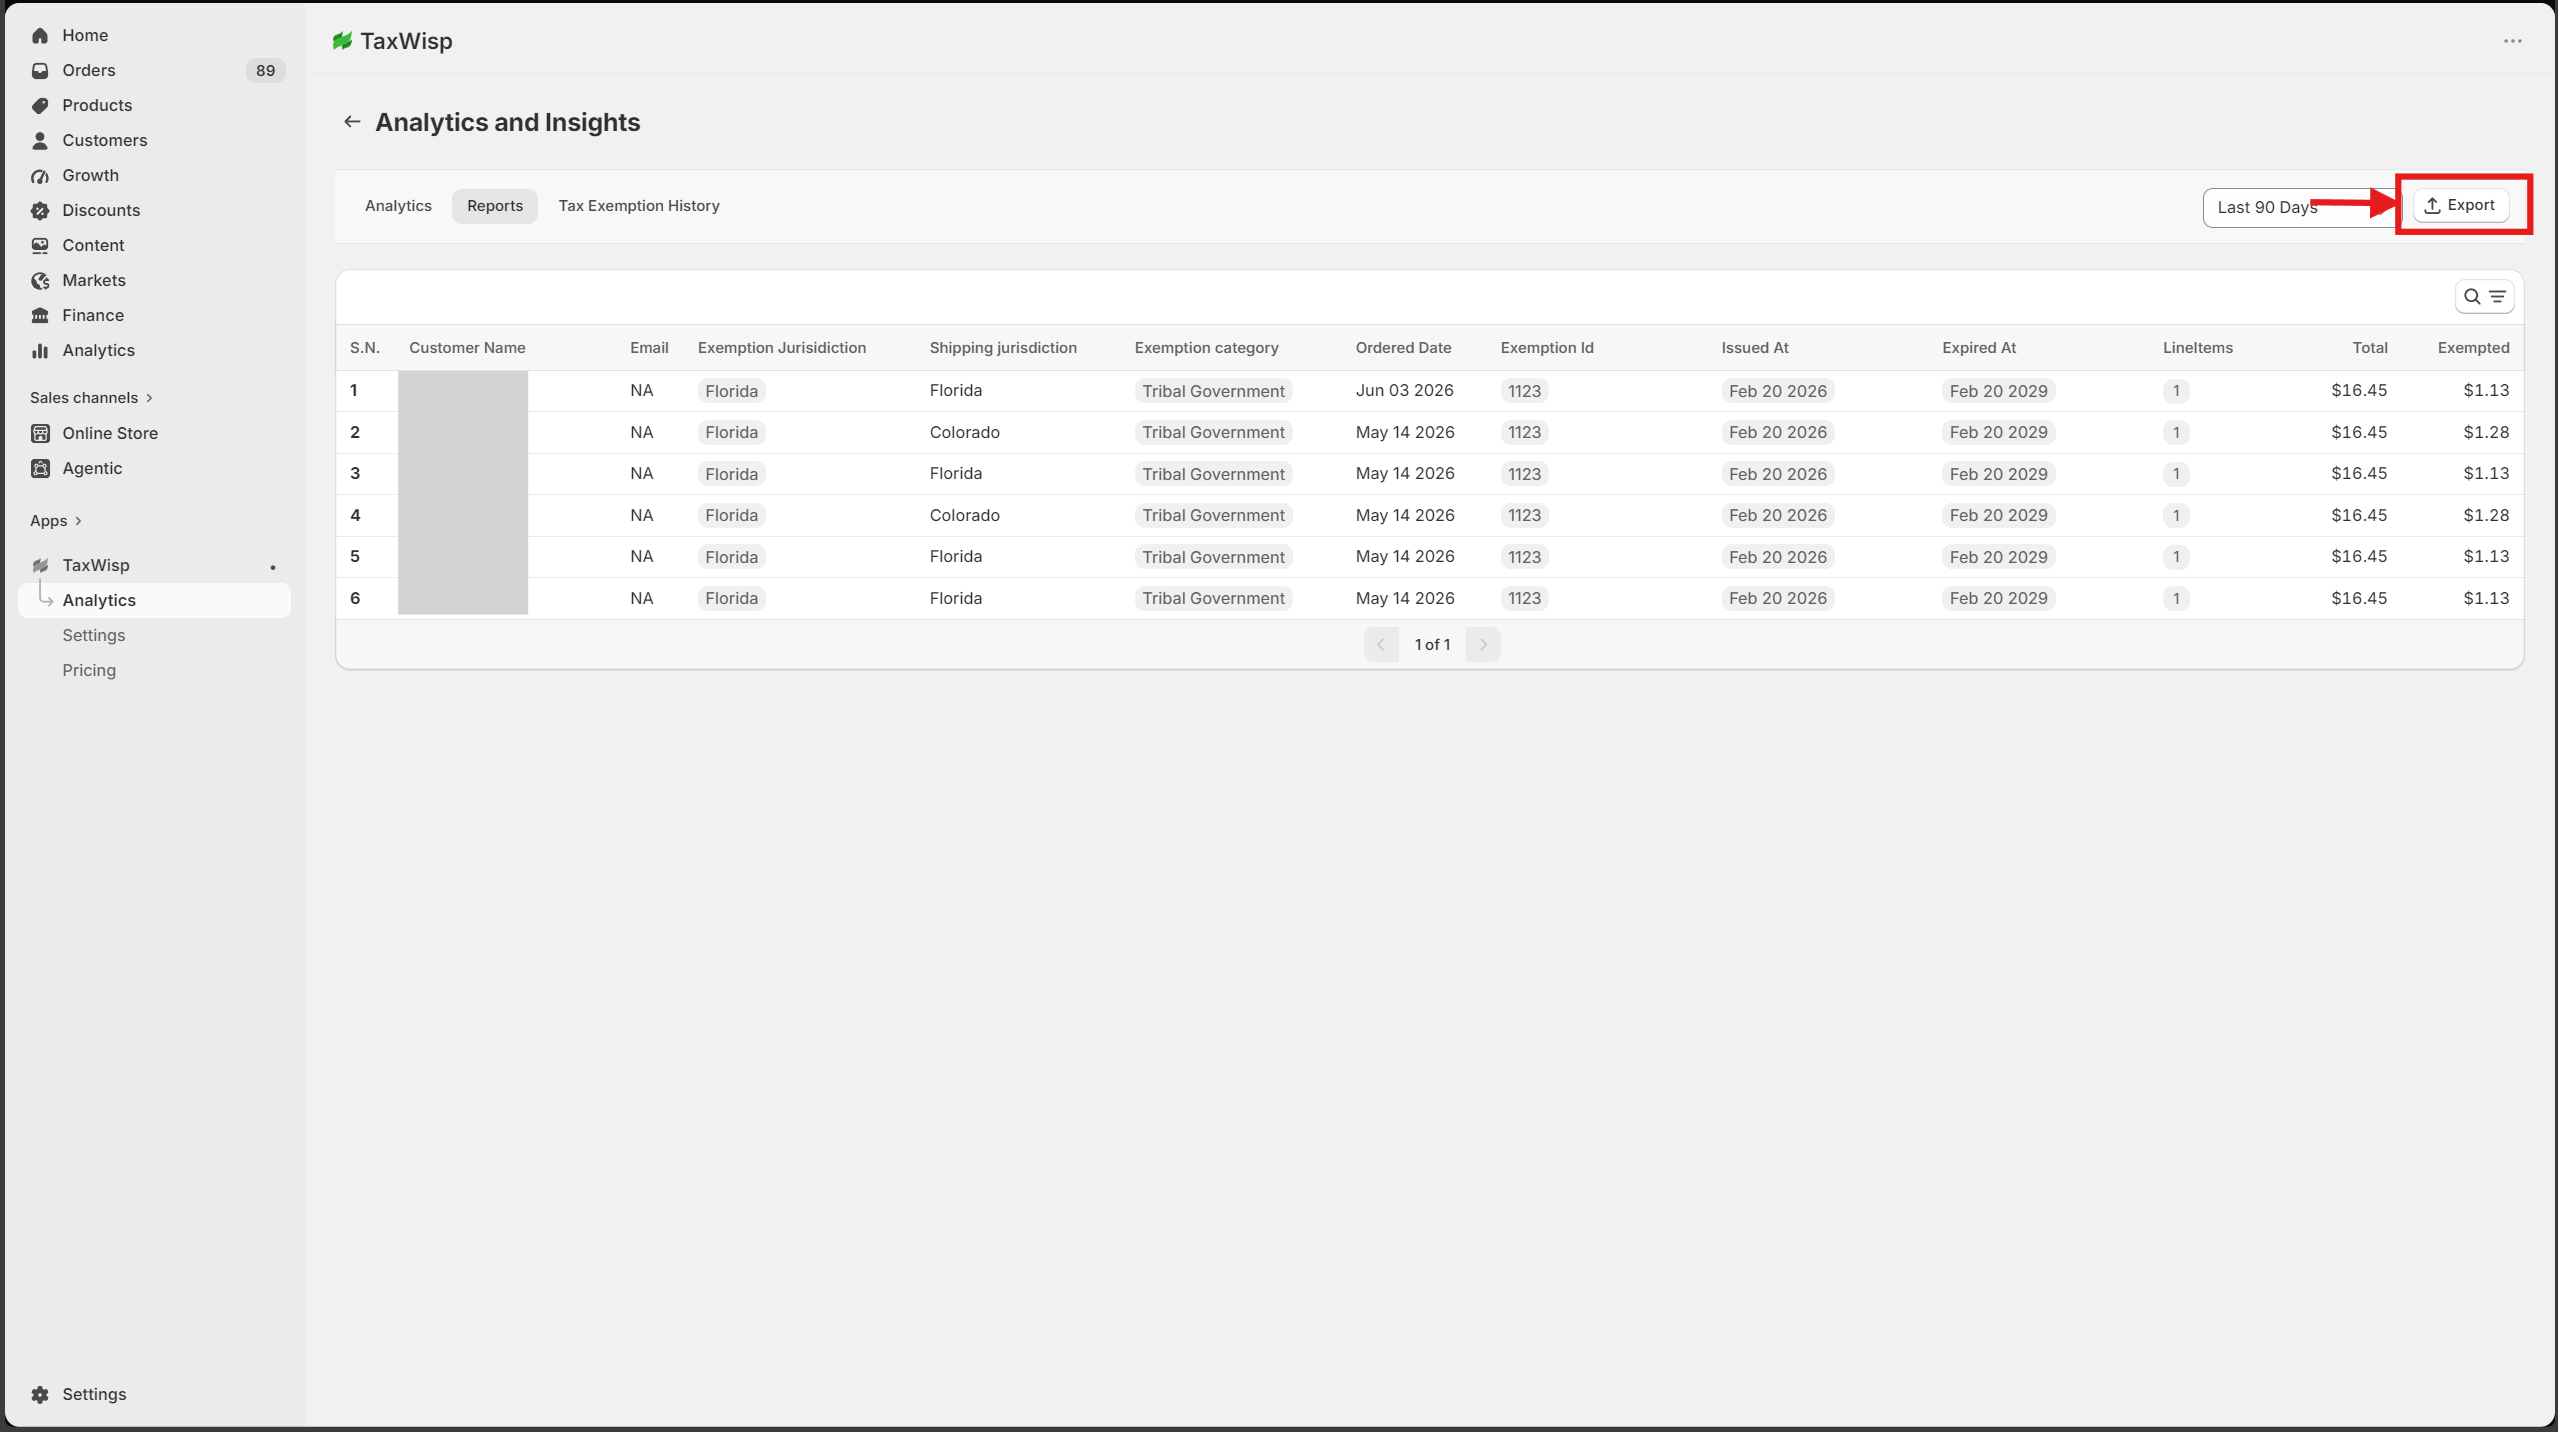
Report Export is available exclusively on the TaxWisp Premium Plan.
Tax Exemption History
The Tax Exemption History tab provides a chronological record of tax exemption events applied to your store. It helps you quickly understand when and how tax exemptions were applied to customer orders, regardless of whether the exemption originated from TaxWisp or another application.
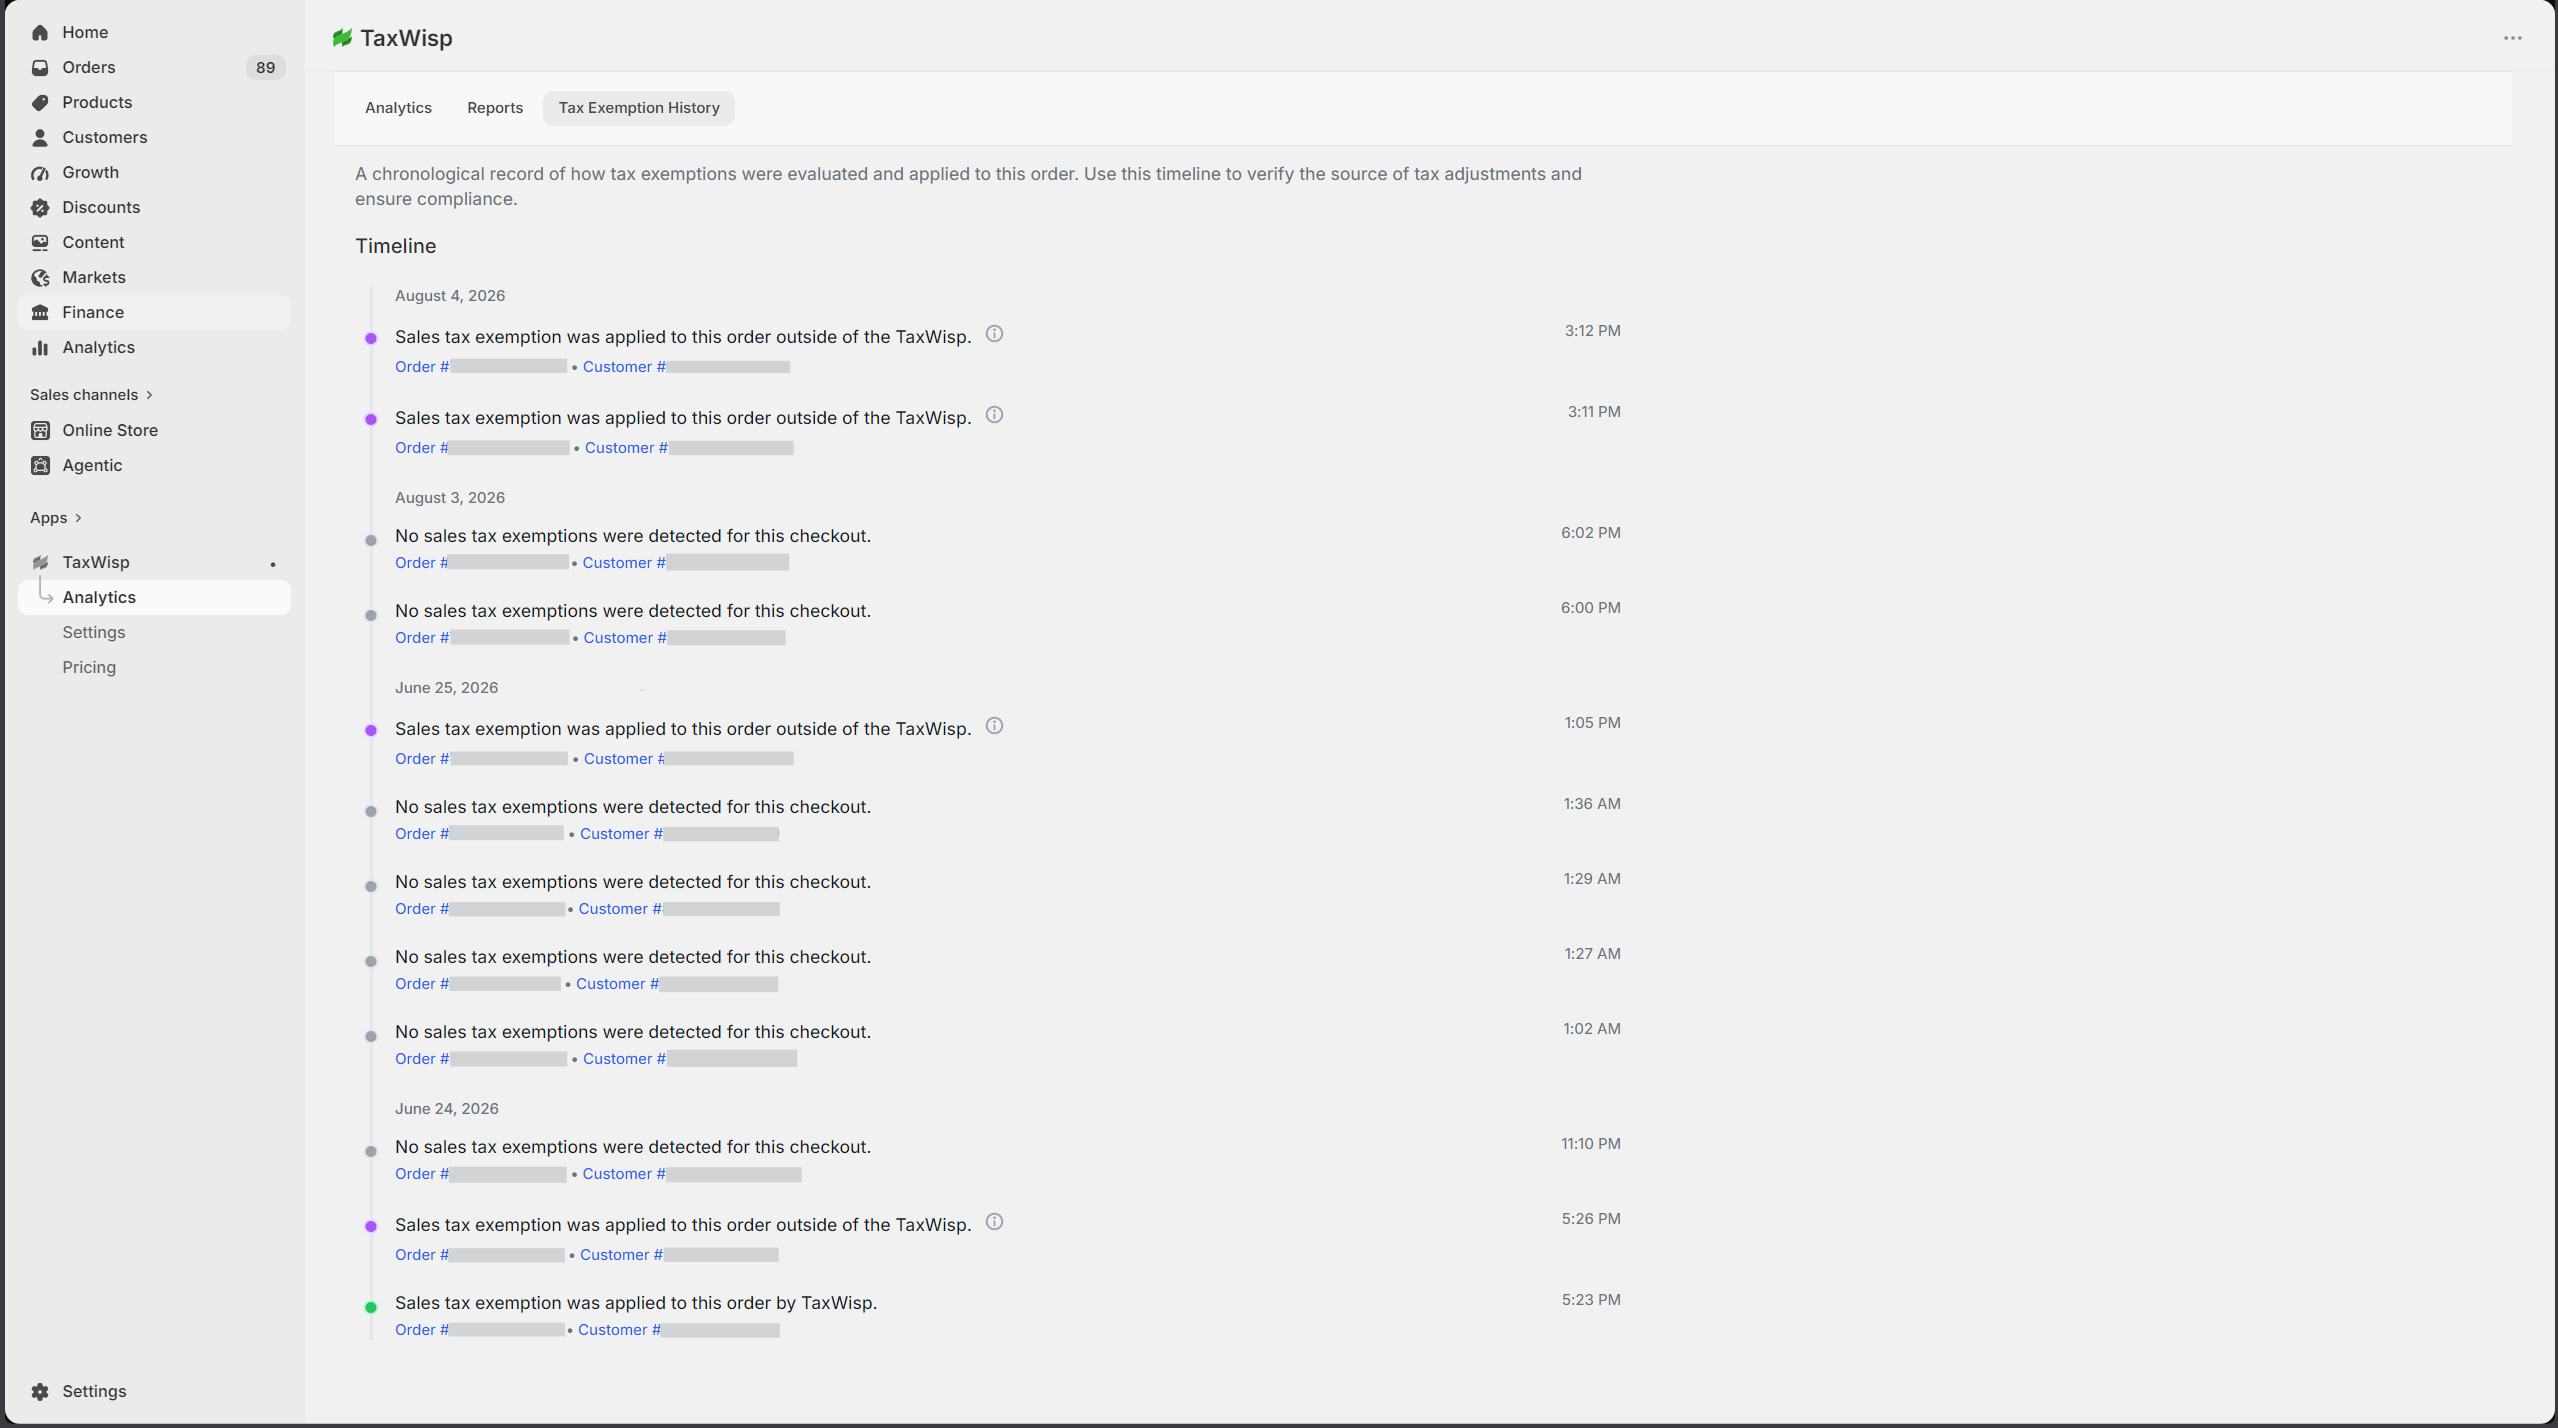
Each history entry includes important information about the exemption event, making it easier to review past activity and understand how tax exemptions have been applied across your store.
Typical events include:
- Tax exemption applied to an order.
- Tax exemption processed through TaxWisp.
- Tax exemption applied by another application.
- Other exemption-related events recorded by the system.
This centralized history provides a single place to review exemption activity without having to inspect individual orders or multiple applications.
Benefits of Analytics & Insights
The Analytics & Insights page helps merchants:
- Understand purchasing behavior of tax-exempt customers.
- Identify high-value and repeat customers.
- Monitor the growth of tax-exempt customers.
- Compare taxable and tax-exempt sales performance.
- Analyze exemption activity across jurisdictions and exemption categories.
- Maintain detailed records for compliance and auditing.
- Export reports for business analysis and operational reporting (Premium Plan).
Customer Experience & Store Configuration
TaxWisp provides a wide range of configuration options that allow you to customize how customers request tax exemption, how exemption requests are processed, and how your storefront experience is presented.
All configuration options can be accessed from: Shopify Admin → Apps → TaxWisp → Settings
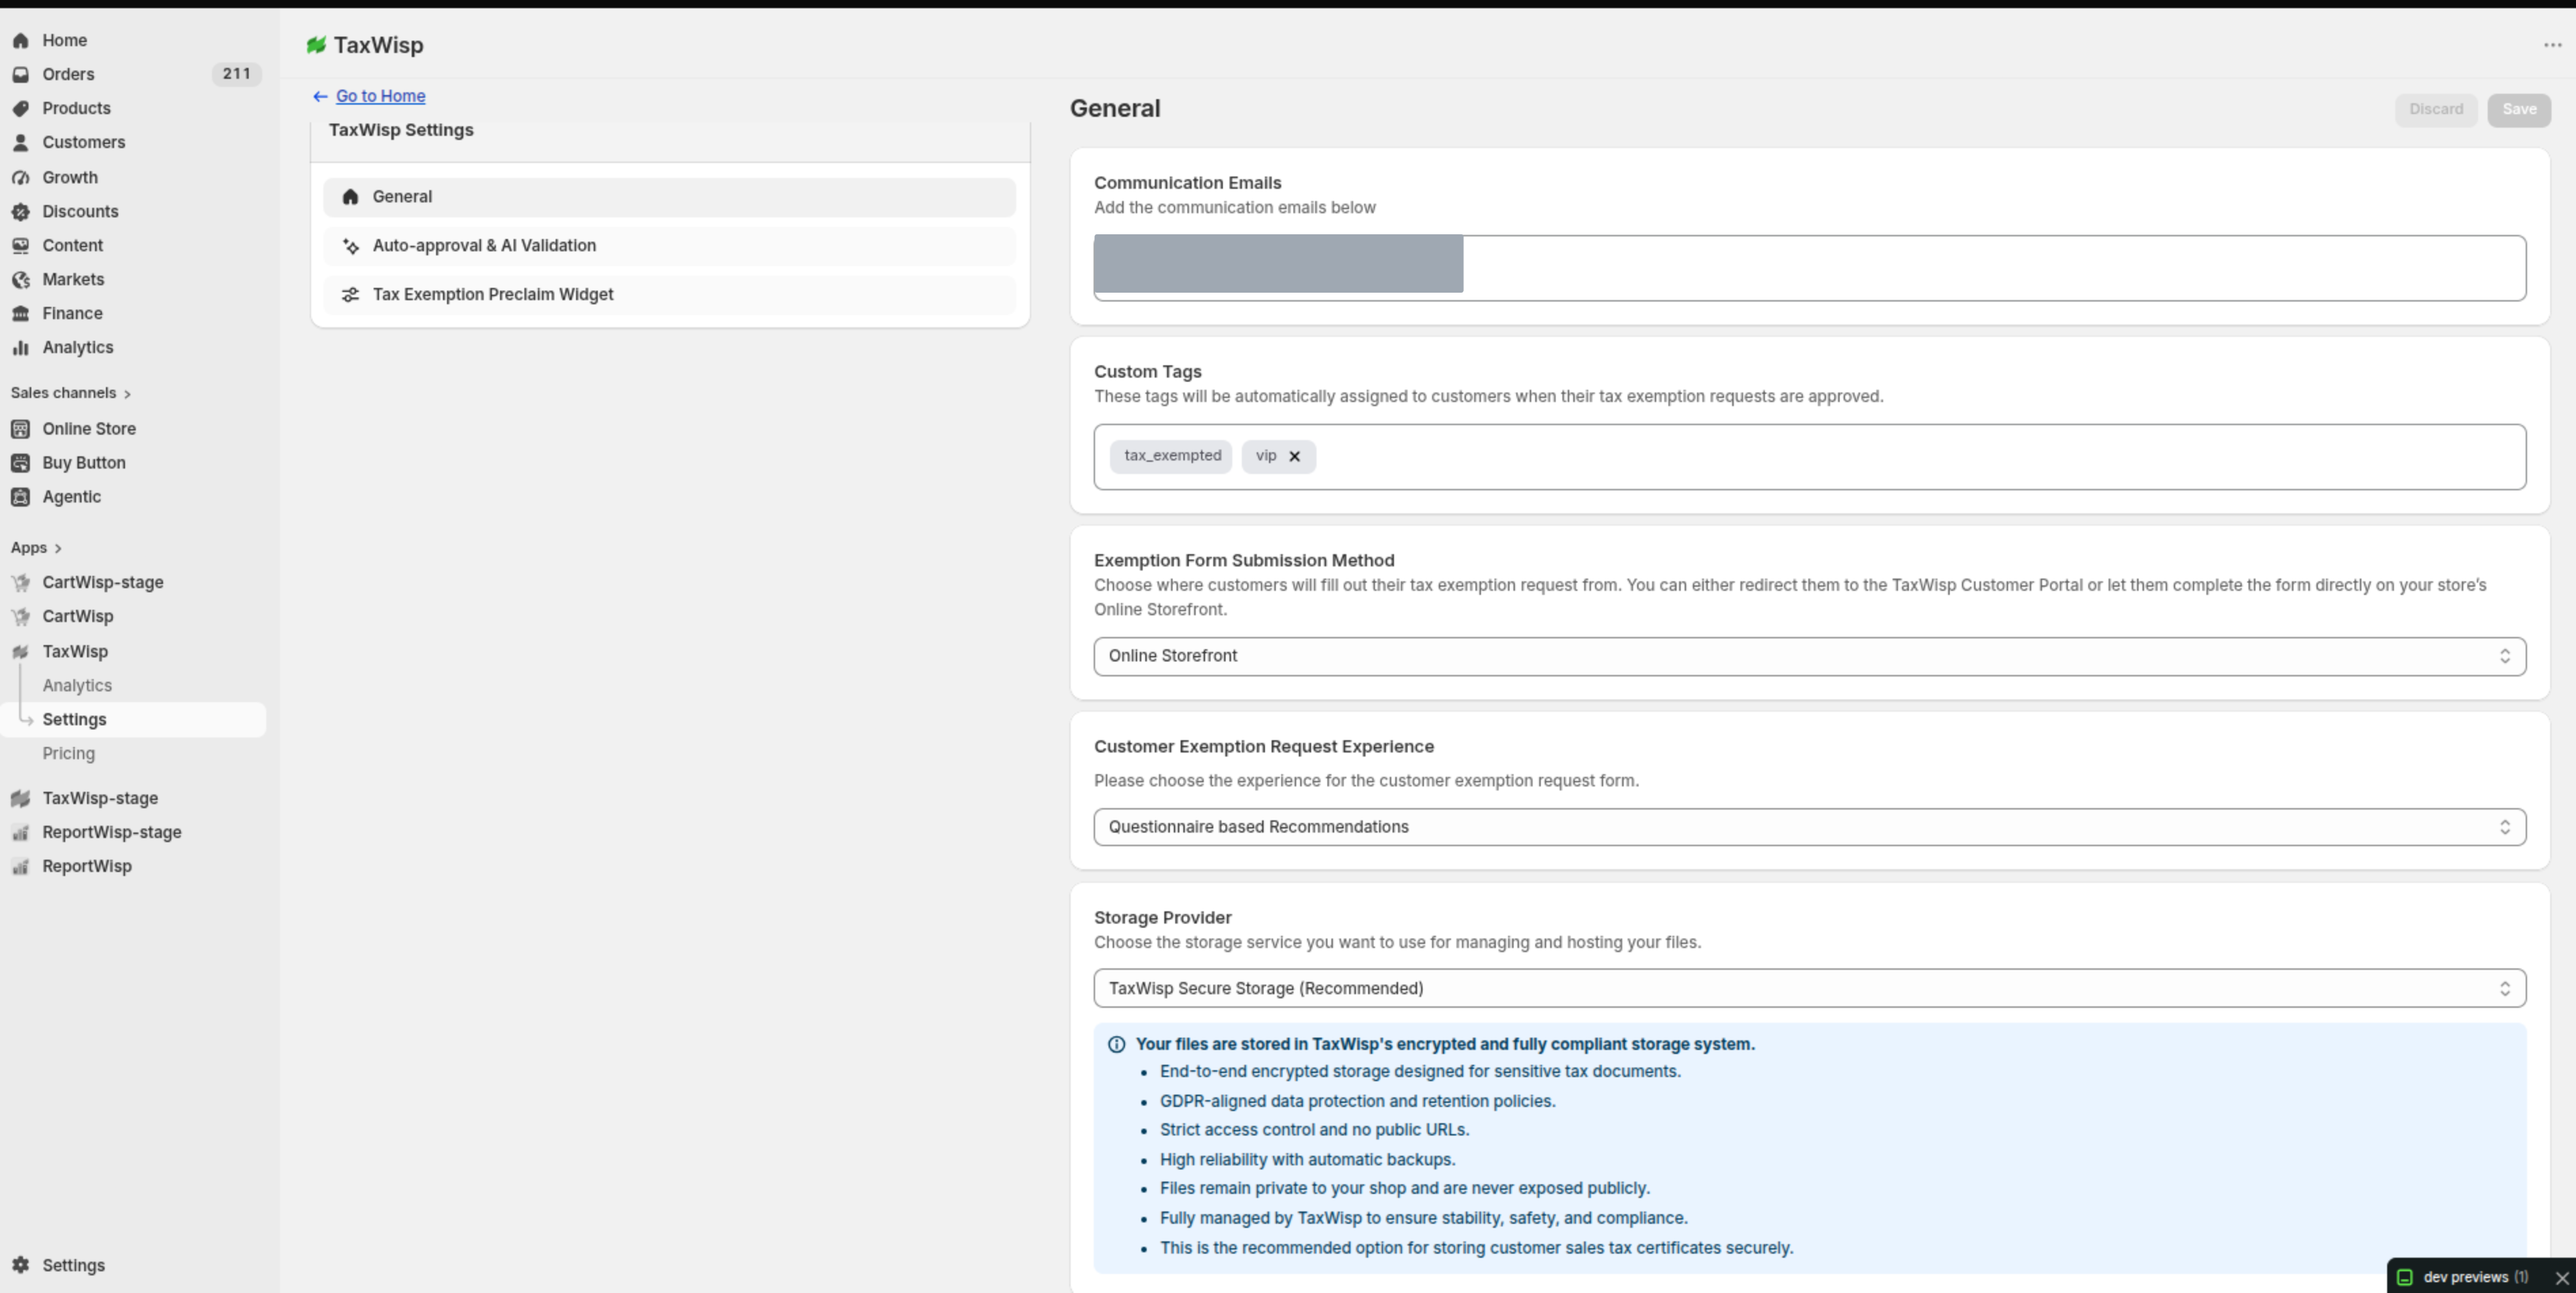
The Settings page is organized into multiple sections, each responsible for a different aspect of your exemption workflow.
Communication Emails
TaxWisp automatically sends email notifications whenever important tax exemption events occur.
By default, notifications are sent to your Shopify Store Owner email address. However, you can configure additional recipients to ensure the appropriate members of your organization stay informed.
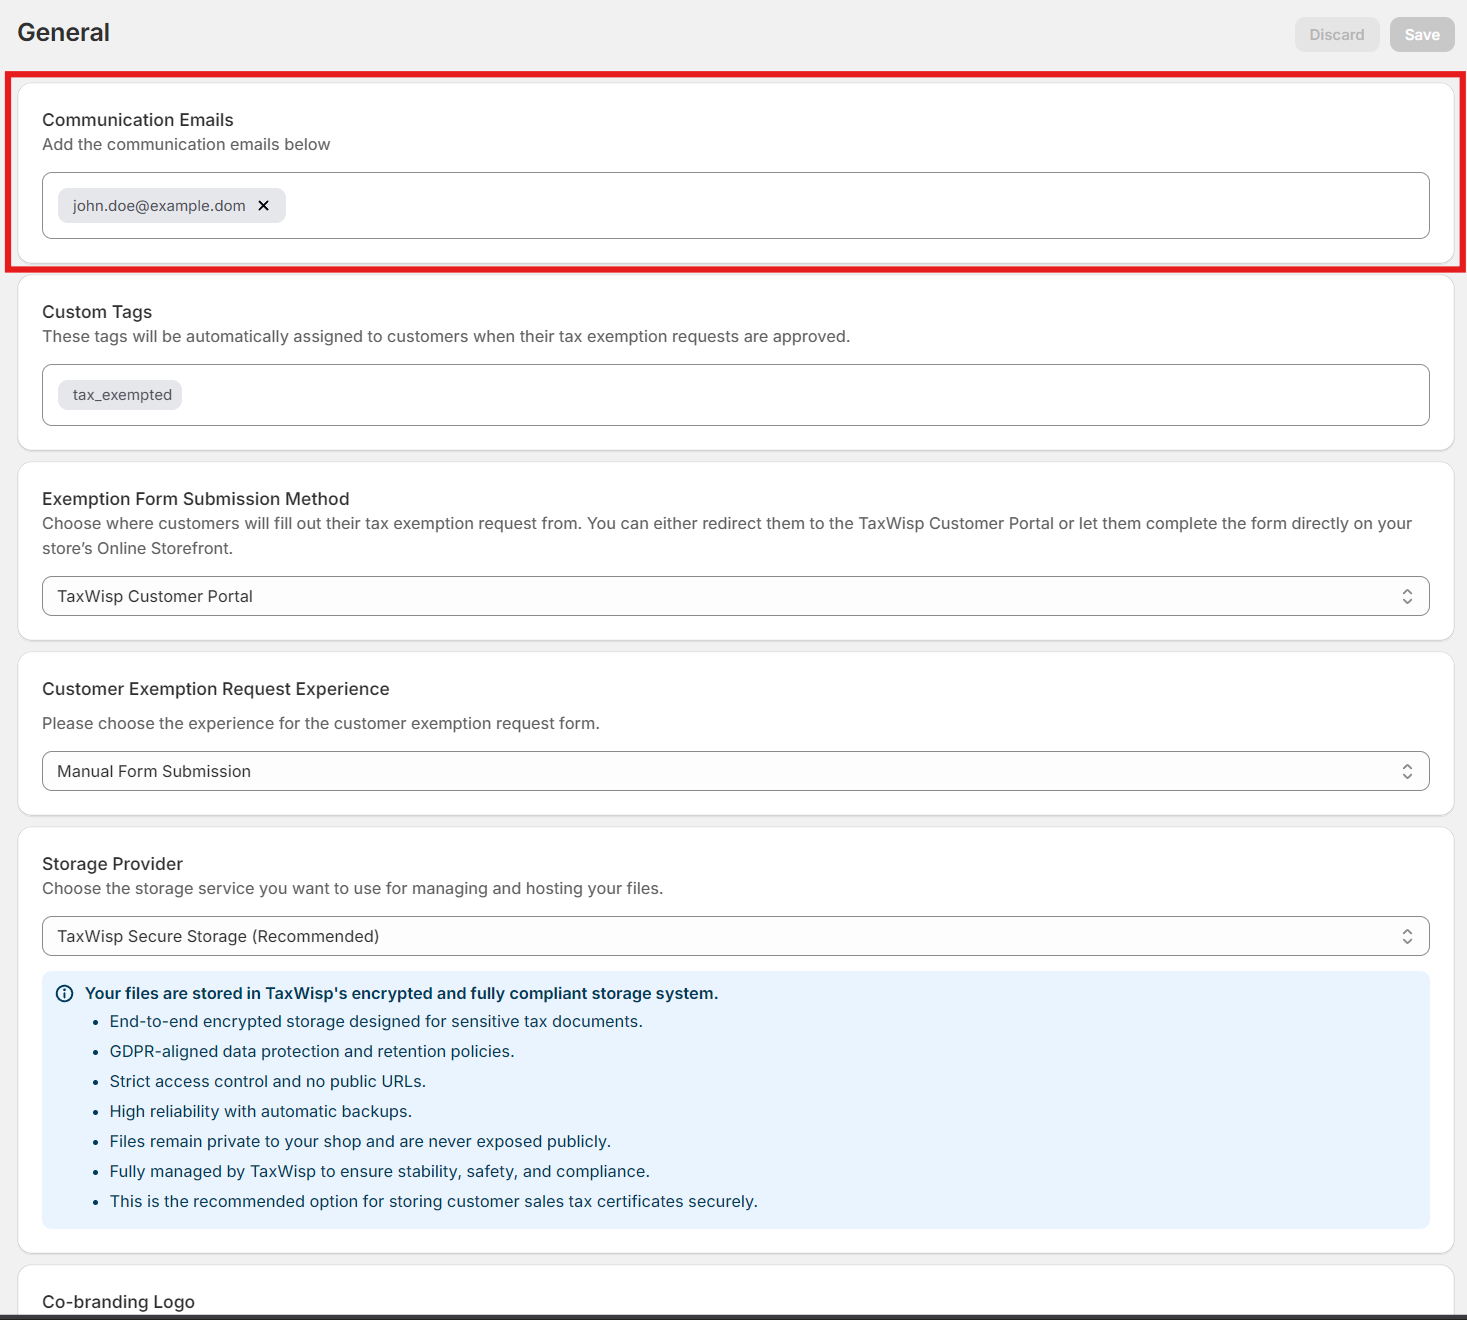
You can add multiple email addresses to receive notifications for events such as:
- New tax exemption requests
- Approved requests
- Rejected requests
- Revoked exemptions
- Expiring exemptions
- Customer submissions
- Other exemption-related activities
This is particularly useful for organizations where finance, tax, compliance, or customer support teams share responsibility for managing tax exemptions.
Customer Tags
Customer tags allow TaxWisp to automatically categorize approved tax-exempt customers within Shopify.
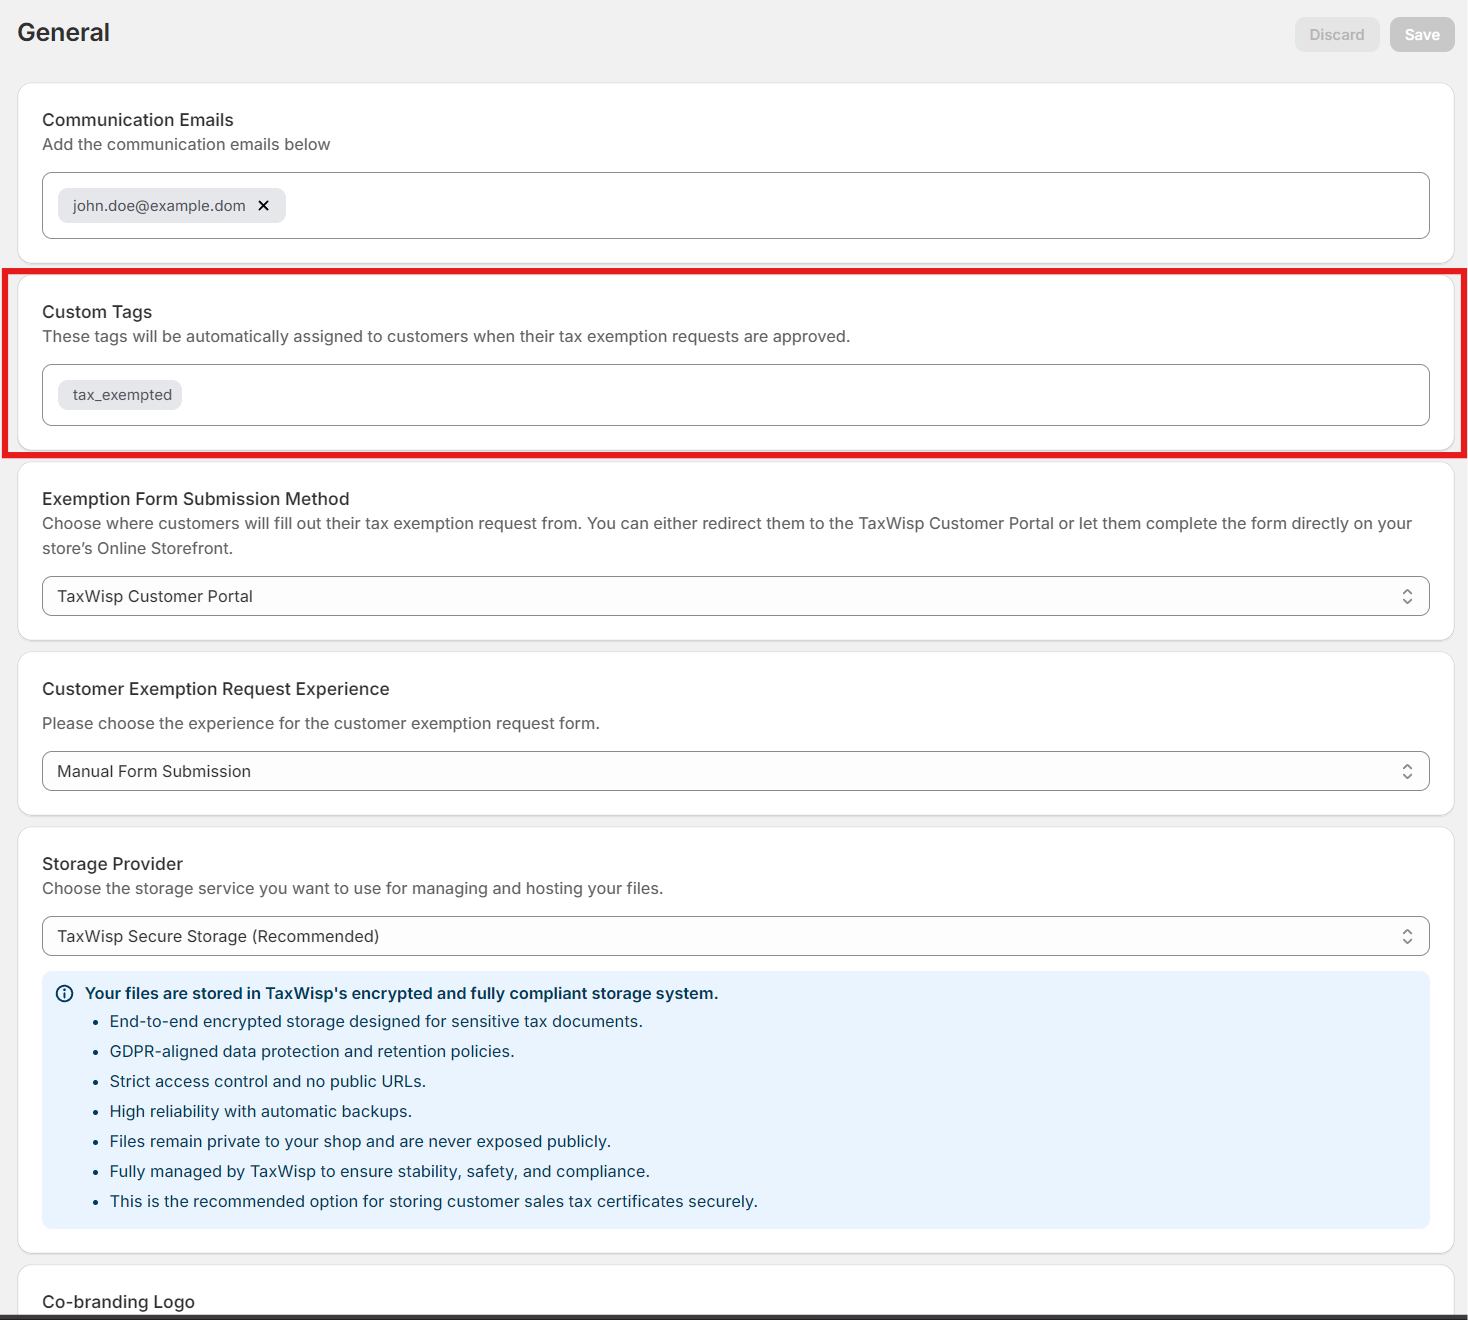
When a customer's exemption request is approved, TaxWisp automatically applies the configured customer tags to their Shopify customer profile.
These tags can be used for:
- Customer segmentation
- Shopify Flow automations
- Marketing campaigns
- Customer filtering
- Internal reporting
- Integration with other Shopify apps
You can configure one or more custom tags depending on your business requirements.
Customer Exemption Request Experience
TaxWisp supports multiple customer experiences for submitting tax exemption requests. Choose the experience that best suits your customers.
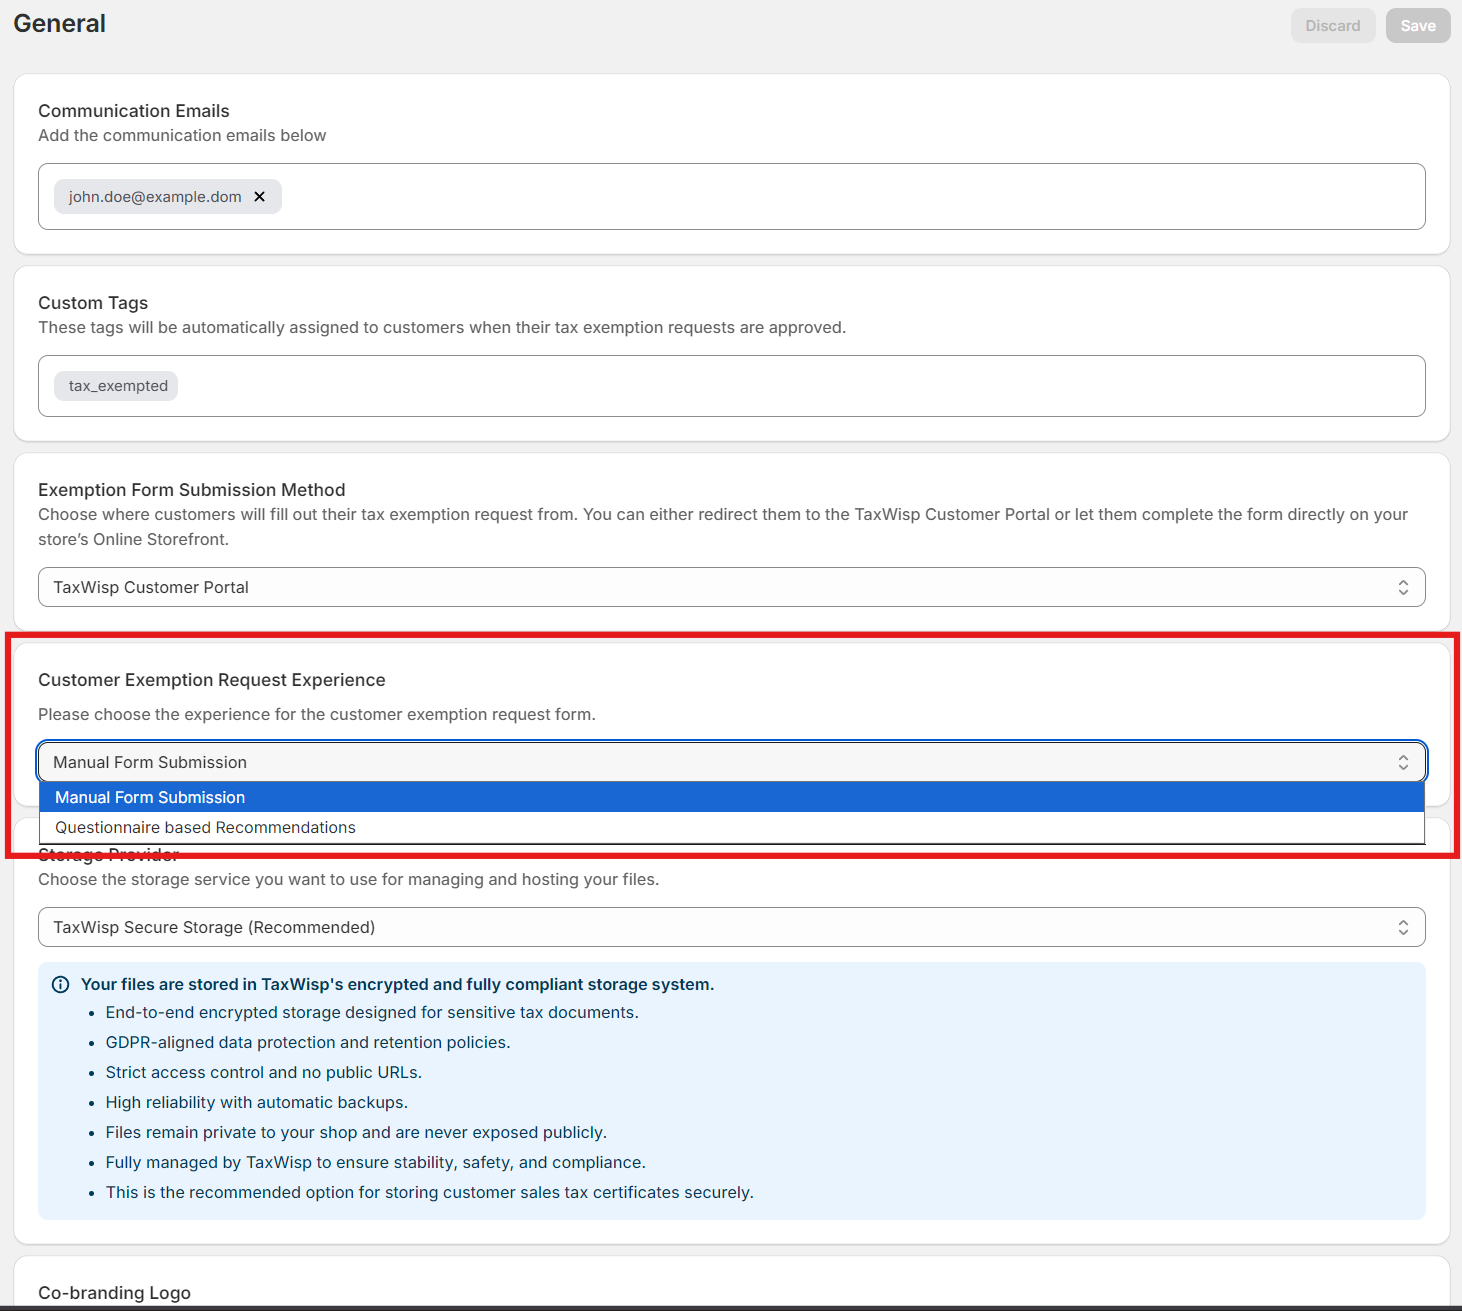
Manual Form Submission
Customers complete the traditional tax exemption request form by entering their exemption details and uploading supporting documents. This option is recommended for merchants that already know the exemption information they need from customers.
Chat-Based Recommendations
The Chat-Based Recommendation experience guides customers through an interactive question-and-answer flow before presenting the exemption request form.
By asking a series of simple questions, TaxWisp helps customers identify the most appropriate exemption category and required information before they submit their request.
This guided experience reduces customer confusion, minimizes incomplete submissions, and helps improve the overall quality of exemption requests.
Exemption Form Submission Method (Premium Plan)
Premium merchants can choose where customers complete the exemption request process.
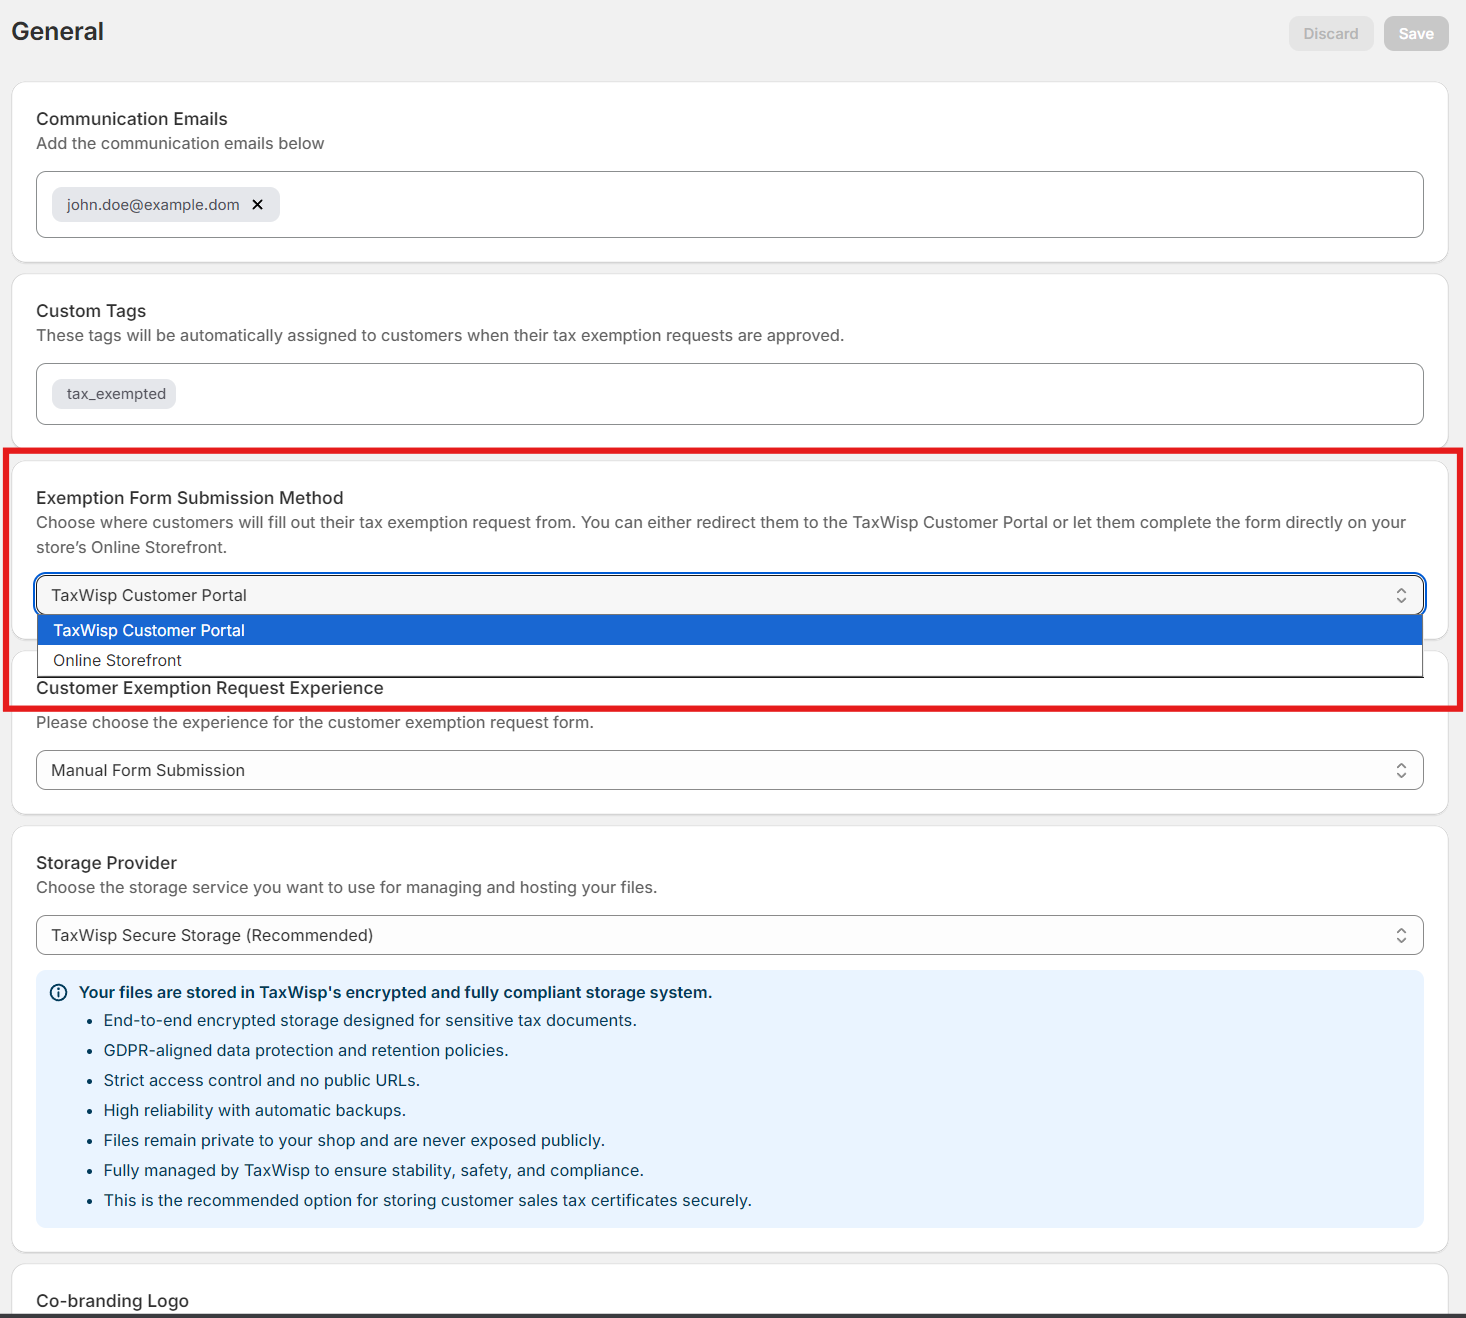
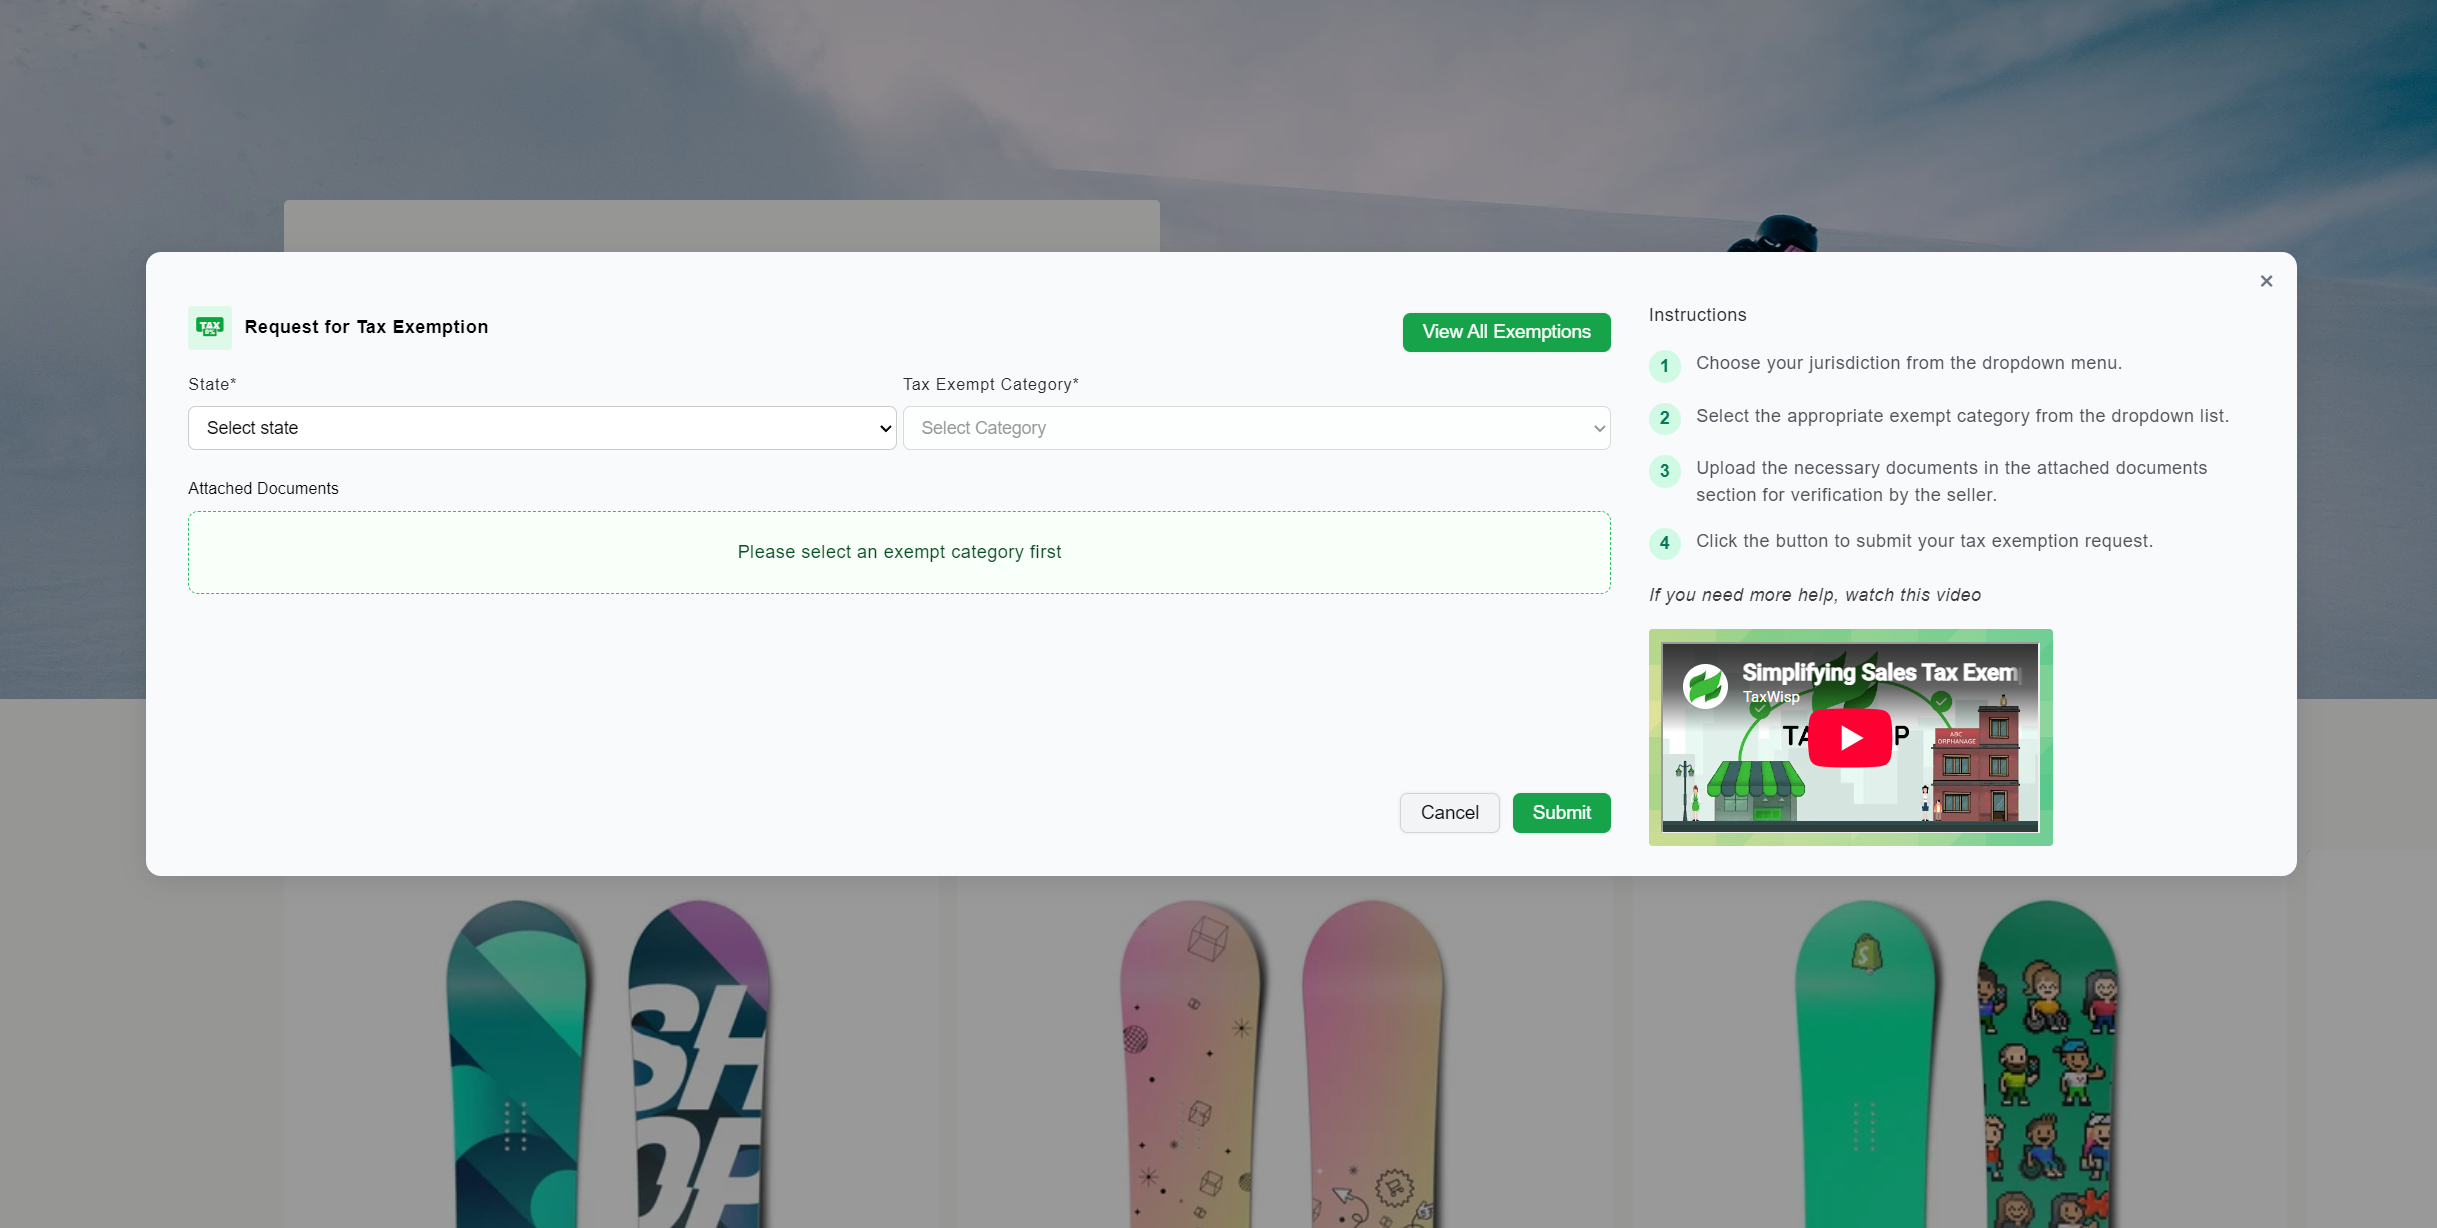
Online Storefront
Customers complete the entire exemption request without leaving your Shopify store. This provides a seamless branded experience and keeps customers within your storefront throughout the submission process.
TaxWisp Customer Portal
Customers are redirected to the TaxWisp Customer Portal to complete their exemption request.
In addition to submitting exemption requests, the Customer Portal allows customers to:
- Track request status
- View approved exemptions
- Manage existing requests
- Extend their enrollment when required
- Upload updated exemption certificates
The Customer Portal is recommended for merchants that expect customers to manage exemptions over time.
Tax Exemption Display Content
You can customize the customer-facing content displayed by the TaxWisp storefront extensions from TaxWisp Settings.
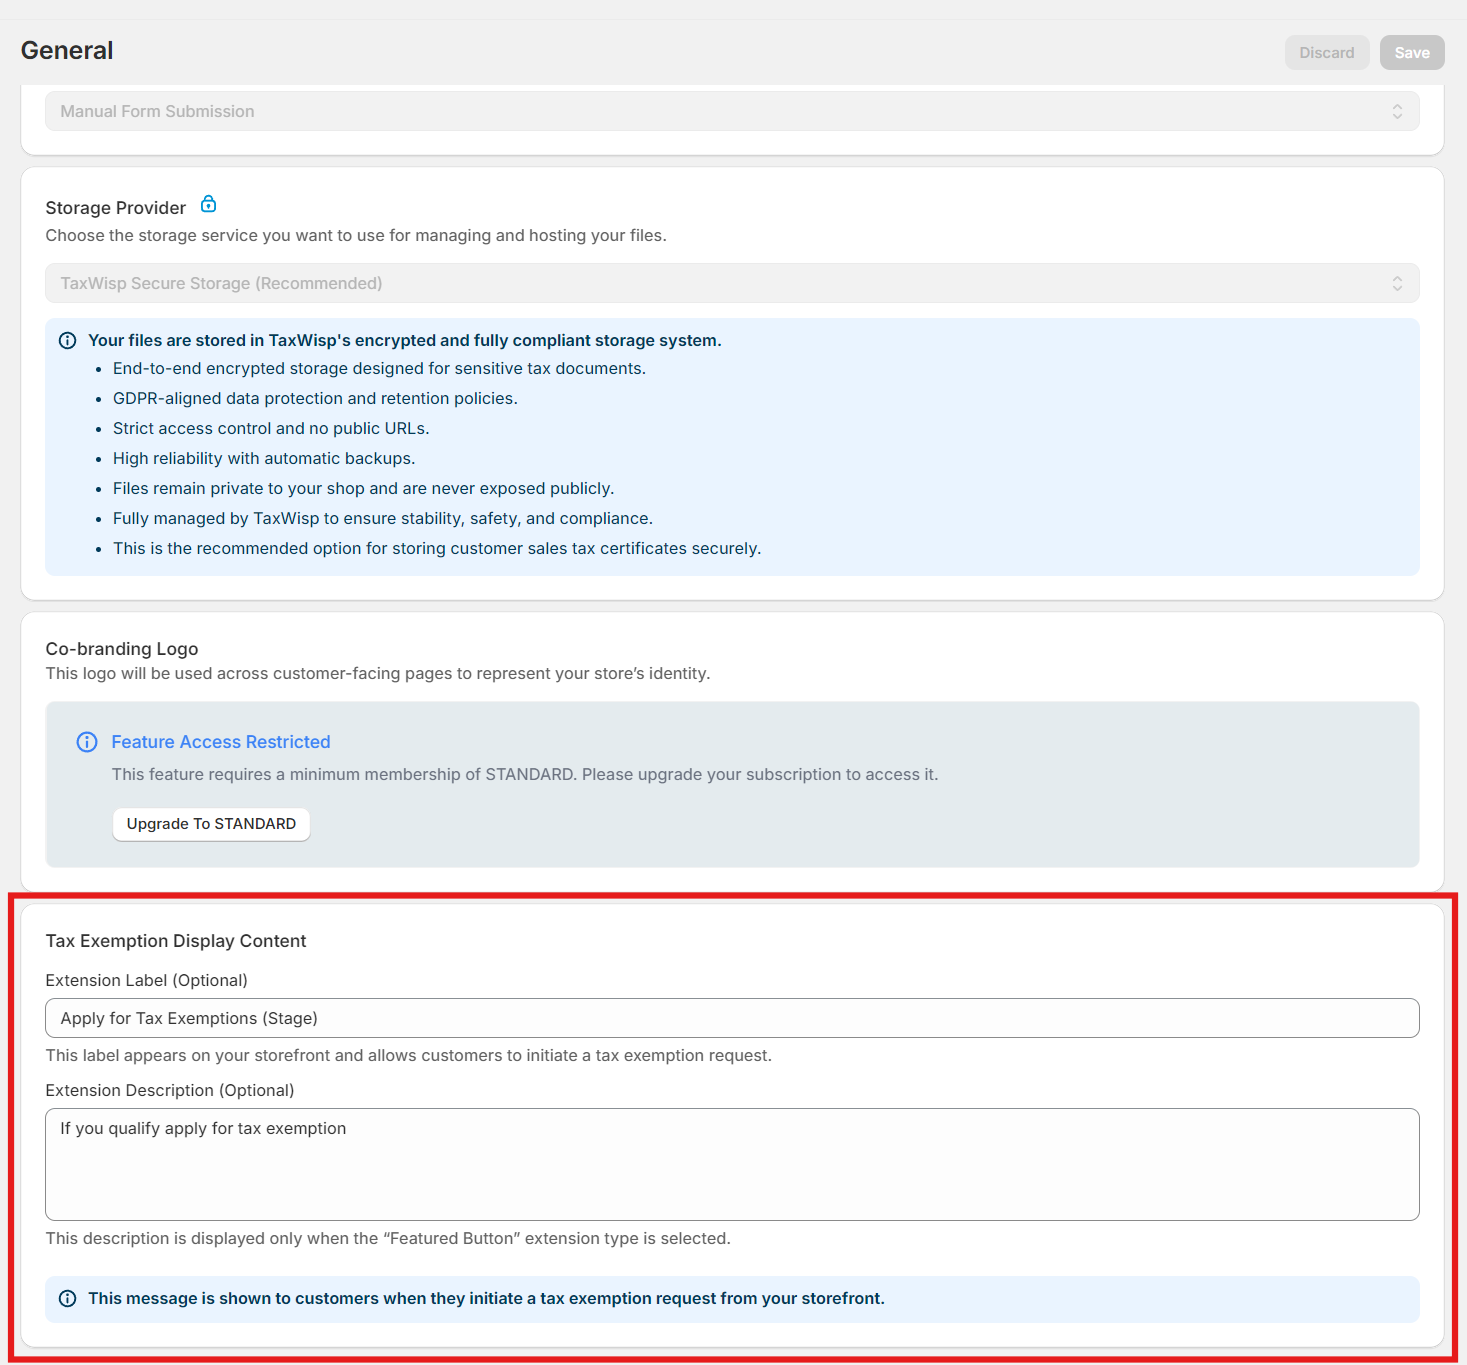
Available customization includes:
- Extension Label
- Extension Description
These settings allow you to align the TaxWisp extension with your store's branding and customer communication style.
Store Co-branding
TaxWisp allows you to display your own branding throughout the customer exemption experience.
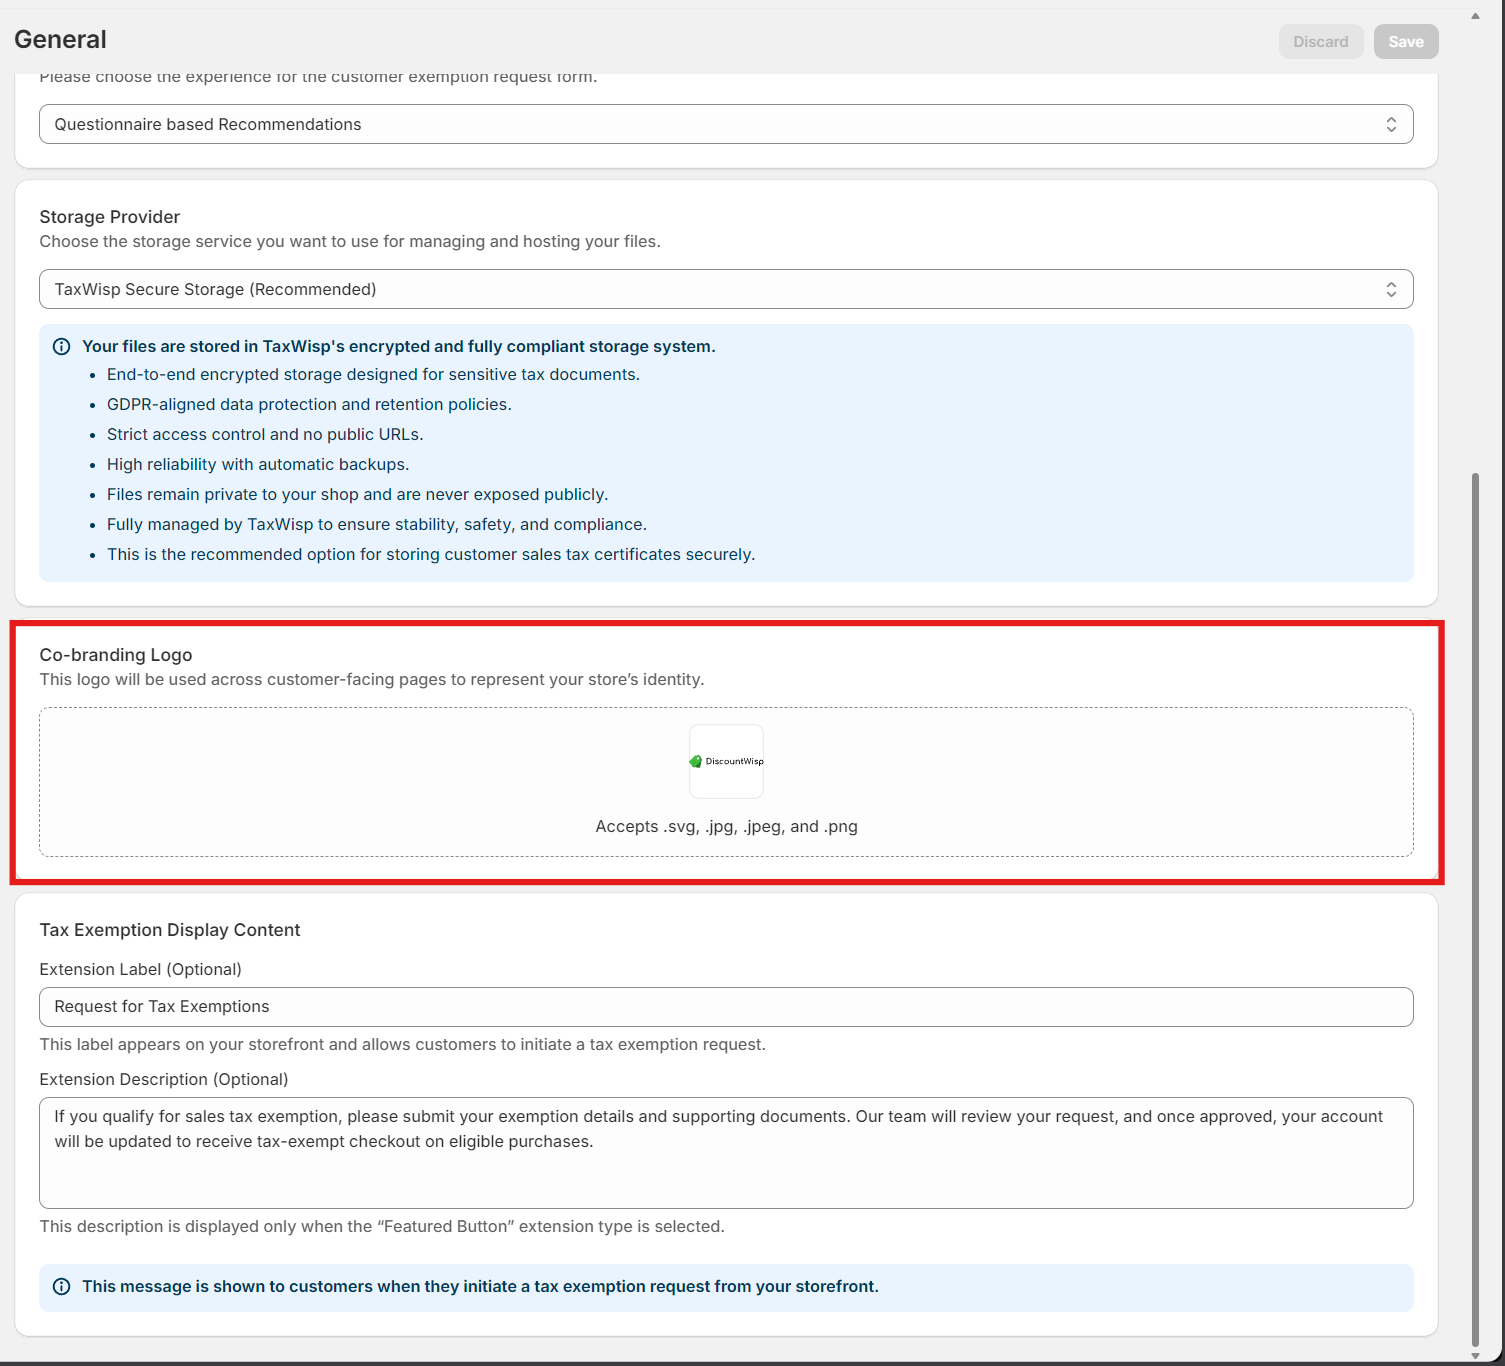
Upload your store logo to personalize TaxWisp Customer Portal to provide the store-branded experience for customers.
Using your own branding logo creates a more consistent customer experience and increases customer confidence throughout the exemption process.
Storage Provider (Premium Plan)
Premium merchants can choose where exemption certificates are securely stored.
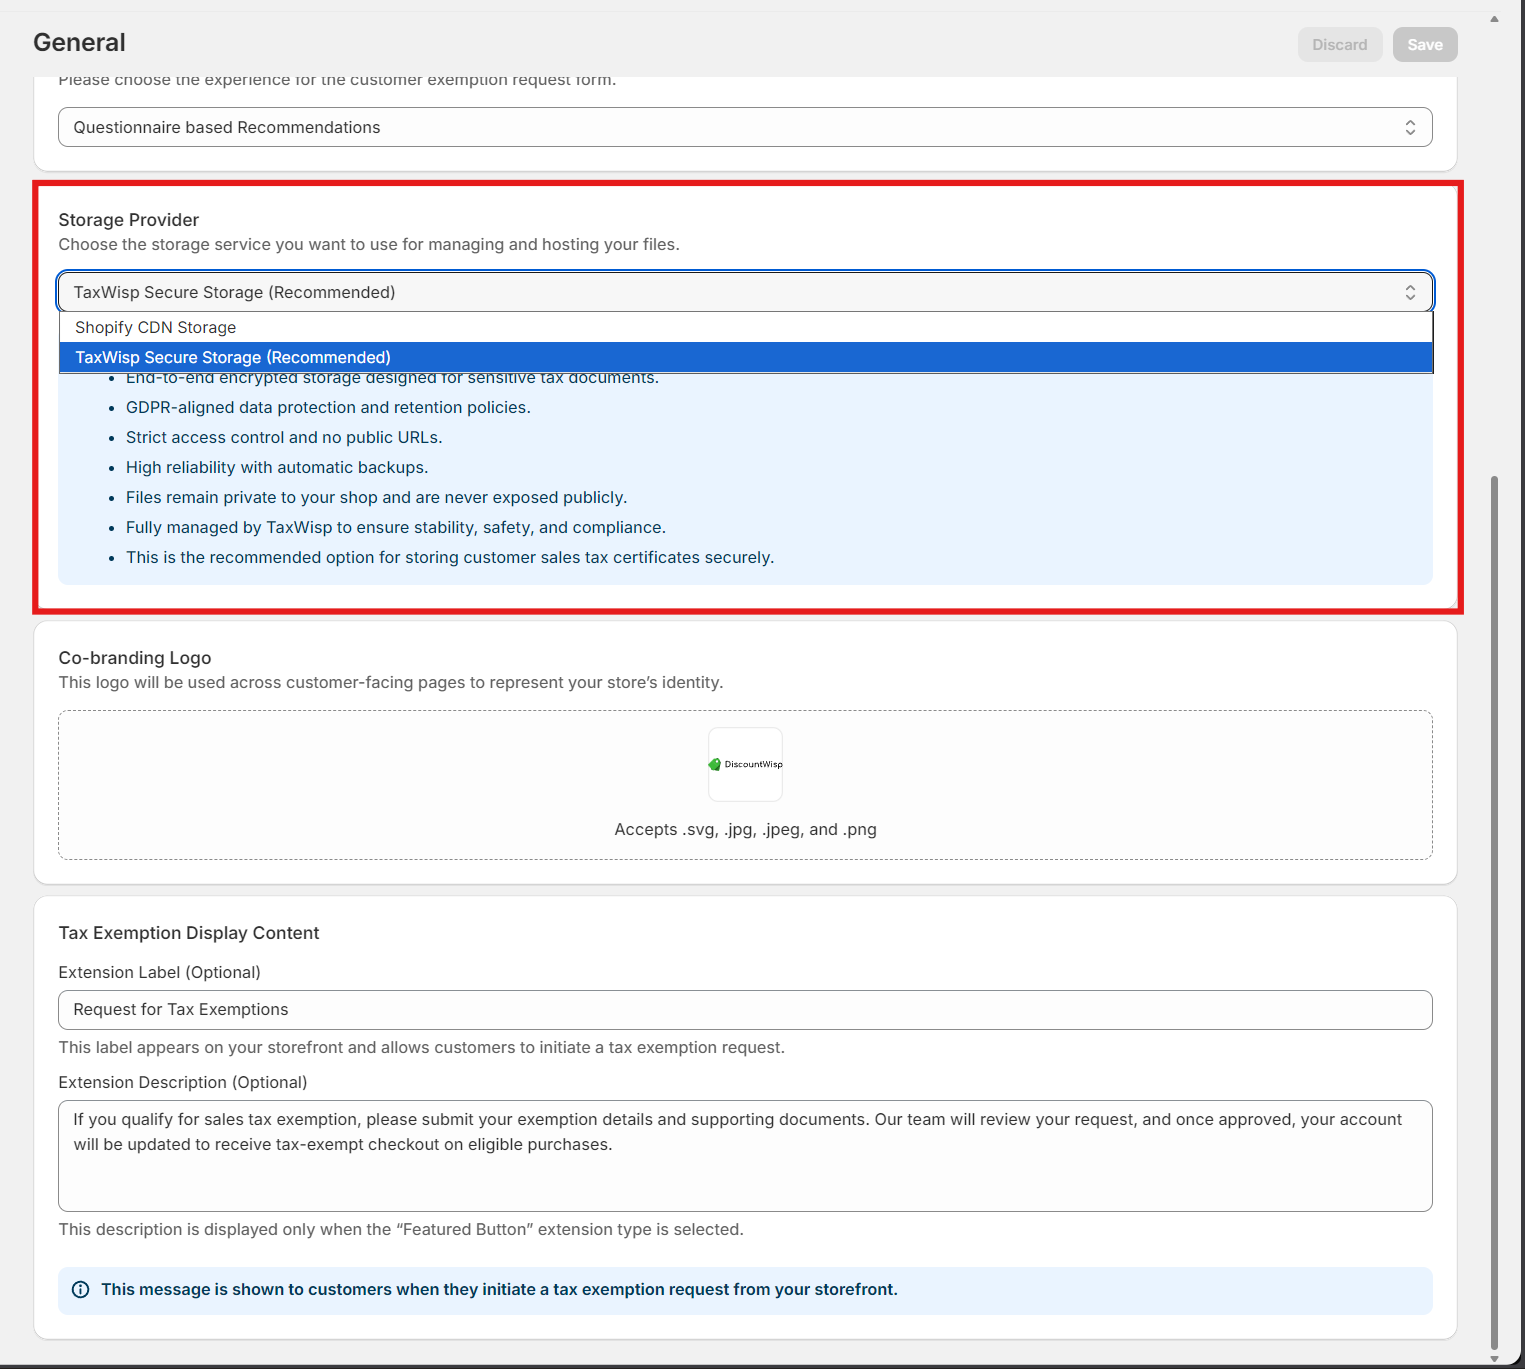
TaxWisp Secure Storage (Recommended)
TaxWisp Secure Storage provides encrypted, privacy-focused storage designed specifically for sensitive tax exemption documents.
Benefits include:
- End-to-end encryption
- Private document storage
- No publicly accessible file URLs
- Secure access controls
- Automatic backups
- GDPR-aligned data protection
- Fully managed by TaxWisp
This is the recommended storage option for merchants handling sensitive customer tax documentation.
Shopify CDN Storage
Alternatively, merchants may choose to store exemption certificates using Shopify's Content Delivery Network (CDN).
When using Shopify CDN:
- Files are stored within Shopify's infrastructure.
- Shopify's storage policies apply.
- Publicly accessible URLs may exist depending on Shopify's implementation.
- Merchants remain responsible for ensuring compliance with their organization's privacy, security, and regulatory requirements.
Choose this option only if it aligns with your organization's compliance policies.
Best Practices
To provide the best customer experience, we recommend:
- Configure communication emails for all team members responsible for tax exemptions.
- Use meaningful customer tags to simplify customer management.
- Enable Chat-Based Recommendations if customers frequently need assistance selecting exemption categories.
- Use the Customer Portal when customers are expected to manage exemptions over time.
- Customize extension content to match your storefront branding.
- Upload your company logo to provide a consistent customer experience.
- Use TaxWisp Secure Storage whenever handling sensitive exemption certificates.
Migrating Existing Tax-Exempt Customers (Premium Plan)
If your business already has tax-exempt customers, you don't need to ask them to submit new exemption requests individually. TaxWisp's Bulk Import feature allows you to migrate your existing tax-exempt customers into TaxWisp, helping you get started quickly while preserving your existing exemption records.
Whether you're moving from spreadsheets, another exemption management solution, or manually maintained customer records, Bulk Import significantly reduces onboarding time and eliminates repetitive manual work.
Why Use Bulk Import?
Bulk Import is recommended when your business already maintains tax-exempt customer records and wants to begin using TaxWisp without disrupting existing operations.
Common scenarios include:
- Migrating from spreadsheets or Excel files.
- Switching from another tax exemption management solution.
- Importing existing wholesale or reseller customers.
- Migrating nonprofit, government, educational, or healthcare organizations.
- Onboarding large numbers of tax-exempt customers during initial TaxWisp setup.
Instead of asking every customer to submit a new exemption request, merchants can import approved customer records directly into TaxWisp.
Preparing Your Import File
Before importing customers, download the Bulk Import Template from the Bulk Import page.
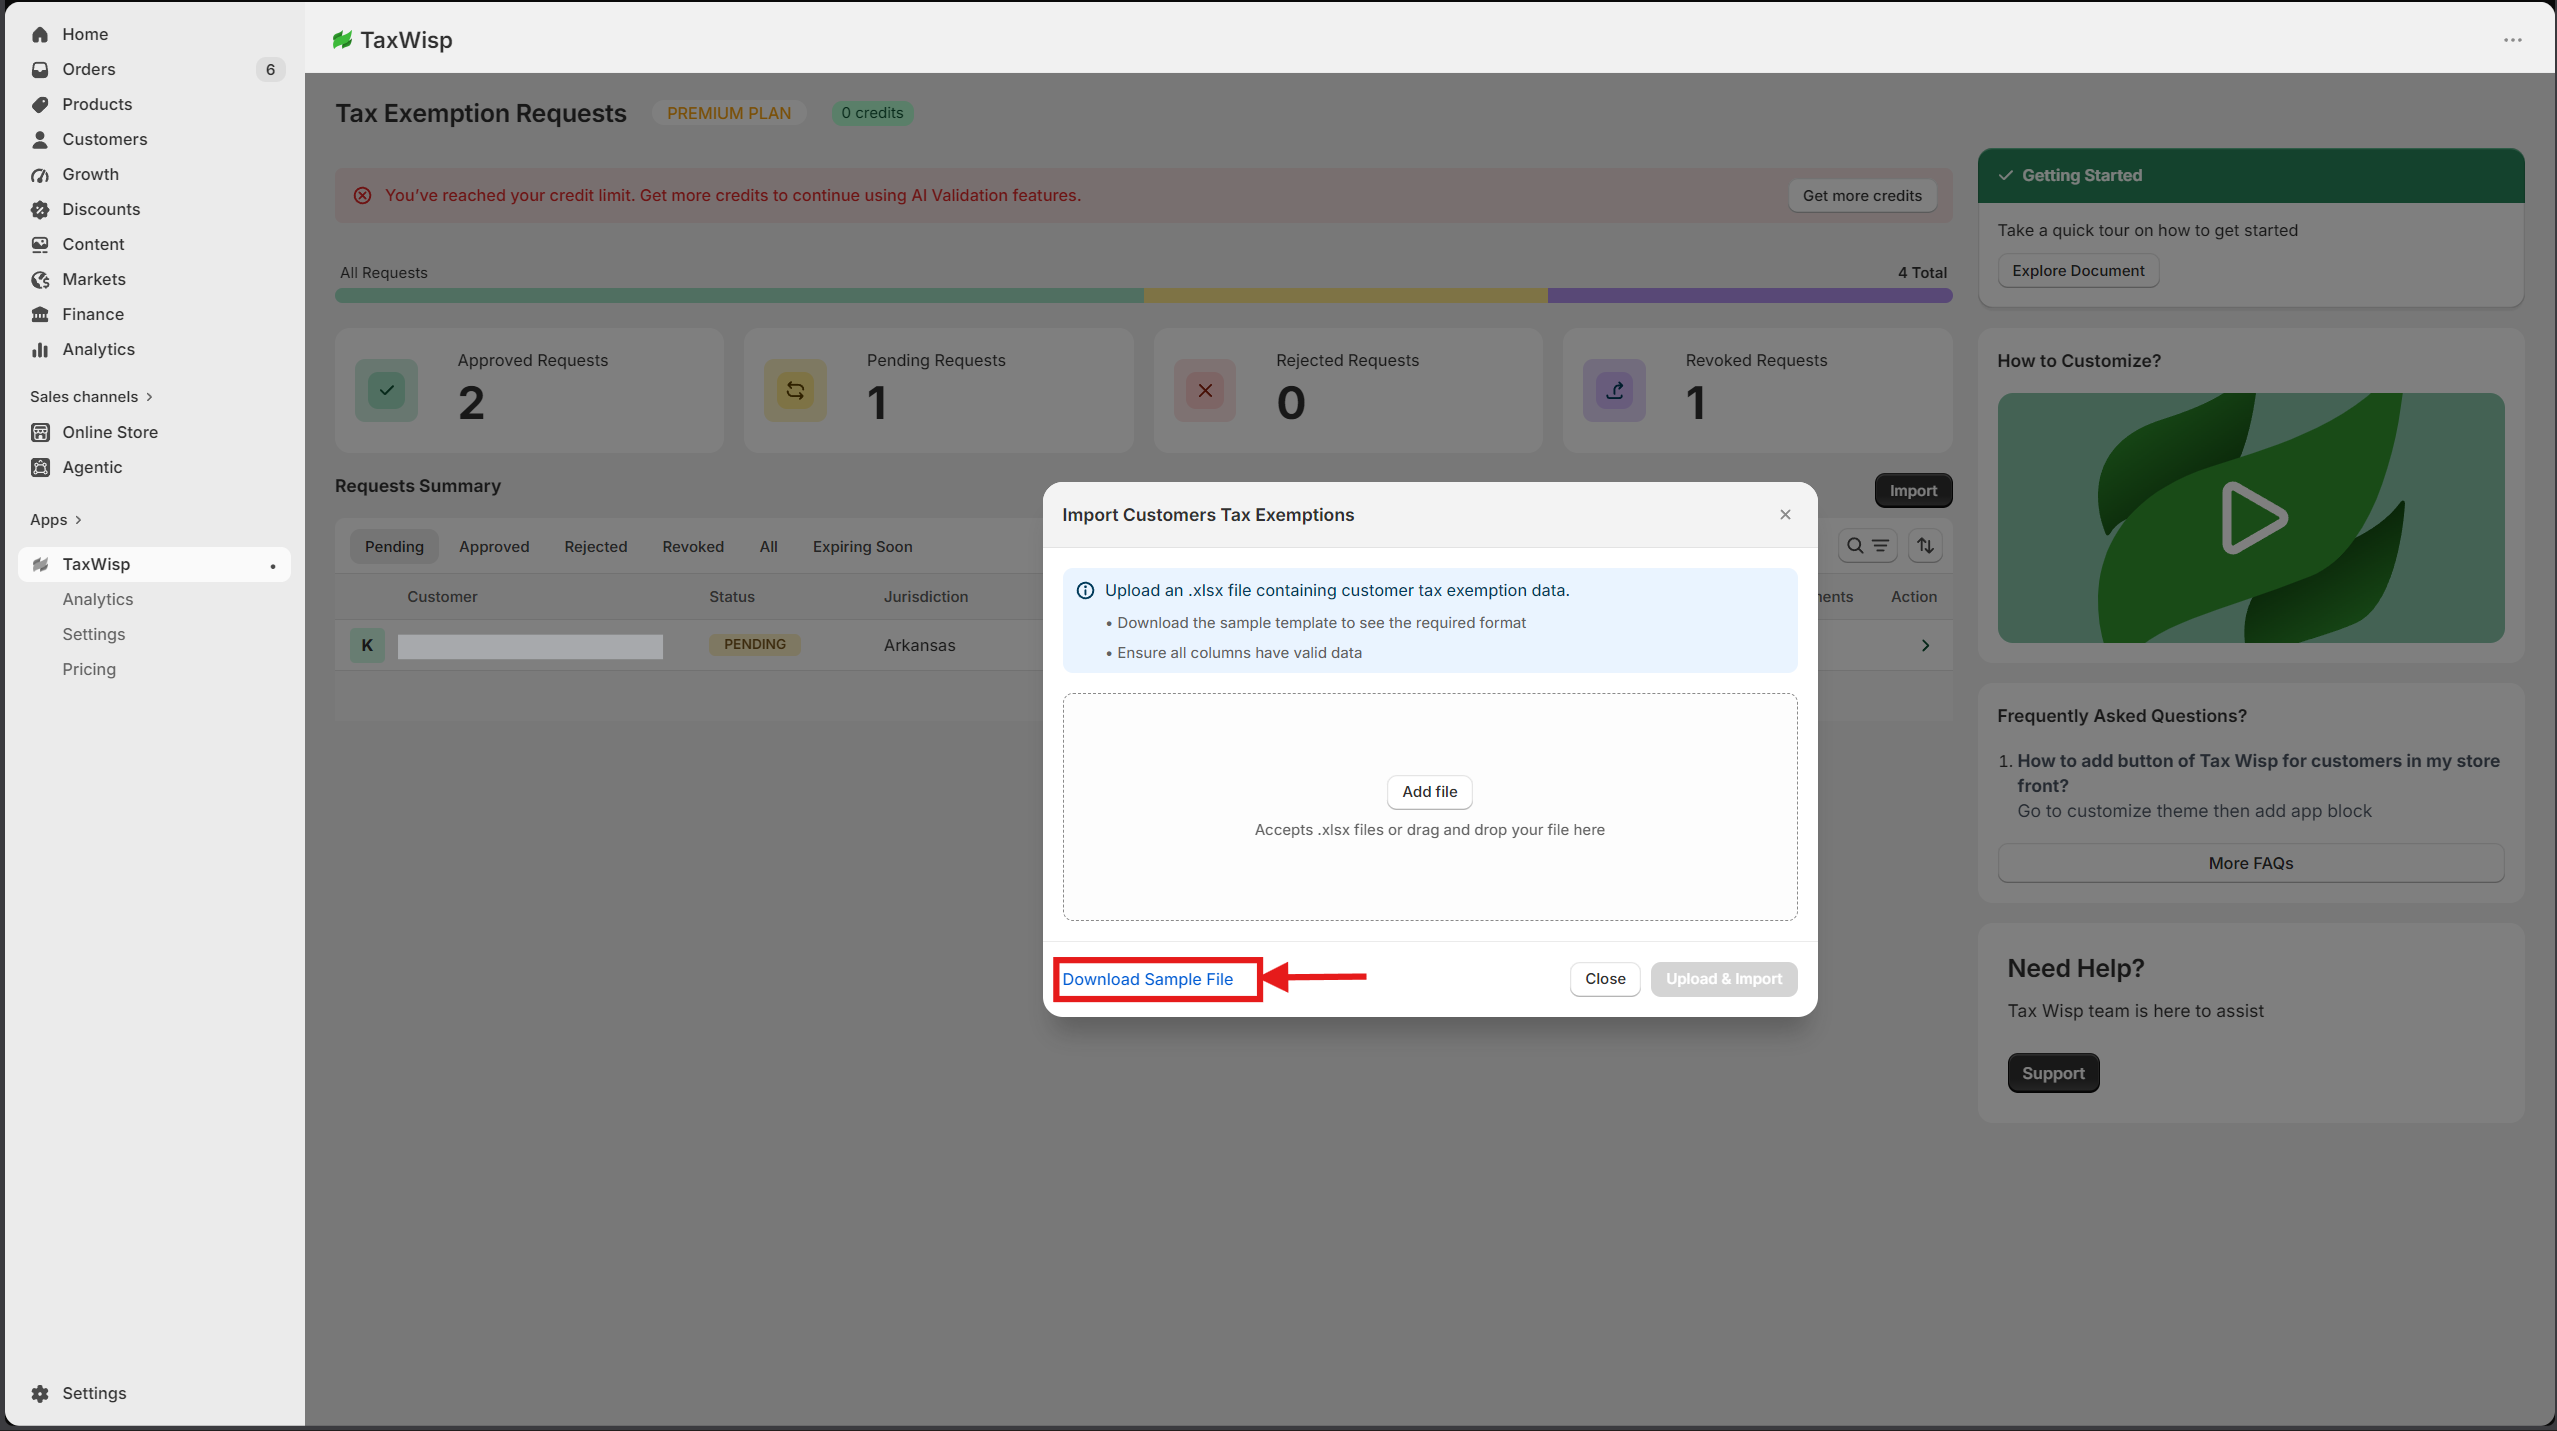
The template contains all supported fields required for importing tax-exempt customers.
Typical information includes:
- Customer Email Address
- Customer Name
- Exemption Category
- Tax Jurisdiction
- Exemption Expiry Date
Complete the template using your existing customer records before uploading it to TaxWisp.
Ensure all required fields are completed accurately before starting the import process.
Importing Customers
After preparing the import template:
- Open TaxWisp → Bulk Import.
- Click Add File.
- Select your completed import file.
- Review the uploaded information.
- Start the import process.
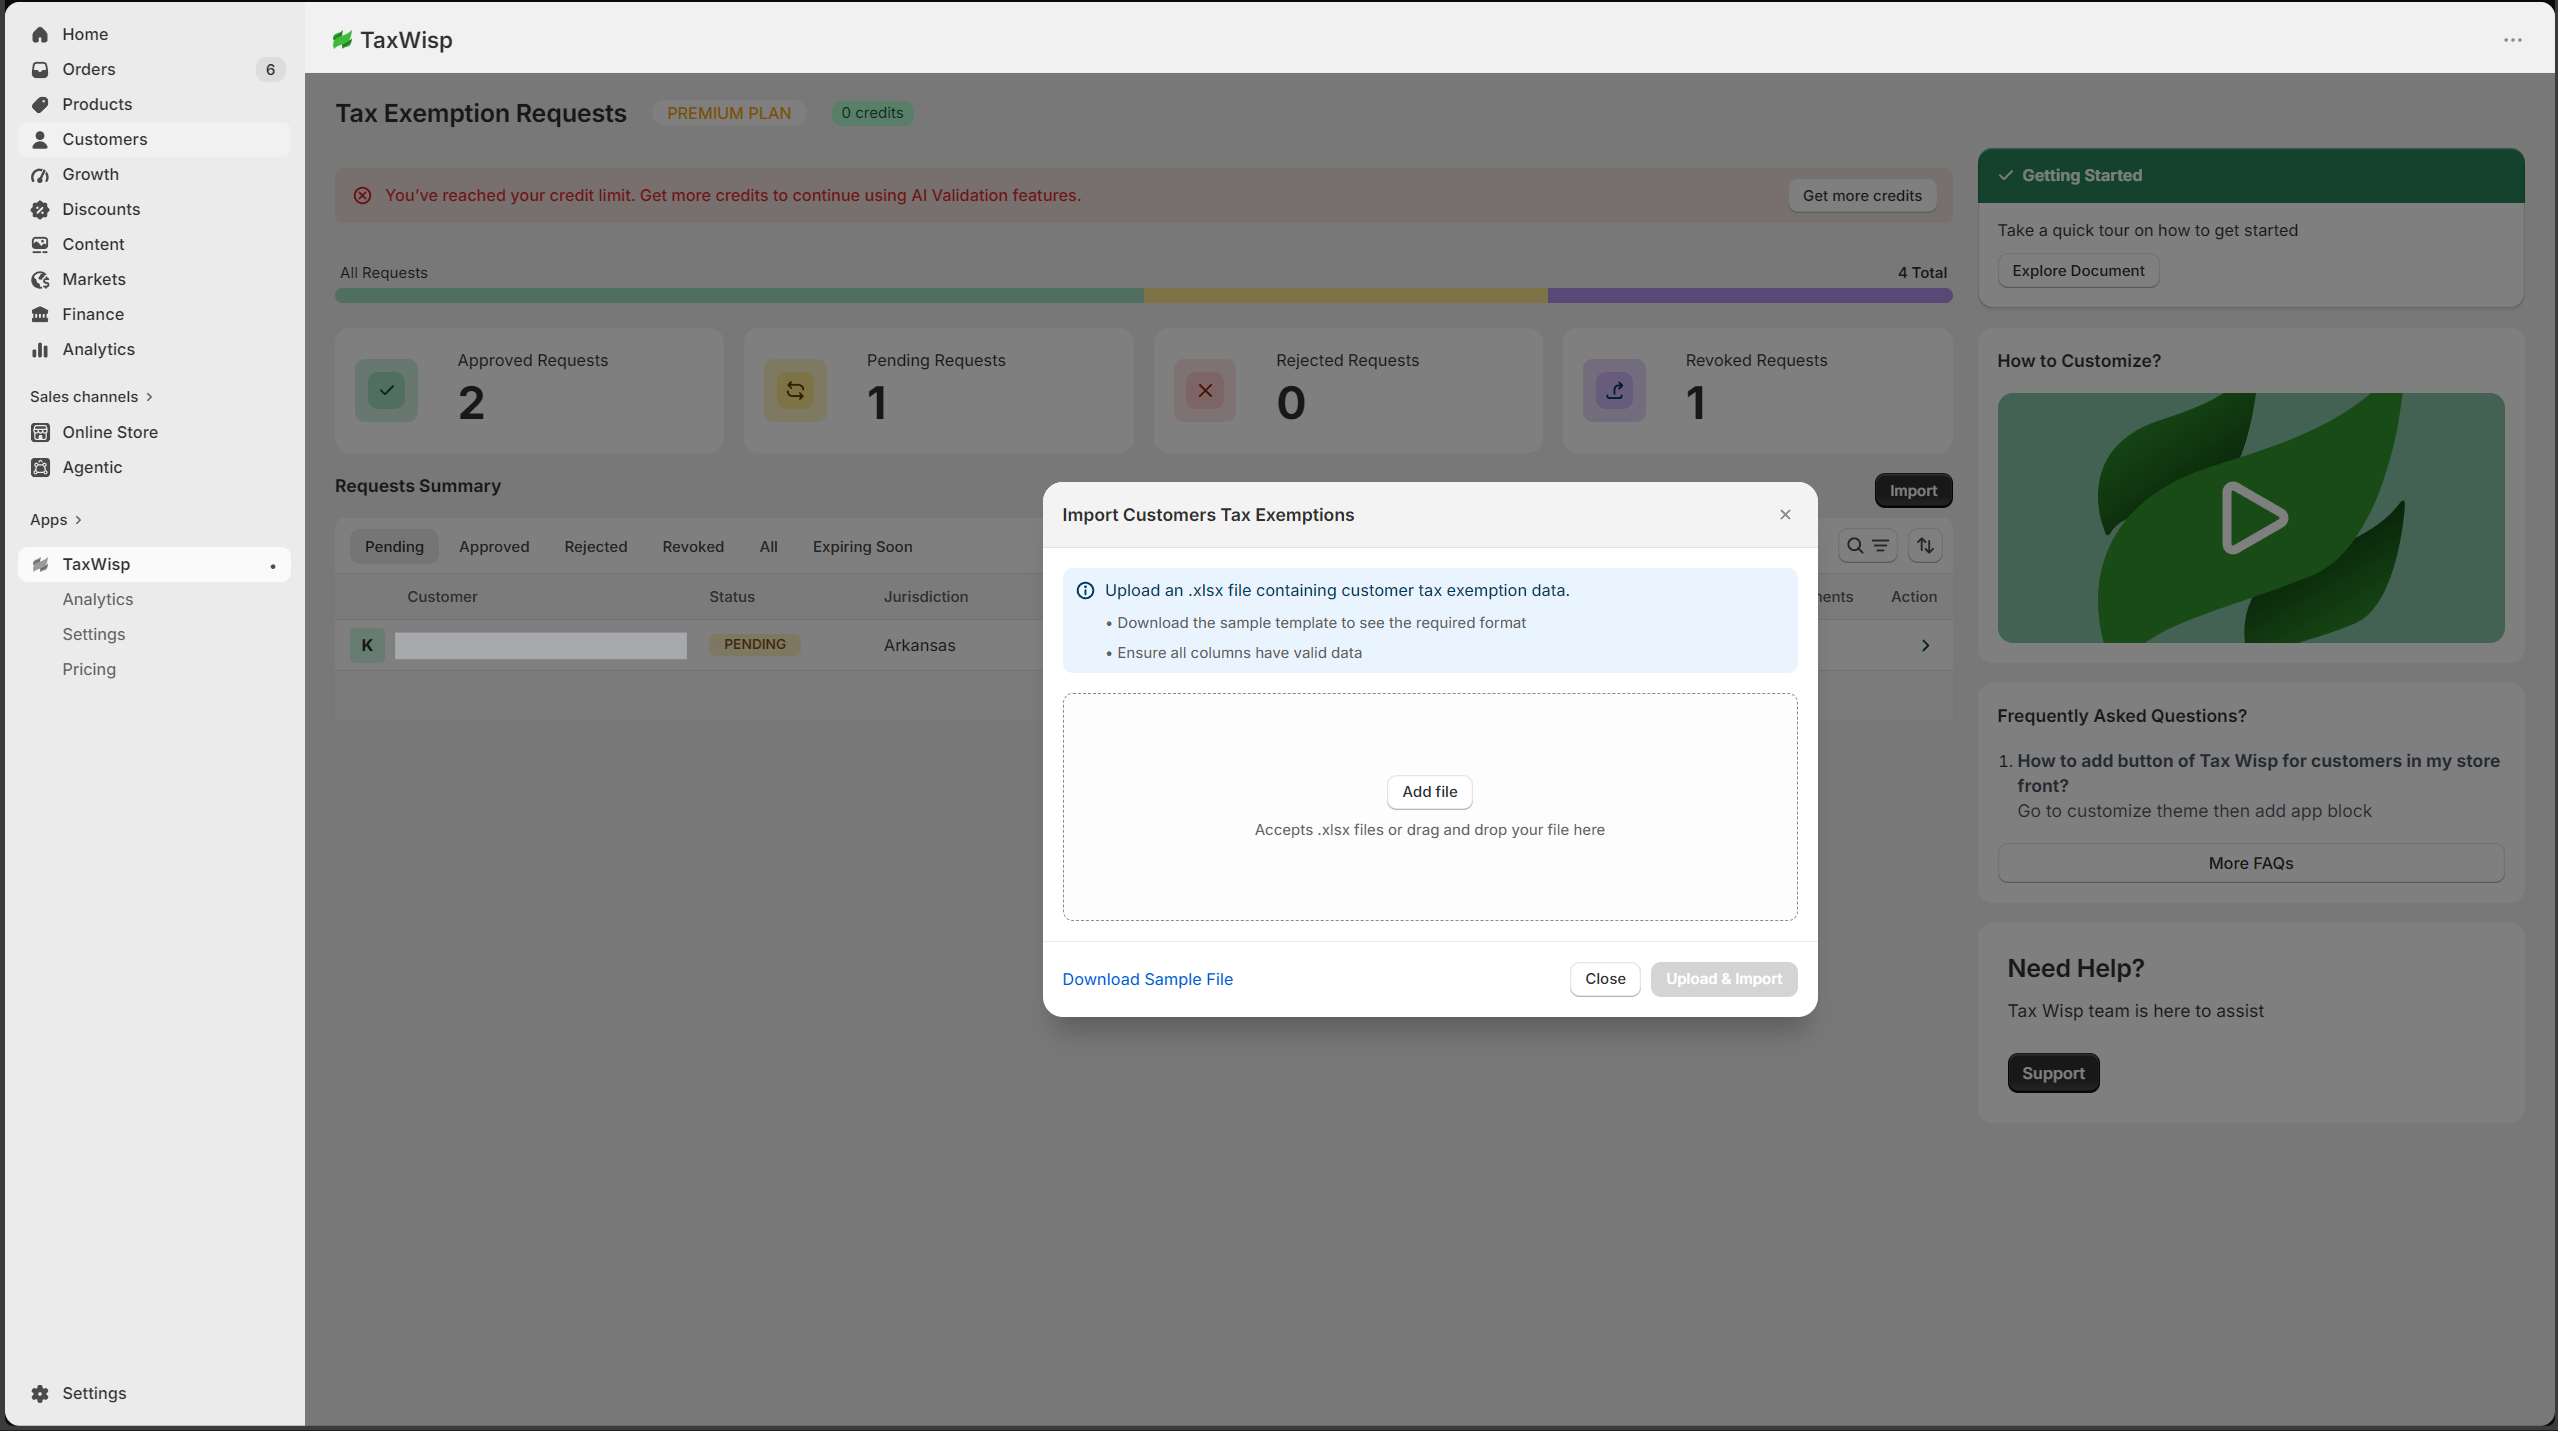
TaxWisp automatically validates the uploaded data before importing customer records.
Validation Process
During the import process, TaxWisp validates the uploaded information to help prevent common errors.
Validation includes checks such as:
- Required fields
- Customer email format
- Duplicate records
- Supported exemption categories
- Supported jurisdictions
- Valid expiry dates
If validation issues are detected, TaxWisp identifies the affected rows so they can be corrected before completing the import.
Best Practices
For the best migration experience, we recommend:
- Review and clean your existing customer data before importing.
- Ensure customer email addresses are accurate.
- Verify exemption expiry dates before migration.
- Remove duplicate customer records.
- Import a small sample first to verify your data before importing large datasets.
- Keep a backup of your original spreadsheet before starting the migration.
Benefits of Bulk Import
Using Bulk Import helps merchants:
- Onboard existing tax-exempt customers quickly.
- Eliminate repetitive manual data entry.
- Preserve existing exemption information.
- Accelerate TaxWisp implementation.
- Reduce customer disruption during migration.
- Scale onboarding for enterprise and high-volume stores.
Subscription Plans
TaxWisp offers flexible subscription plans designed to support businesses of every size, from stores just beginning to manage tax exemptions to enterprise organizations processing large volumes of exemption requests.
Each plan builds upon the previous one, providing additional automation, analytics, AI-powered validation, and enterprise features as your business grows.
TaxWisp Basic Plan
The Basic Plan is ideal for merchants who are getting started with tax exemption management and process a limited number of exemption requests.
Included Features:
- Up to 30 approved tax exemption requests
- Manual approval workflow
- Auto Approval (Approve All Requests)
- Tax Exemption Audit History
- Storefront tax exemption extensions
- Customer Portal
- Communication emails
- Customer tags
- Basic exemption management
This plan is well suited for smaller businesses with occasional tax-exempt customers.
TaxWisp Standard Plan
The Standard Plan is designed for growing businesses that require unlimited exemption processing and better visibility into customer activity.
Everything included in Basic, plus:
- Unlimited exemption approvals
- Analytics Dashboard
- Reports
- Chat-Based Customer Recommendation
- Co-branding
- Certificate expiry management
- Customer experience customization
This plan is recommended for merchants processing tax exemptions regularly and looking to improve operational efficiency.
TaxWisp Premium Plan
The Premium Plan provides the complete TaxWisp experience with advanced automation, AI-powered validation, and enterprise-ready features.
Everything included in Standard, plus:
- AI Co-Pilot Document Validation
- Criteria-Based Auto Approval
- Monthly AI Validation Credits
- Purchase Additional AI Credit Bundles
- Bulk Import
- Tax Exemption Preclaim
- Export Reports
- Flexible Exemption Form Submission (Storefront or Customer Portal)
- Storage Provider Selection
- Advanced compliance workflows
The Premium Plan is ideal for businesses processing large volumes of exemption requests or looking to automate their exemption workflow while maintaining compliance.
Choosing the Right Plan
Choose the plan that best matches your business requirements:
- Basic – Best for stores beginning to manage tax-exempt customers with lower request volumes.
- Standard – Ideal for growing businesses that need unlimited approvals, analytics, and a more personalized customer experience.
- Premium – Designed for high-volume and enterprise merchants seeking AI-powered automation, advanced compliance workflows, and the most flexible customer experience.
As your business grows, you can upgrade your TaxWisp subscription at any time to unlock additional capabilities without disrupting your existing tax exemption data or customer records.
When store owner uninstalls the TaxWisp app from the Shopify store, previously exempted customers will remain tax-exempt even after the app is uninstalled.
By following this configuration guide, you can tailor the TaxWisp Shopify App to optimize tax exemption processes and deliver a seamless experience for both, your store and your customers. If you encounter any challenges or need assistance during the configuration process, don't hesitate to reach out to our Support Team for help. We're here to ensure your success with our app.