Stores on Shopify Plus Plan
Thank you for choosing TaxWisp to streamline your tax exemption process and enhance your customers' shopping experience. This installation guide is designed for stores on Shopify Plus plan and helps you to successfully install TaxWisp on your store.
Follow these simple steps to install the Tax Wisp App:
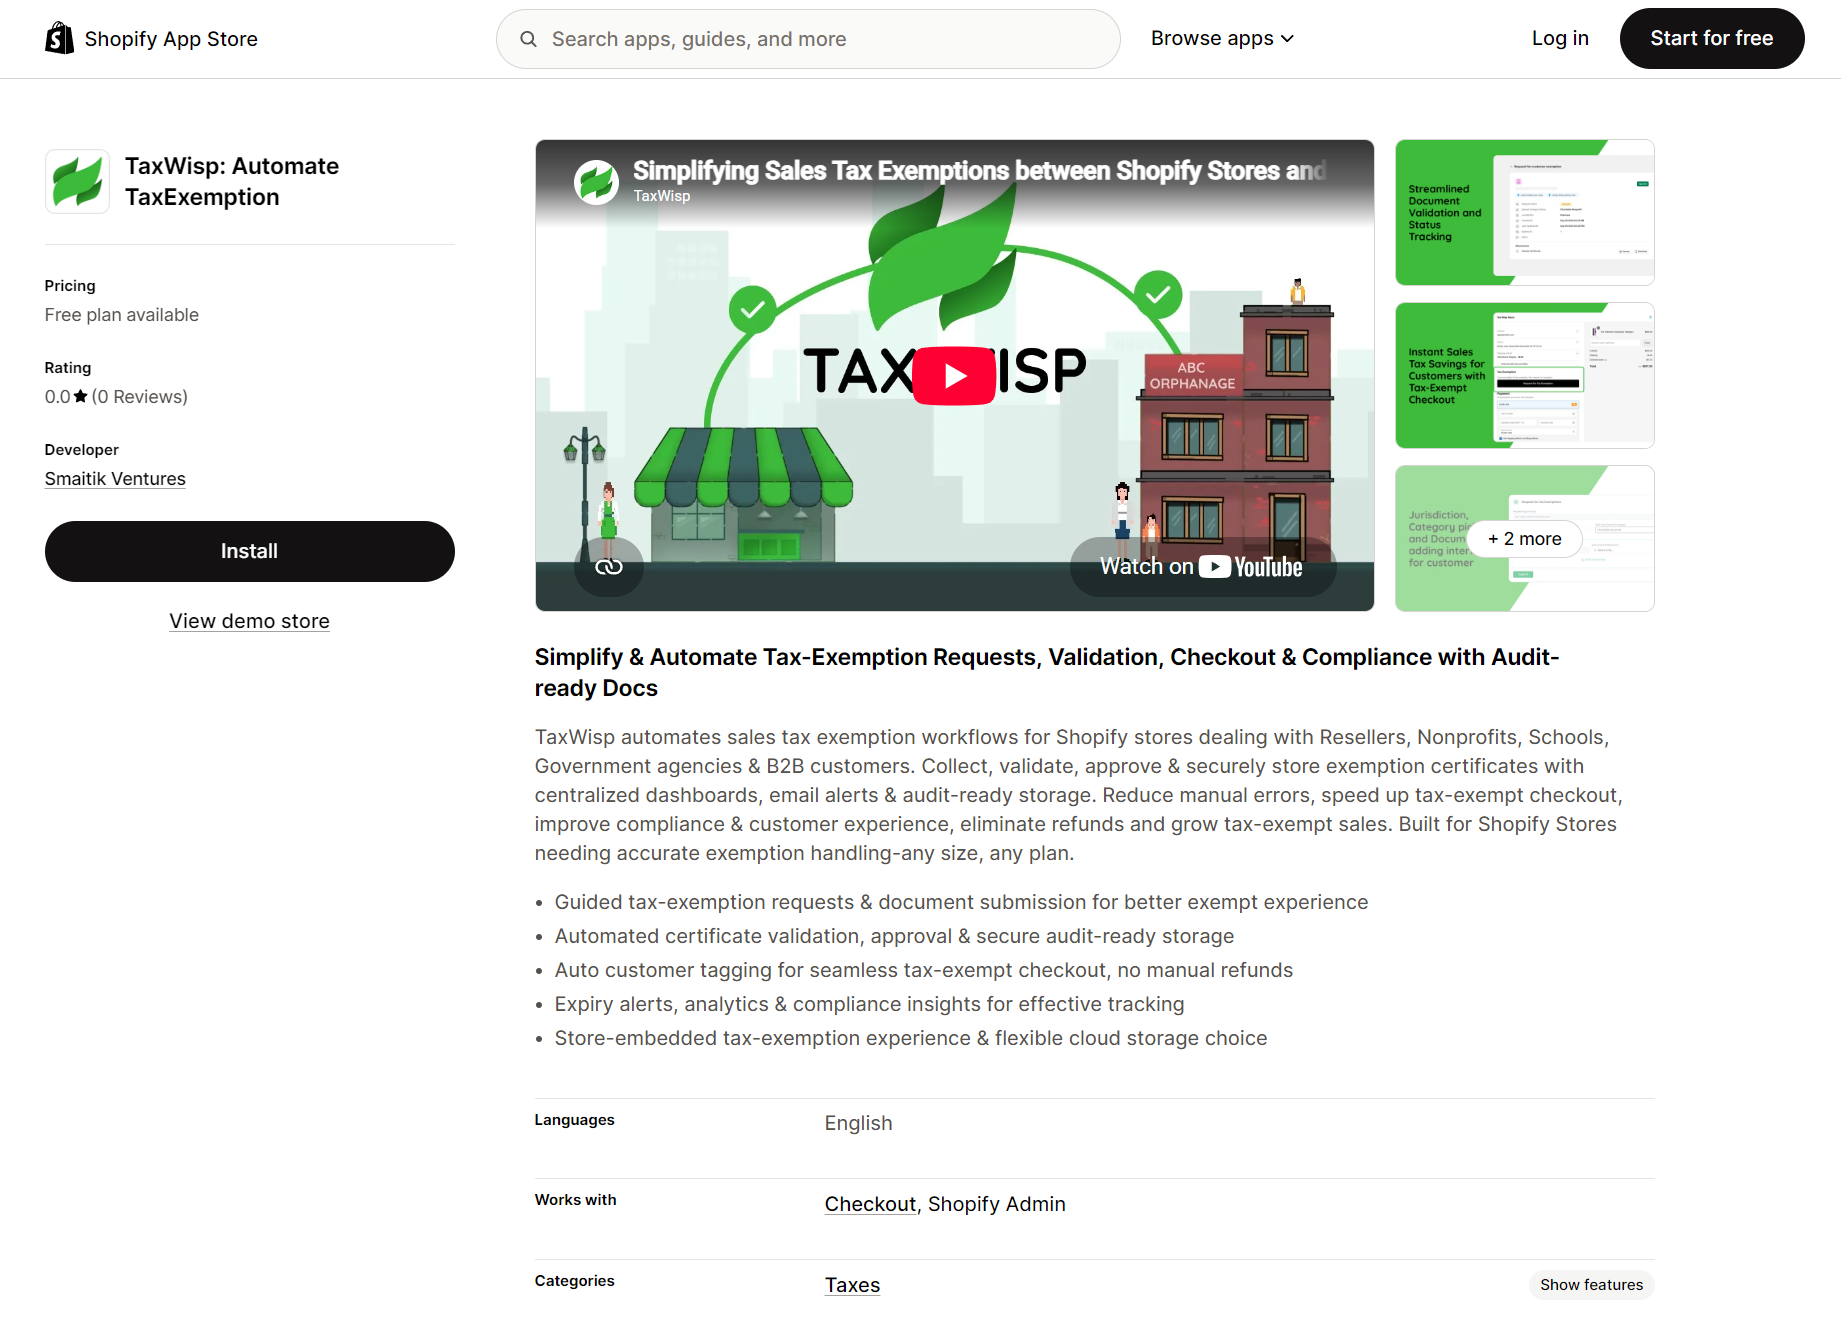
Step 1: Access the Shopify App Store
Alternatively, open your web browser and navigate to the Shopify App Store. Use the search bar to find the TaxWisp App.
Step 2: Install the App
- Once you have located the TaxWisp Shopify App, click on it to view more details.
- Review the app description and features to ensure it meets your requirements.
- Click on the "Install" button to initiate the installation process.
Step 3: Log in to Your Shopify Account
- You will be prompted to log in to your Shopify account if you're not already logged in.
Step 4: Installing TaxWisp
-
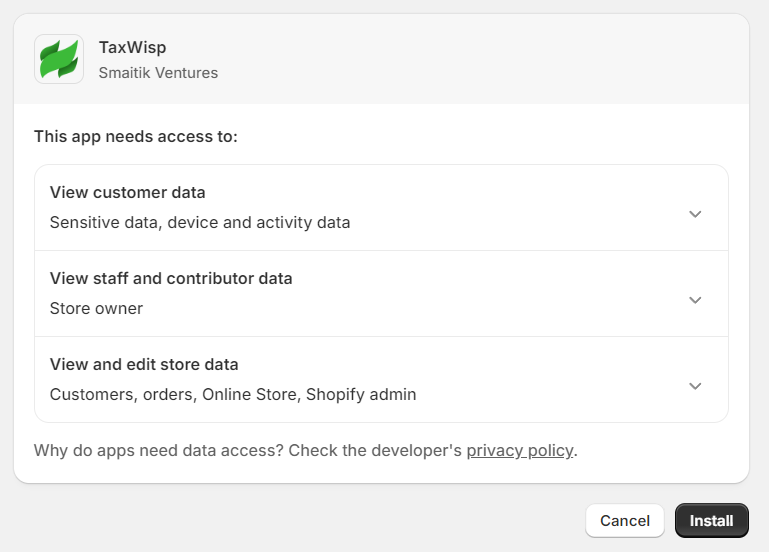
After logging in, Shopify will ask for permission to install the TaxWisp app on your store. Review the permissions requested and click "Install app" to continue. TaxWisp needs access to store data including customers, store owner and products within the shopify store.
-
Follow any additional prompts or instructions provided by Shopify to complete the installation process.
Step 5: Adding TaxWisp App Icon (%) on Your Online Store Header
After installing TaxWisp, you must add the TaxWisp extension to your storefront. This enables customers to access the tax exemption request flow directly from your online store.
There are two ways to open the Theme Editor and add the extension.
Method 1: Using the Dashboard Shortcut (Recommended)
-
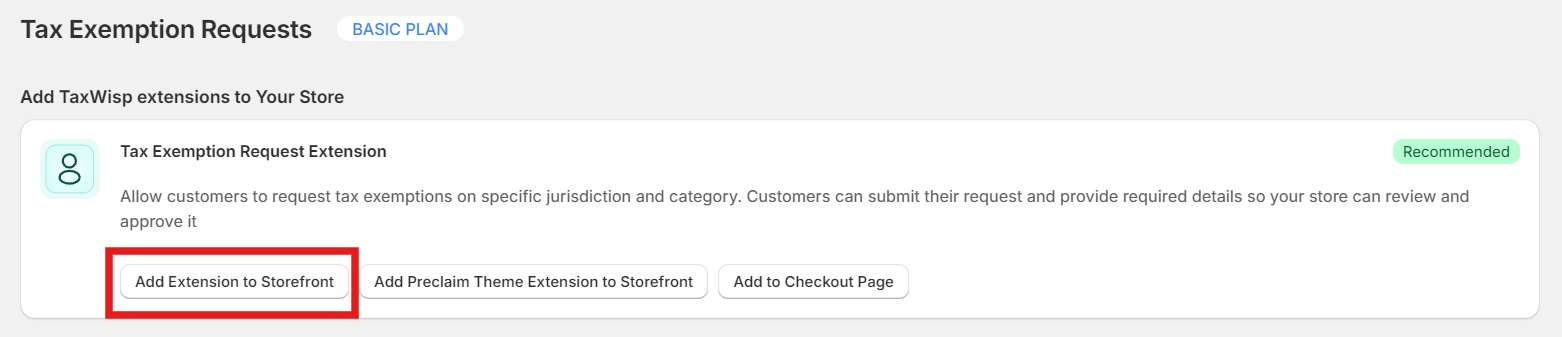
Open Shopify Admin → Apps → TaxWisp.
-
From the TaxWisp Dashboard, click Add Extension to Storefront.
-
You'll be redirected to the Shopify Theme Editor with the TaxWisp extension ready to be added to your Header.
Method 2: Using the Shopify Theme Editor
-
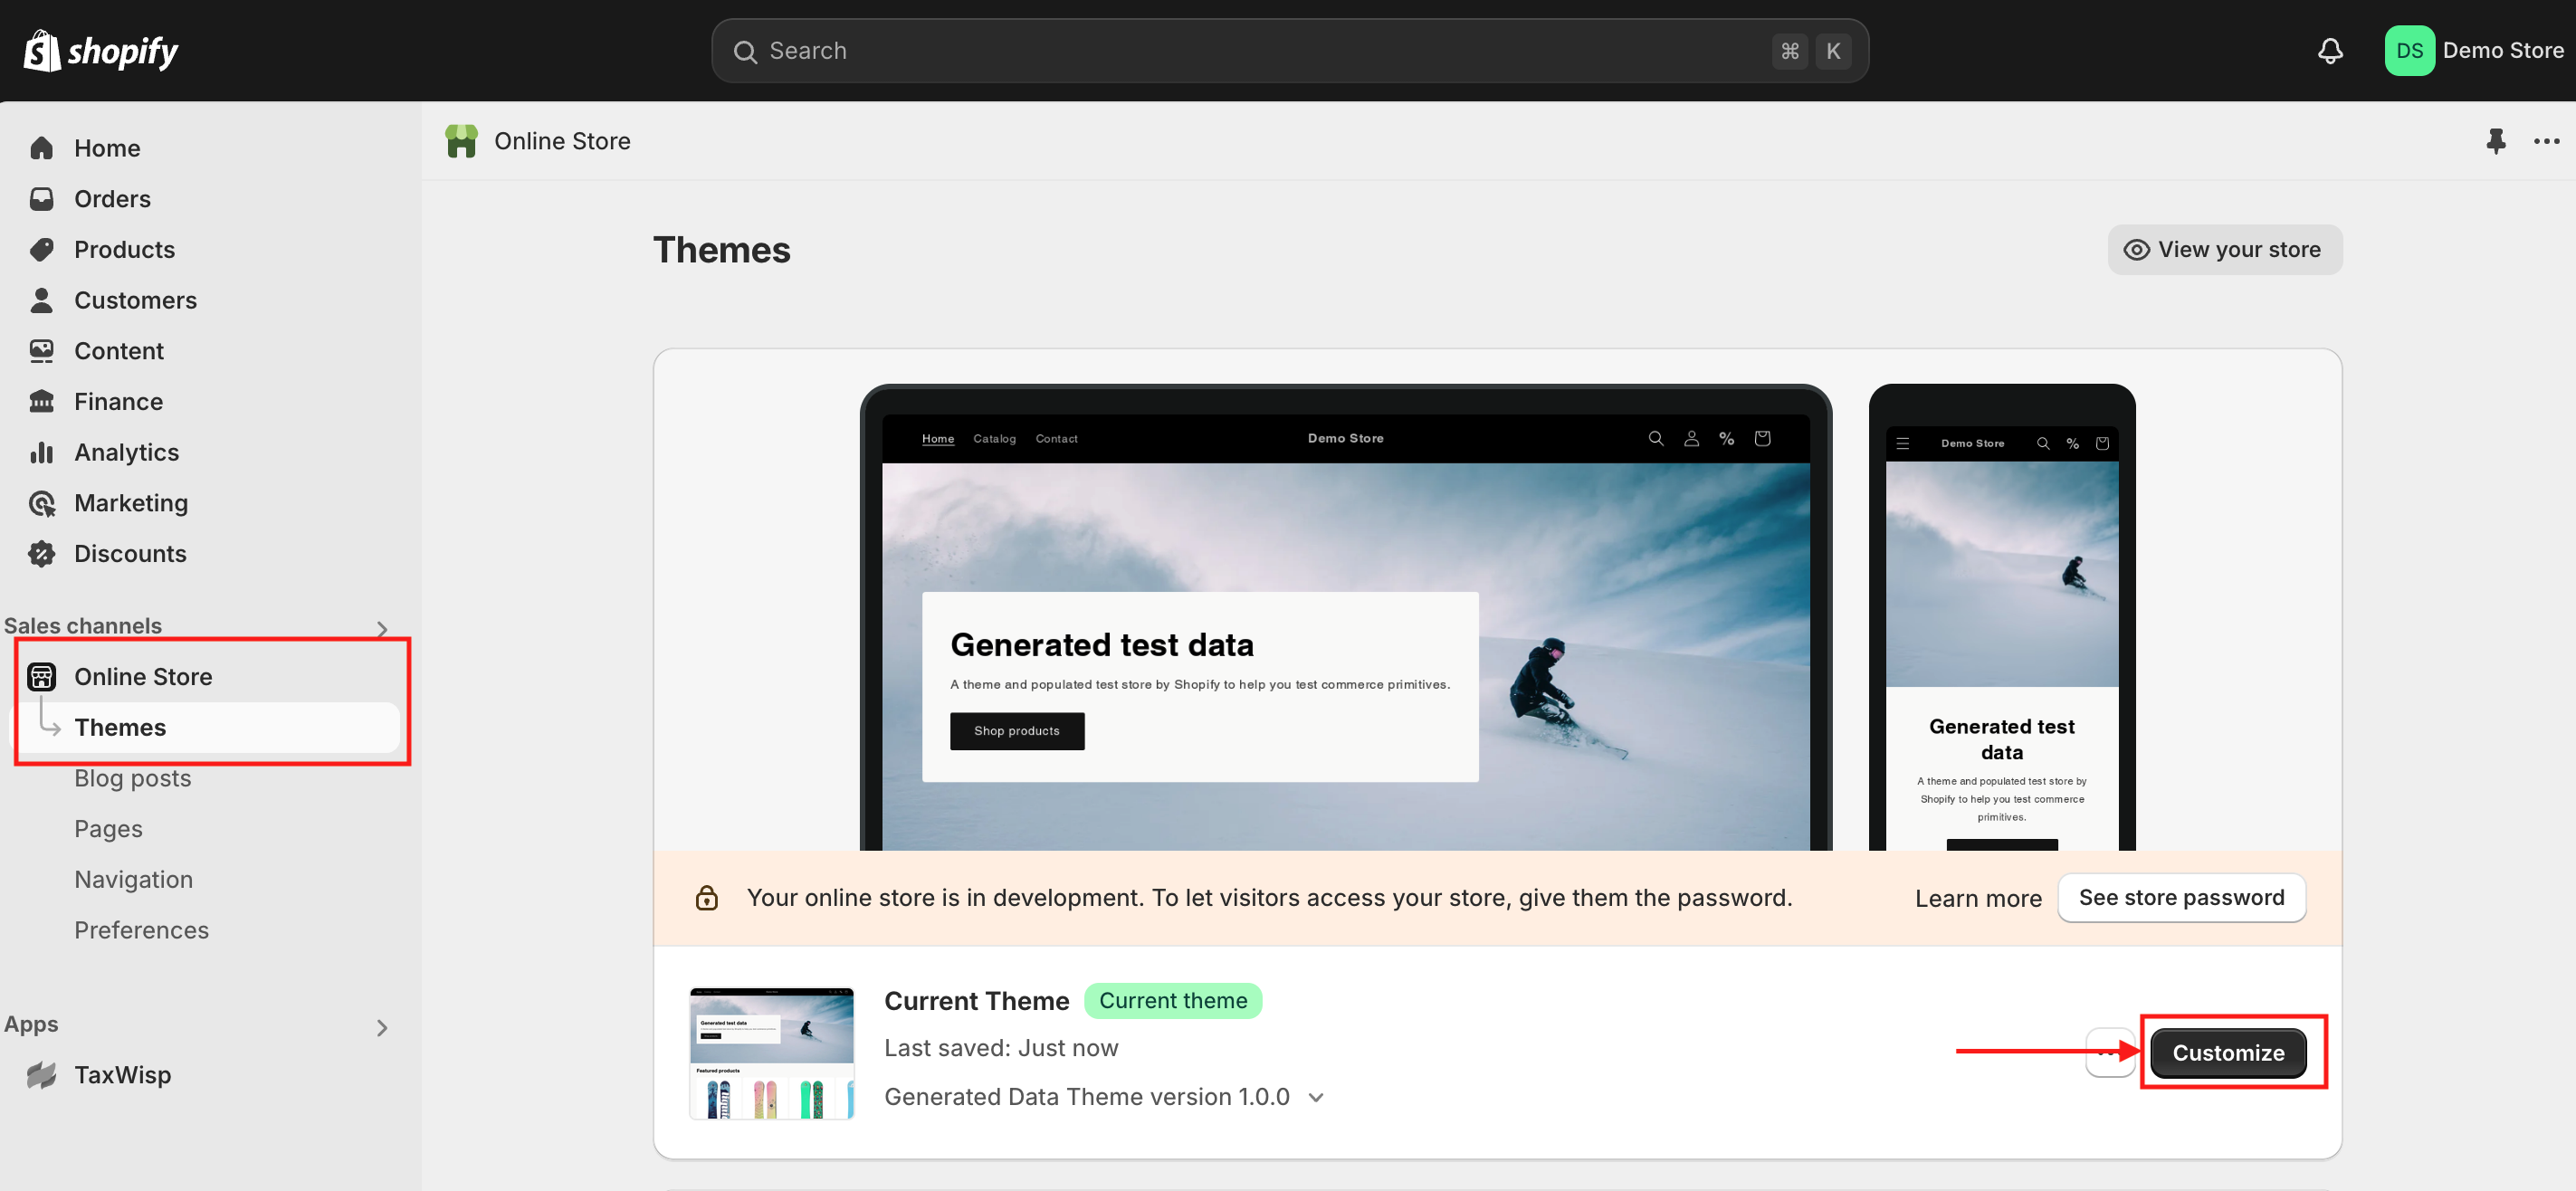
In your Shopify Admin, navigate to Online Store under Sales Channels, then click on Themes and select Customize.
-
You’ll be taken to the Theme Customization page. From the navigation, select Header.
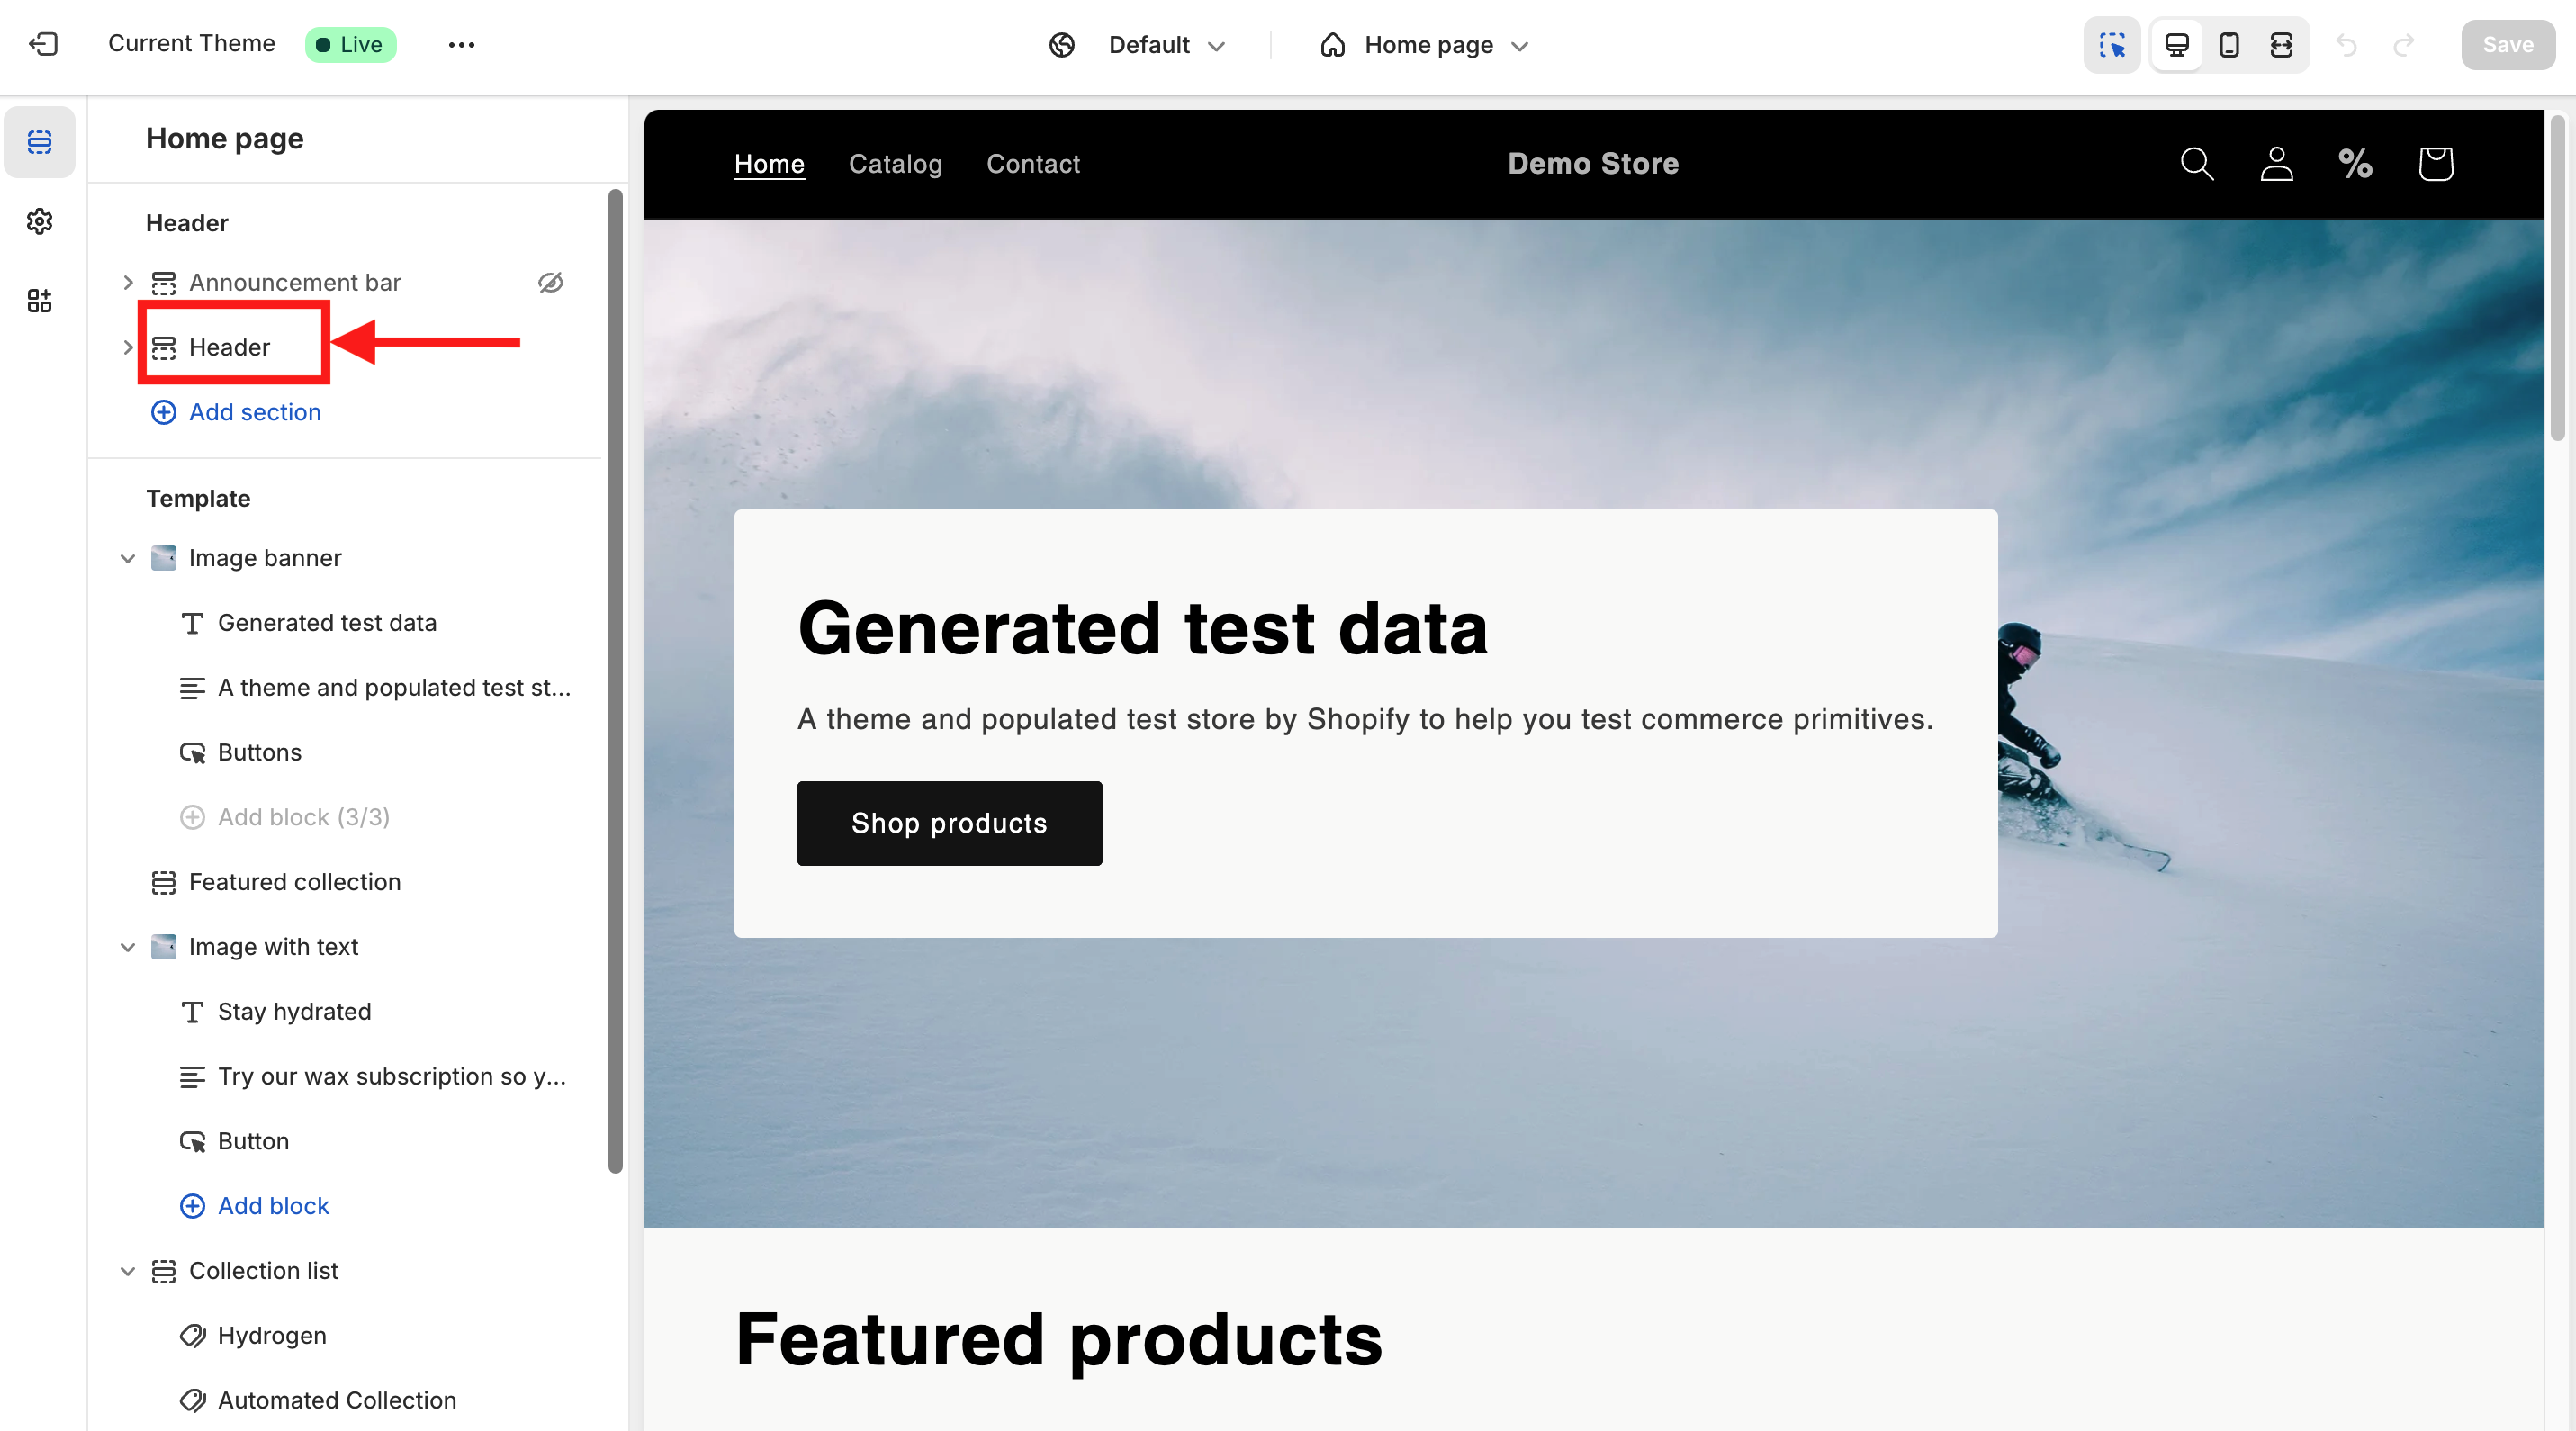
-
In the Header section, you’ll see an option to Add Block. Click on it.
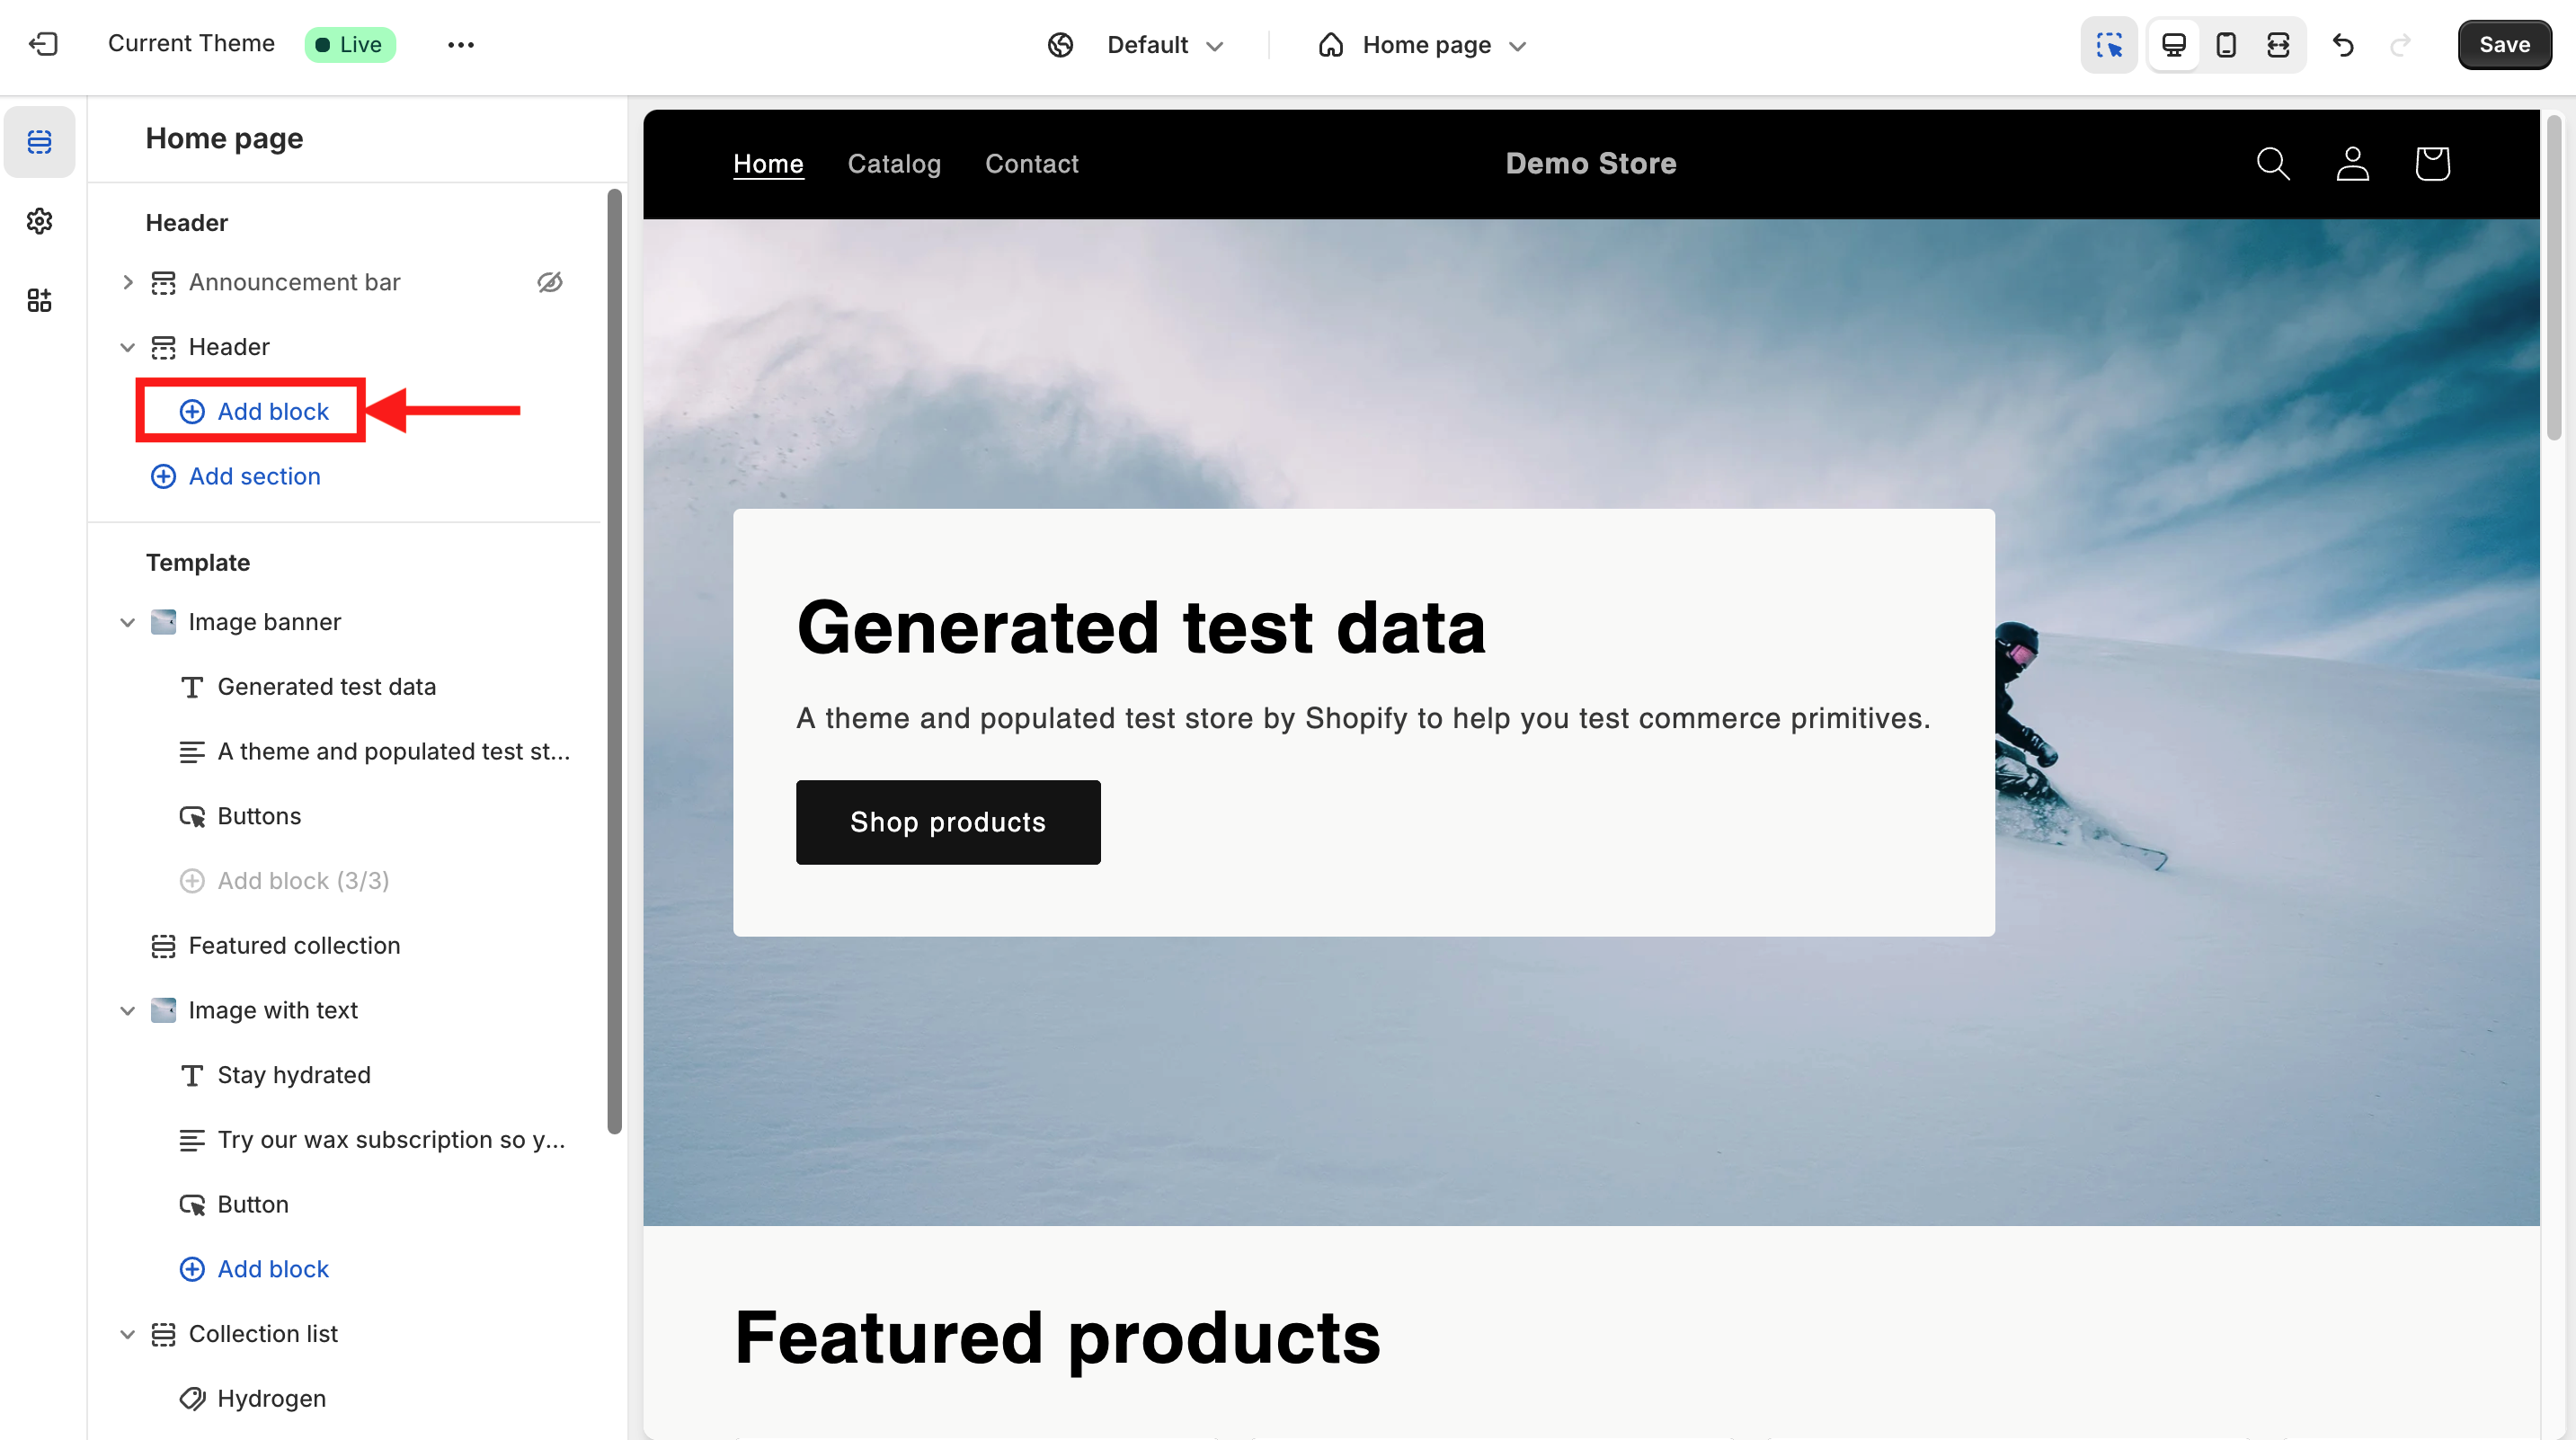
-
This will open a prompt where you can search for blocks and apps.
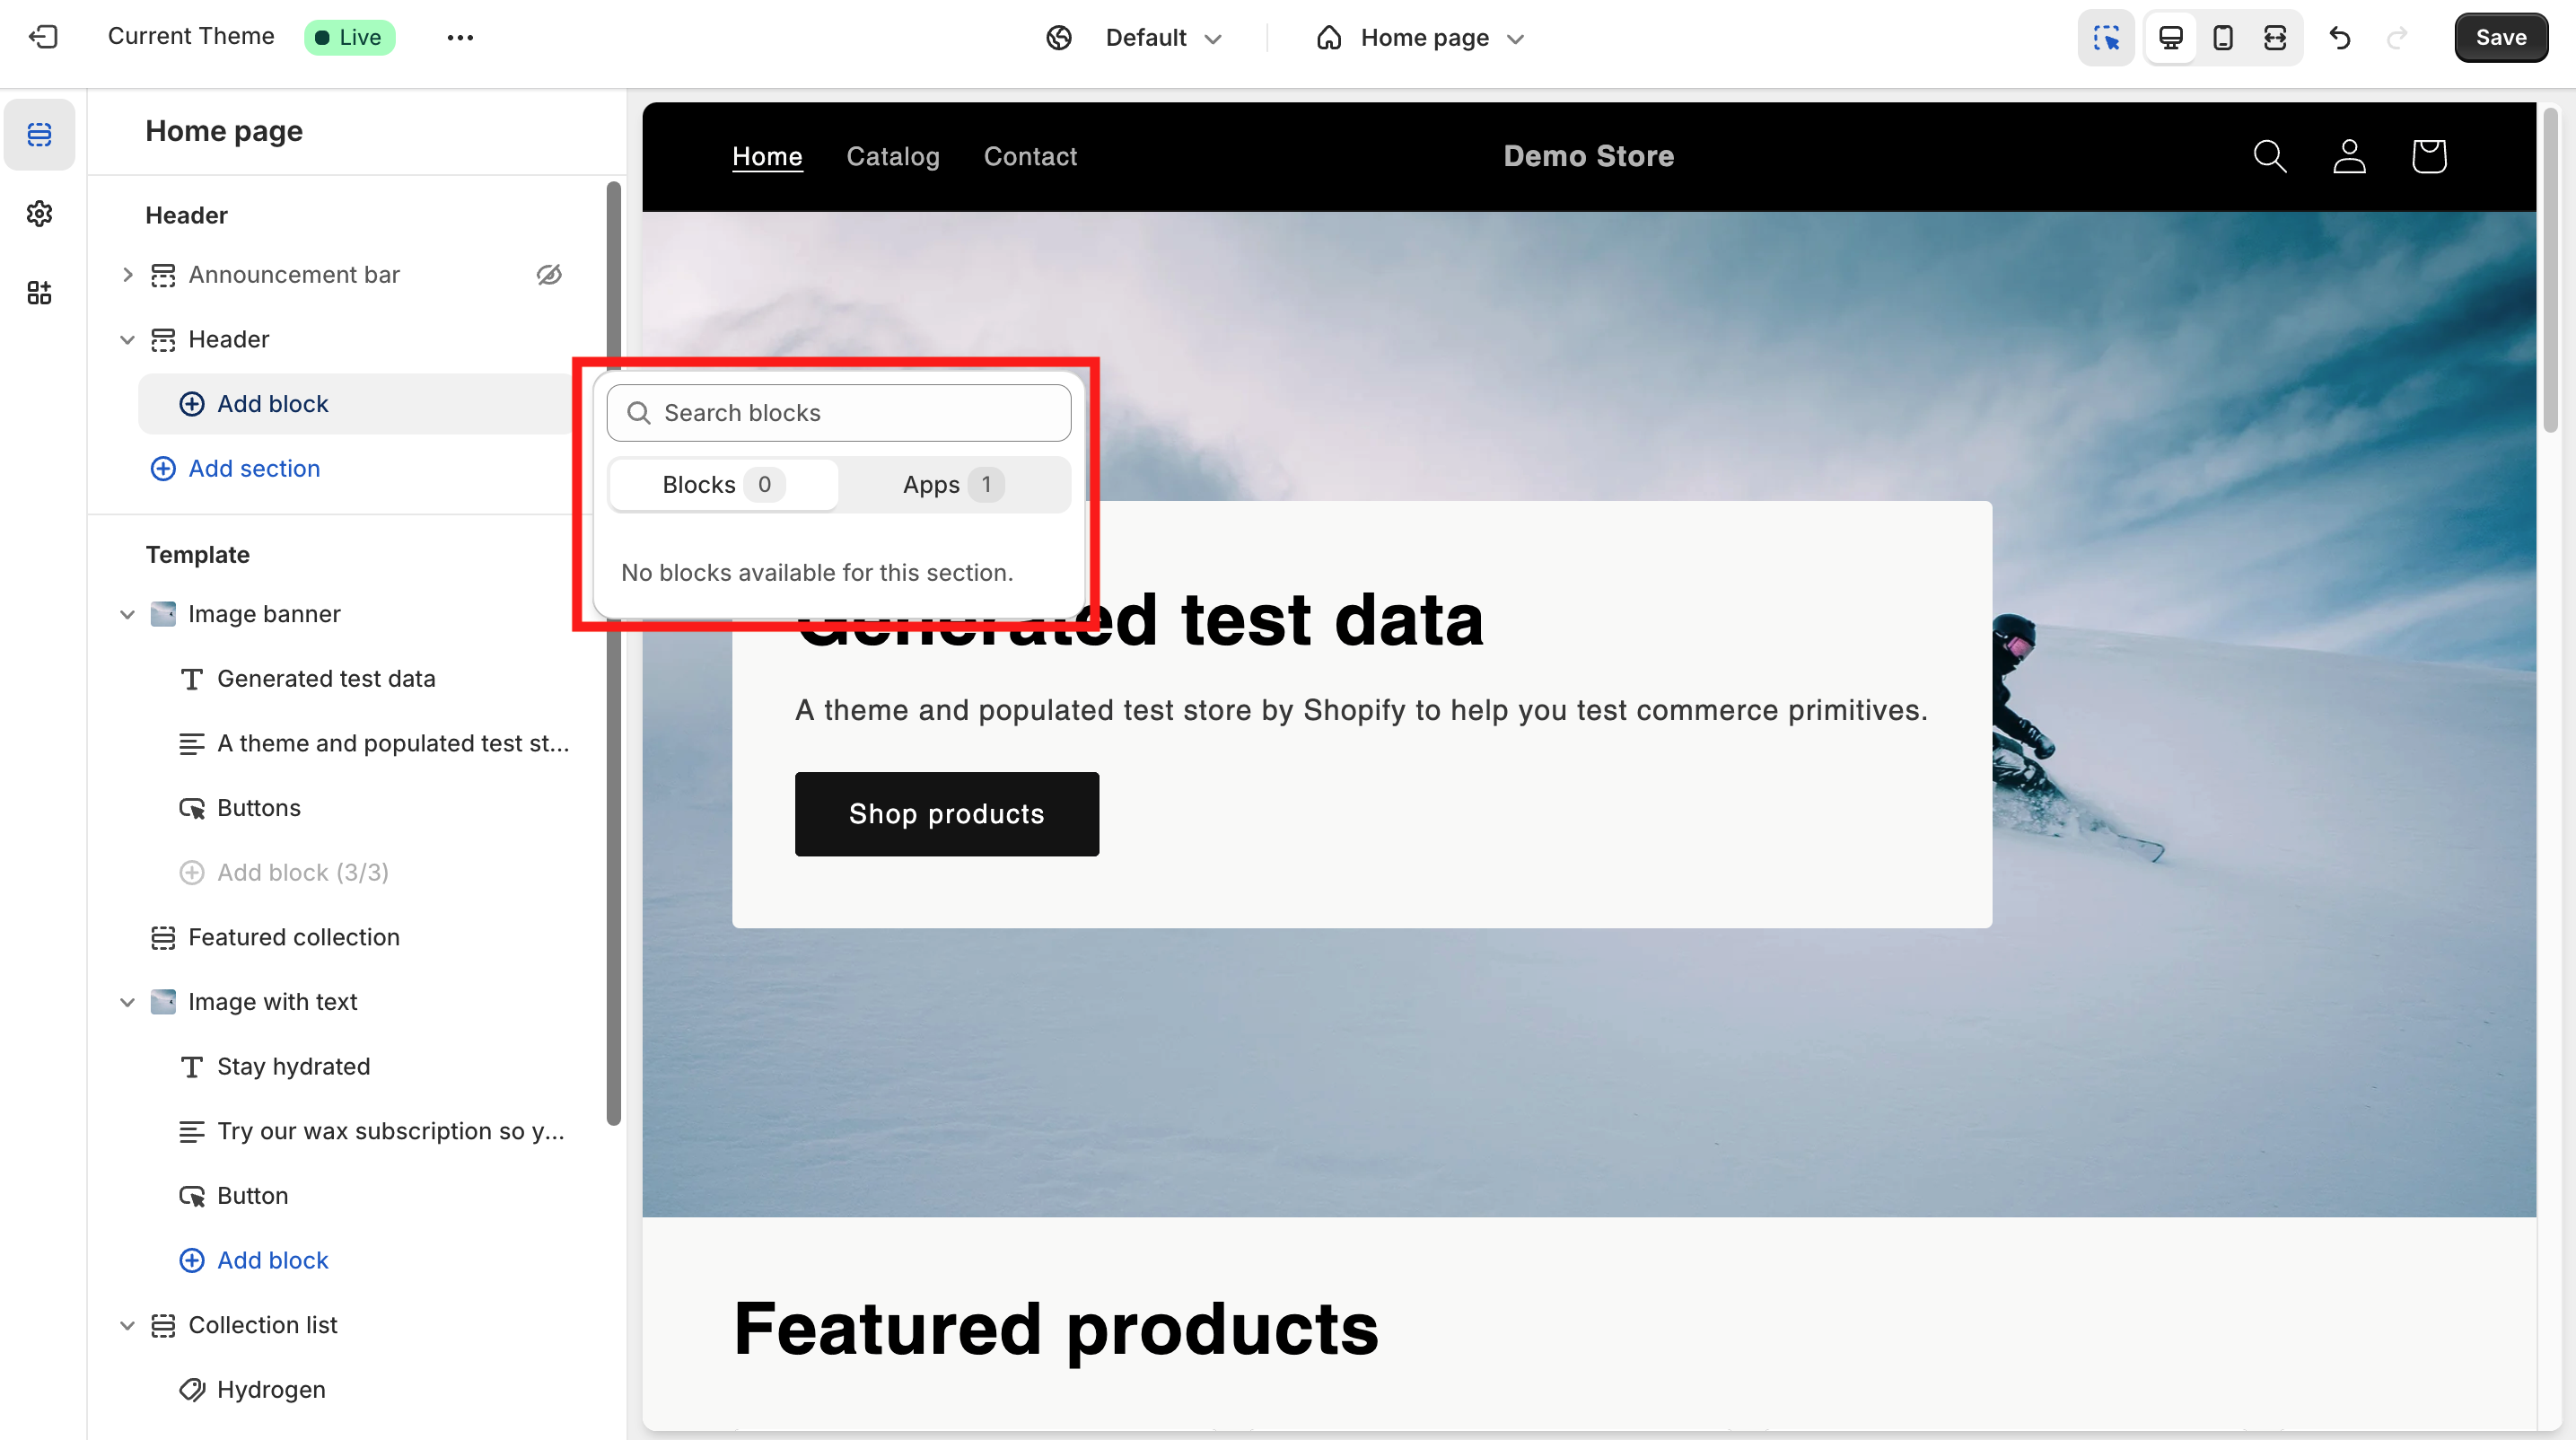
-
Click on Apps, and you’ll see TaxWisp listed.
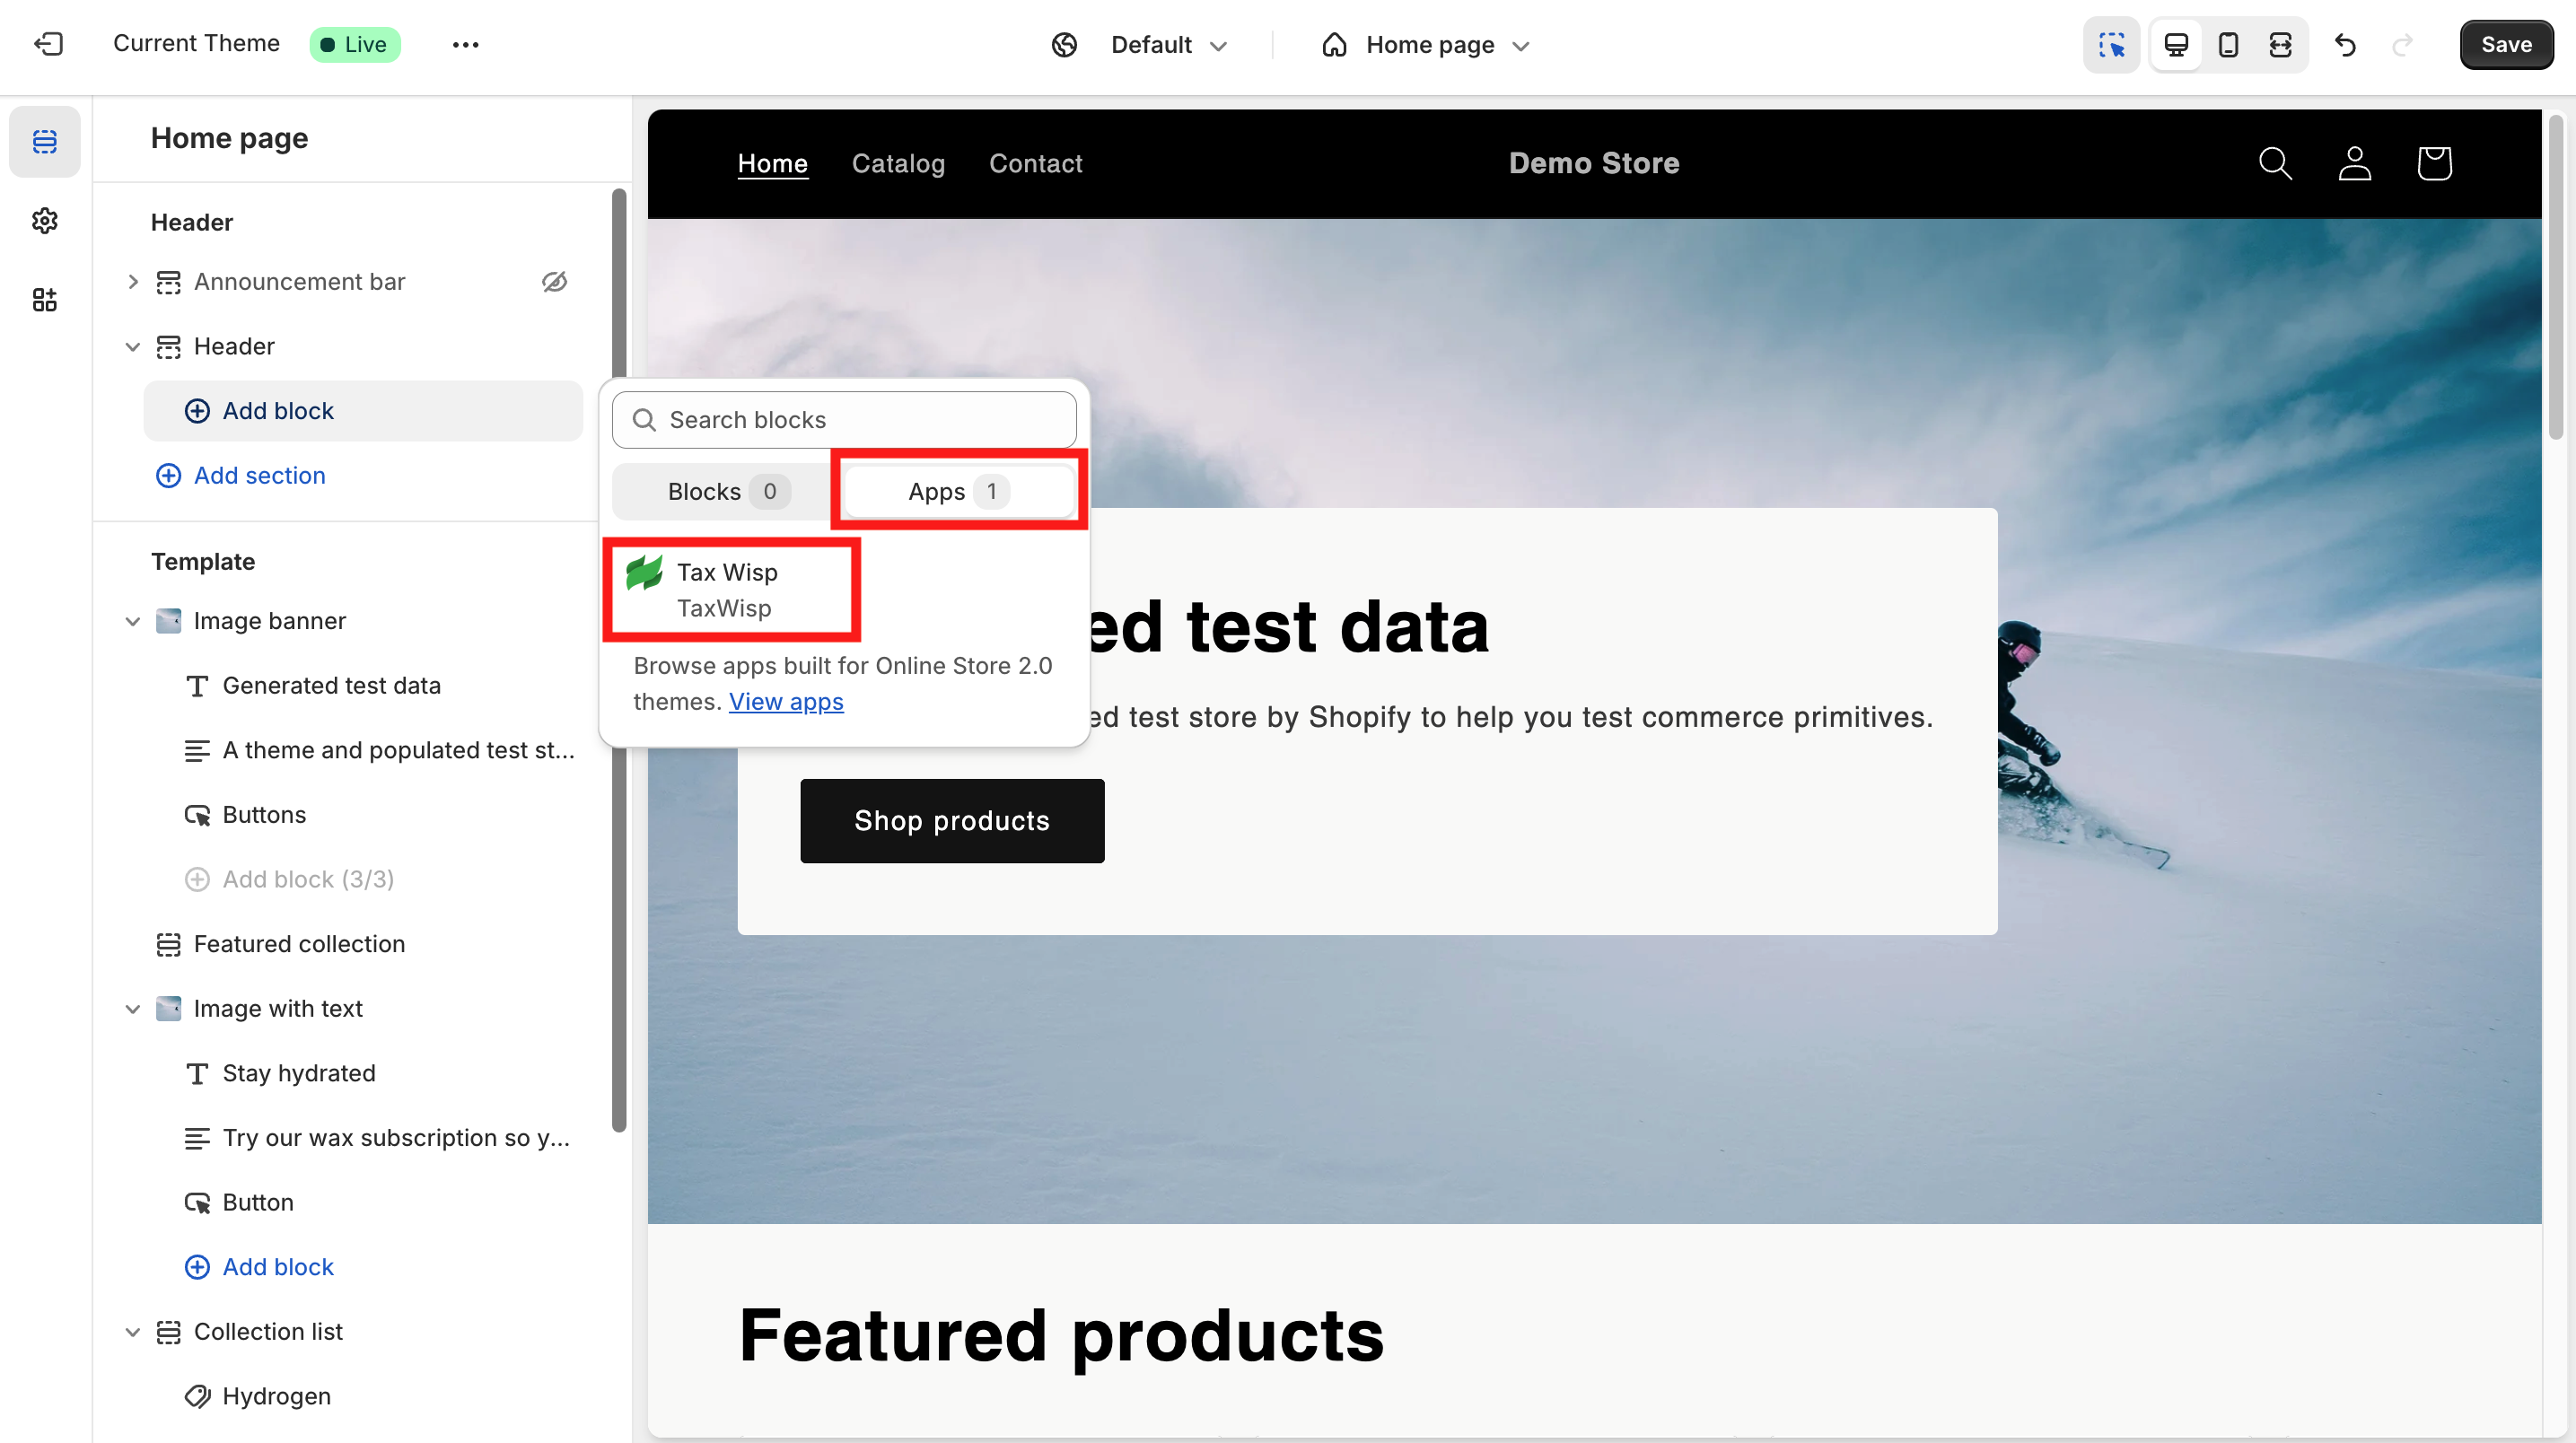
-
Select TaxWisp to add the app icon to your header.
Once the TaxWisp app block has been added, the extension customization panel will appear.
Configure the Header Extension
Since this extension is being added to your Store Header, only a few settings require configuration.
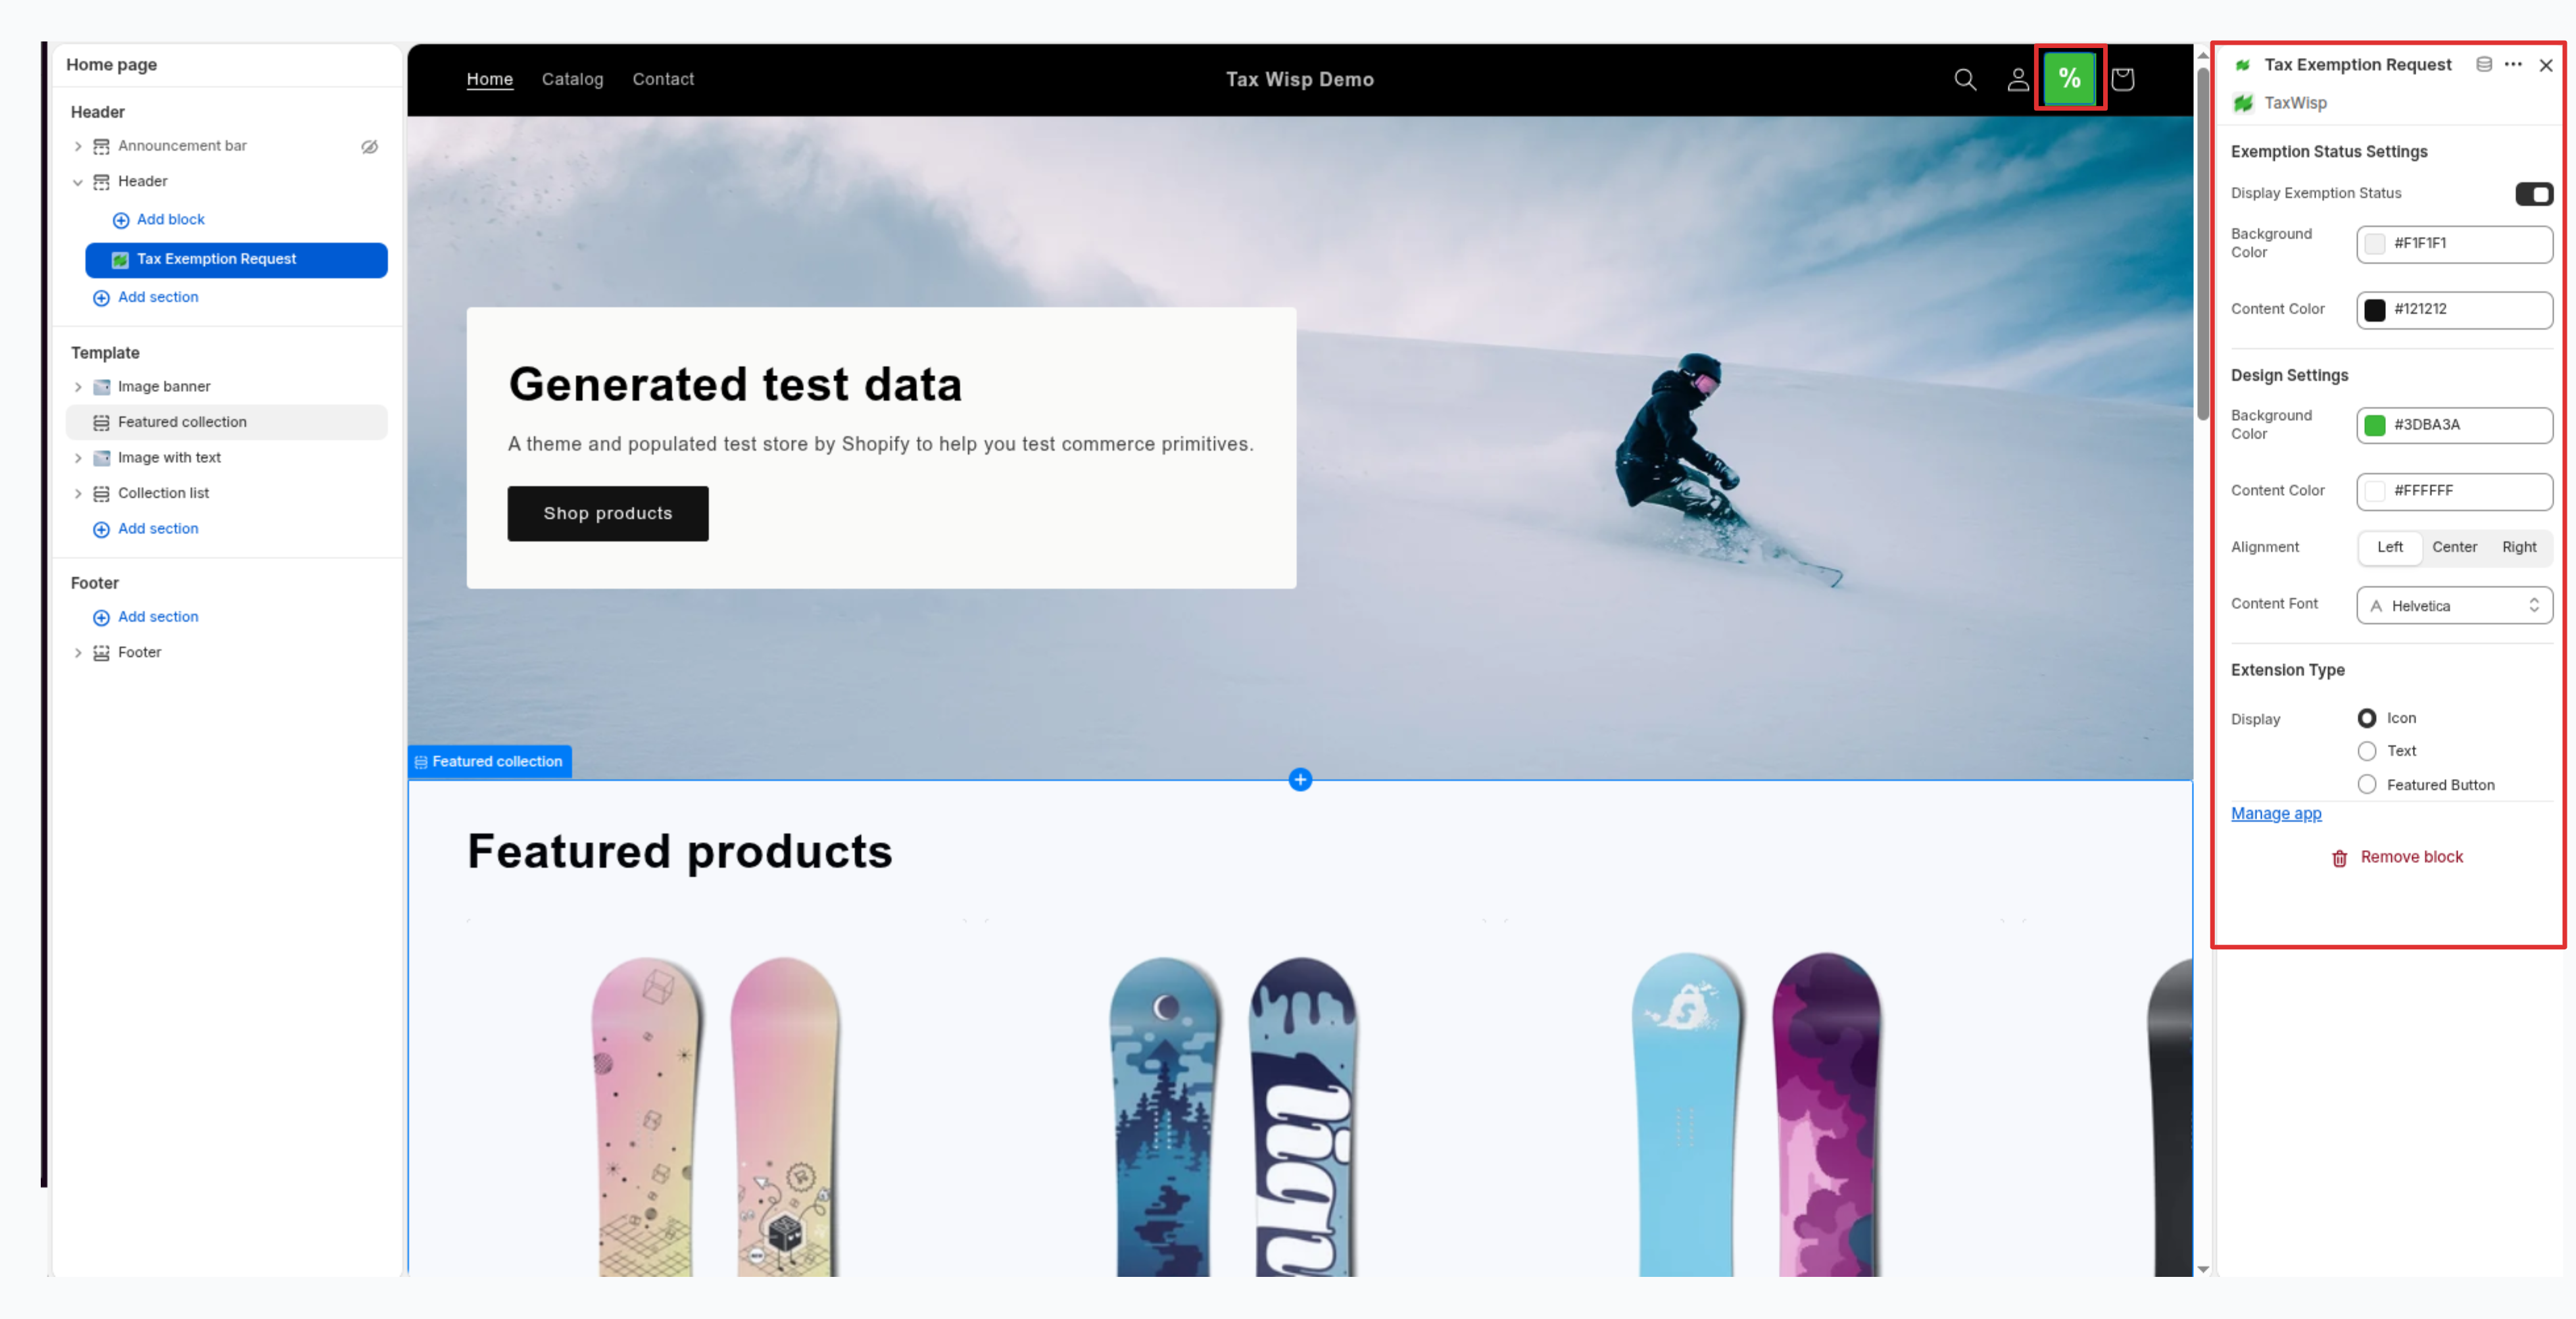
1. Exemption Status Settings
The Display Exemption Status option controls whether customers can see the status of their exemption request directly from the extension.
Recommendation: Leave this option disabled for the Header extension. The header is intended only as an entry point for requesting tax exemption, not for displaying exemption status.
2. Design Settings
Use the Design Settings to match the TaxWisp icon with your store's theme.
You can customize:
- Background Color
- Content Color
- Content Alignment
- Content Font
Choose colors that complement your storefront while keeping the icon clearly visible.
3. Extension Type
TaxWisp supports three display types: Icon, Text, & Featured Button.
Always select Icon for the Header extension. Since the header has limited space, Text and Featured Button are not recommended. These display types are better suited for Product Pages, Dedicated Tax Exemption Pages, or your Store Footer.
4. Save & Verify the Extension
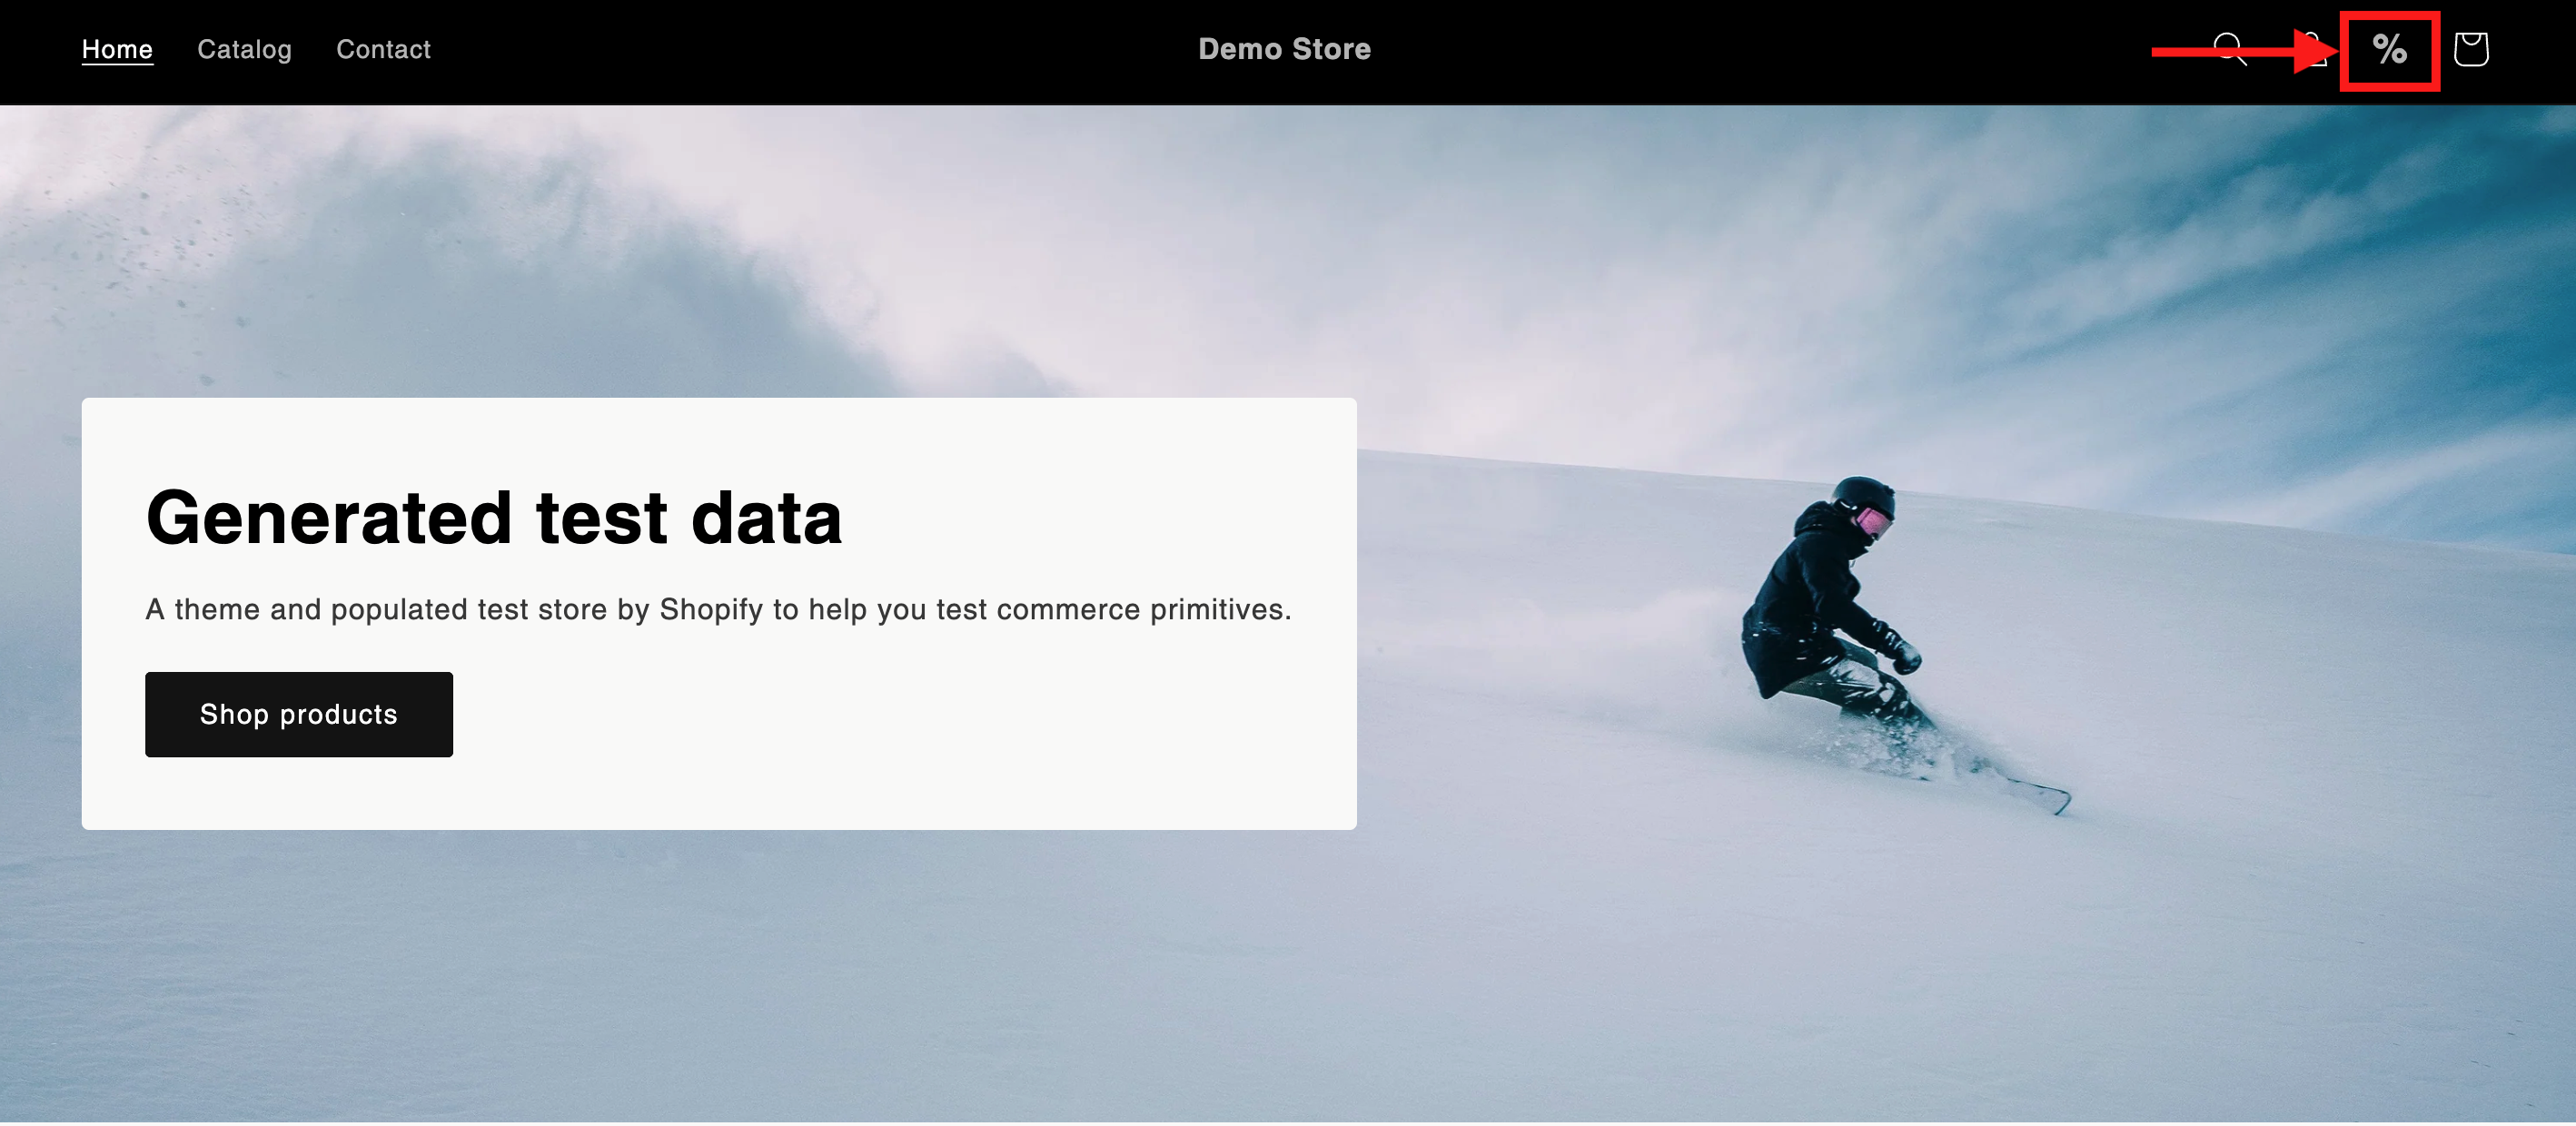
Click Save in the Theme Editor after completing the customizations. Then visit your storefront and confirm that the TaxWisp (%) icon appears in your store header alongside options such as Search, Account, and Cart.
If the icon isn't visible, revisit the Theme Editor to ensure the TaxWisp app block has been added to the correct section and that your changes have been saved.
Step 6: Adding the TaxWisp Extension to Product Pages
Adding the TaxWisp extension to your Product Pages allows customers to request tax exemption before purchasing a product, providing a smoother shopping experience. Although the extension can be added to any page or section of your storefront, Product Pages are the recommended location because they offer the highest visibility and allow customers to request tax exemption before adding products to their cart.
There are two ways to open the Theme Editor and add the extension, similar to the header extension.
Method 1: Using the Dashboard Shortcut (Recommended)
-
Open Shopify Admin → Apps → TaxWisp.
-
From the TaxWisp Dashboard, click Add Extension to Storefront.
-
Once the Theme Editor opens, select Product Page from the page selector.
-
Choose Default Product (or your product template) and add the TaxWisp extension to the Product Information section.
tipIf your Shopify store uses a custom theme, your product template may have a different name instead of Default Product. Select the appropriate product template before adding the extension.
Method 2: Using the Shopify Theme Editor
-
In your Shopify Admin, navigate to Online Store under Sales Channels, then click on Themes and select Customize.
-
On the Theme Customization page, select the Product Page from the dropdown, the Home Page is selected by default.
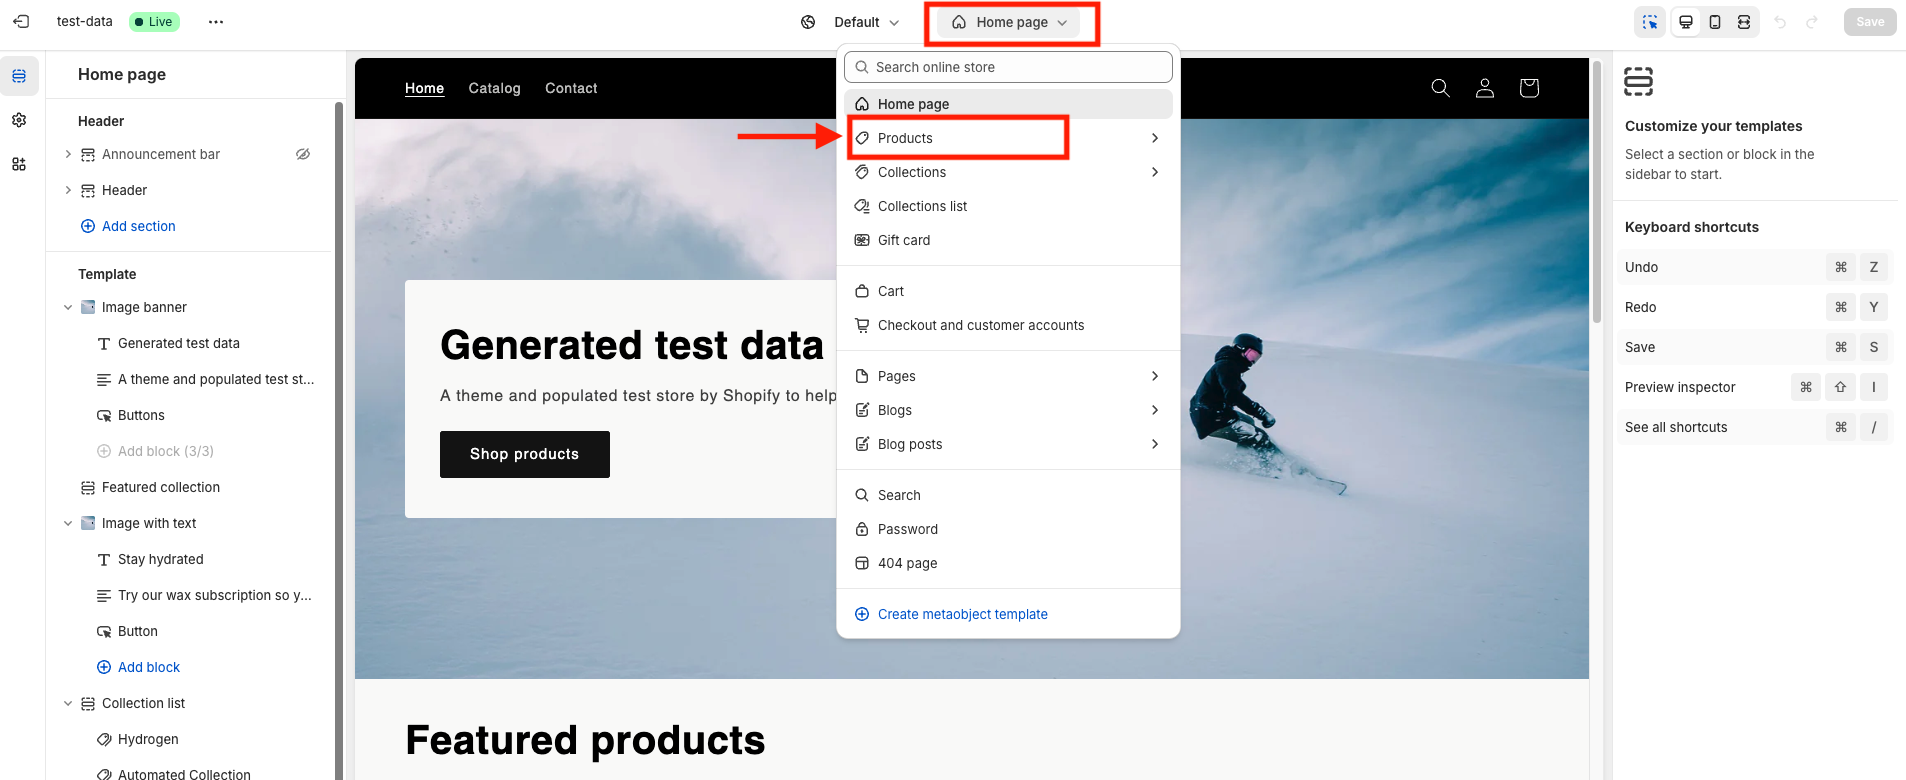
-
After selecting the Product Page, choose Default Product to apply the extension across all products.
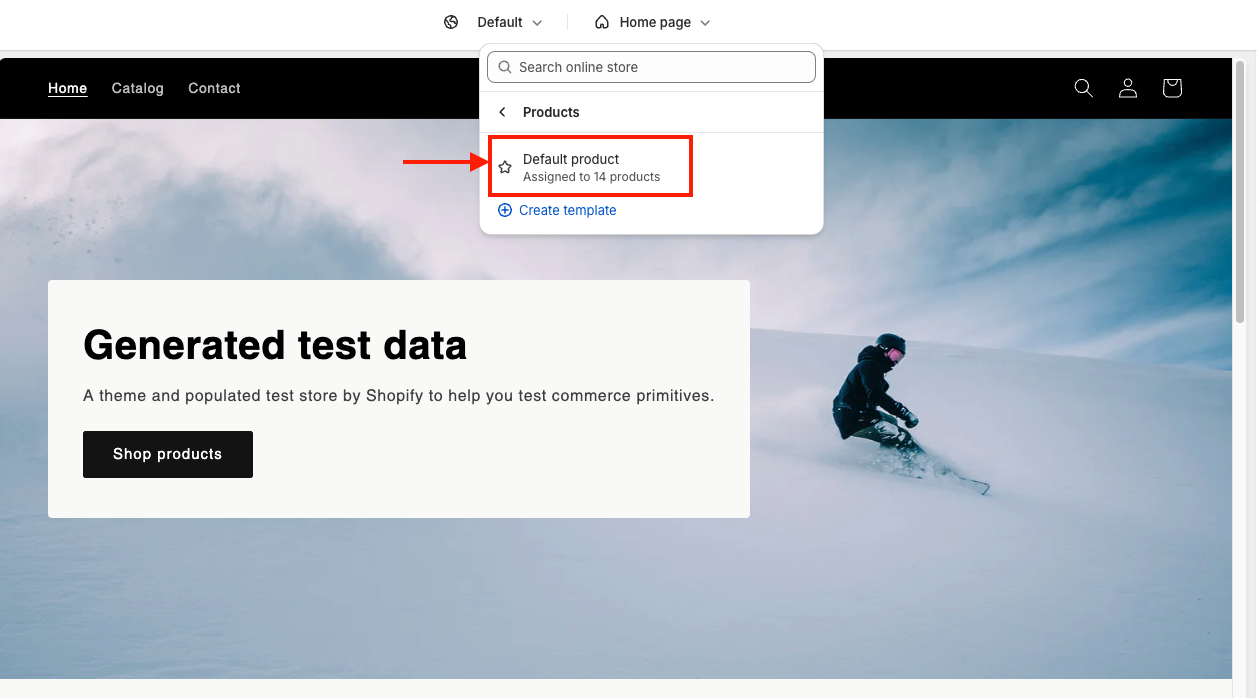 tip
tipIf your Shopify store uses a custom theme, the product page may have a different name instead of "Default Product." In such cases, locate and select the appropriate product page in your theme to ensure that the TaxWisp extension is correctly applied to your store’s product pages.
-
Under the Product Information section on the left navigation, click on Add Block.
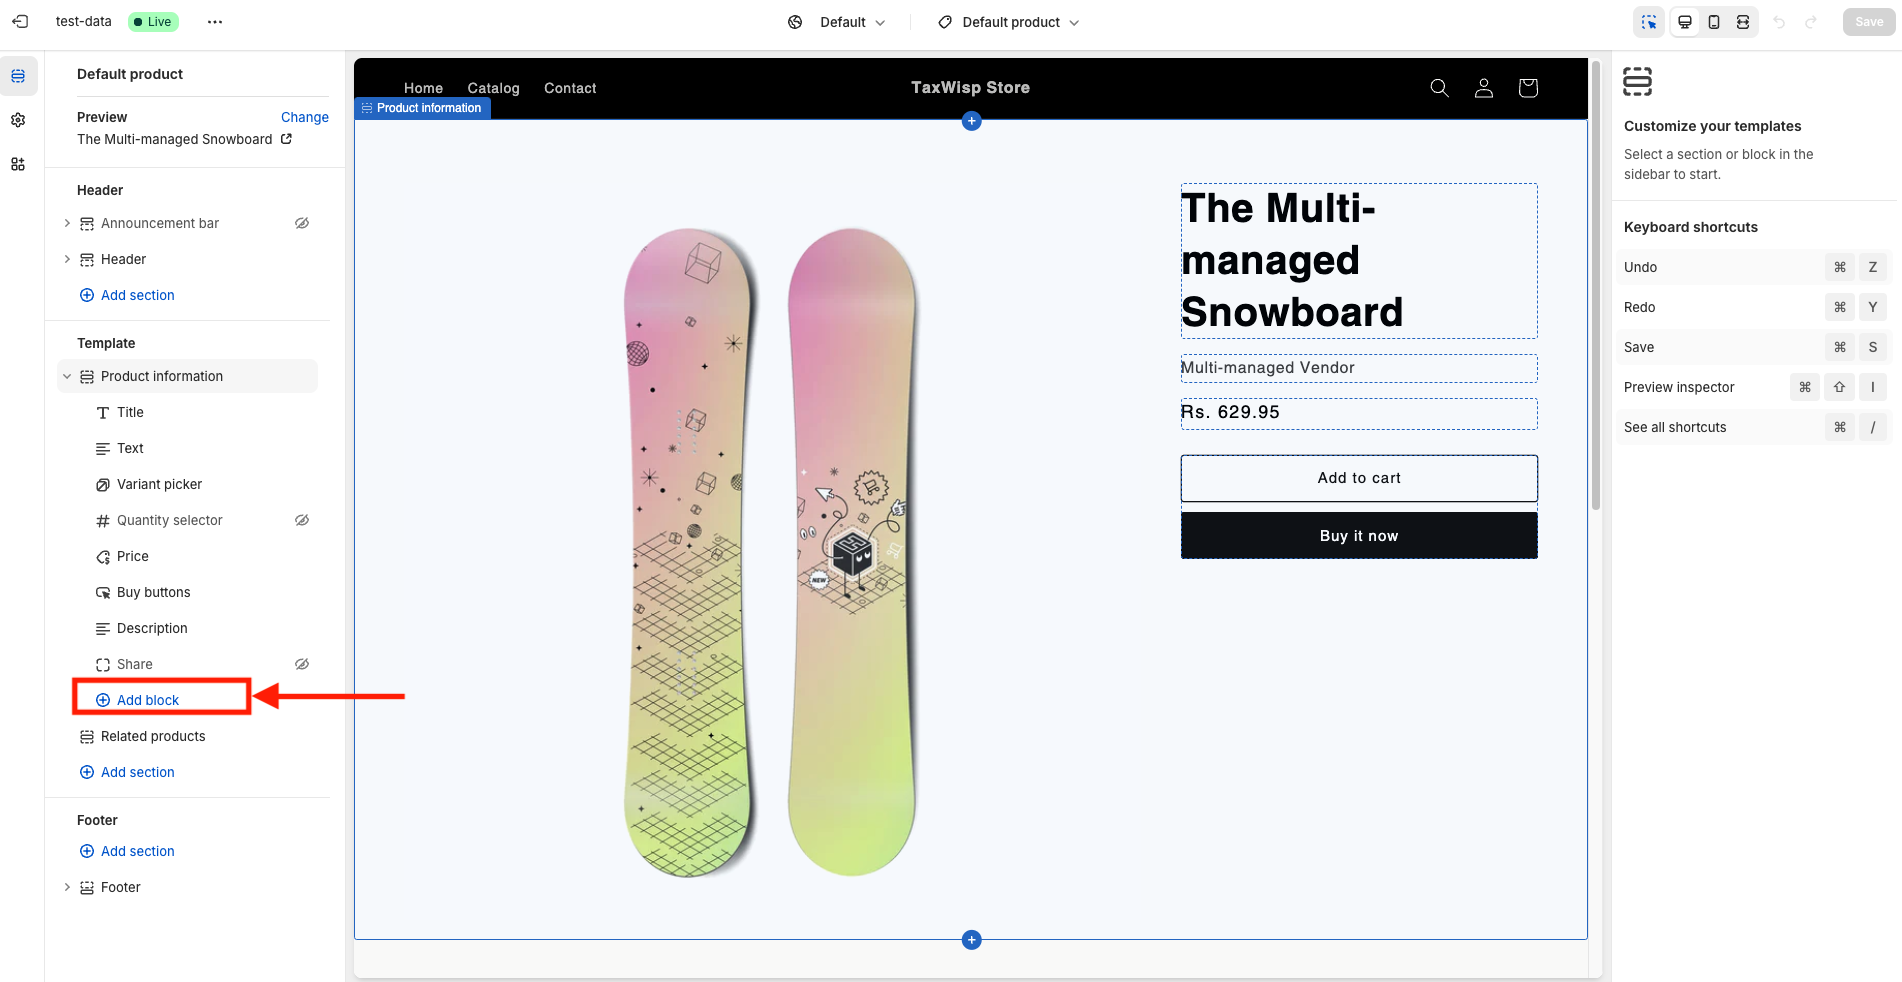
-
This will open a prompt where you can search for blocks and apps.
-
Click on Apps, and you’ll see TaxWisp listed.
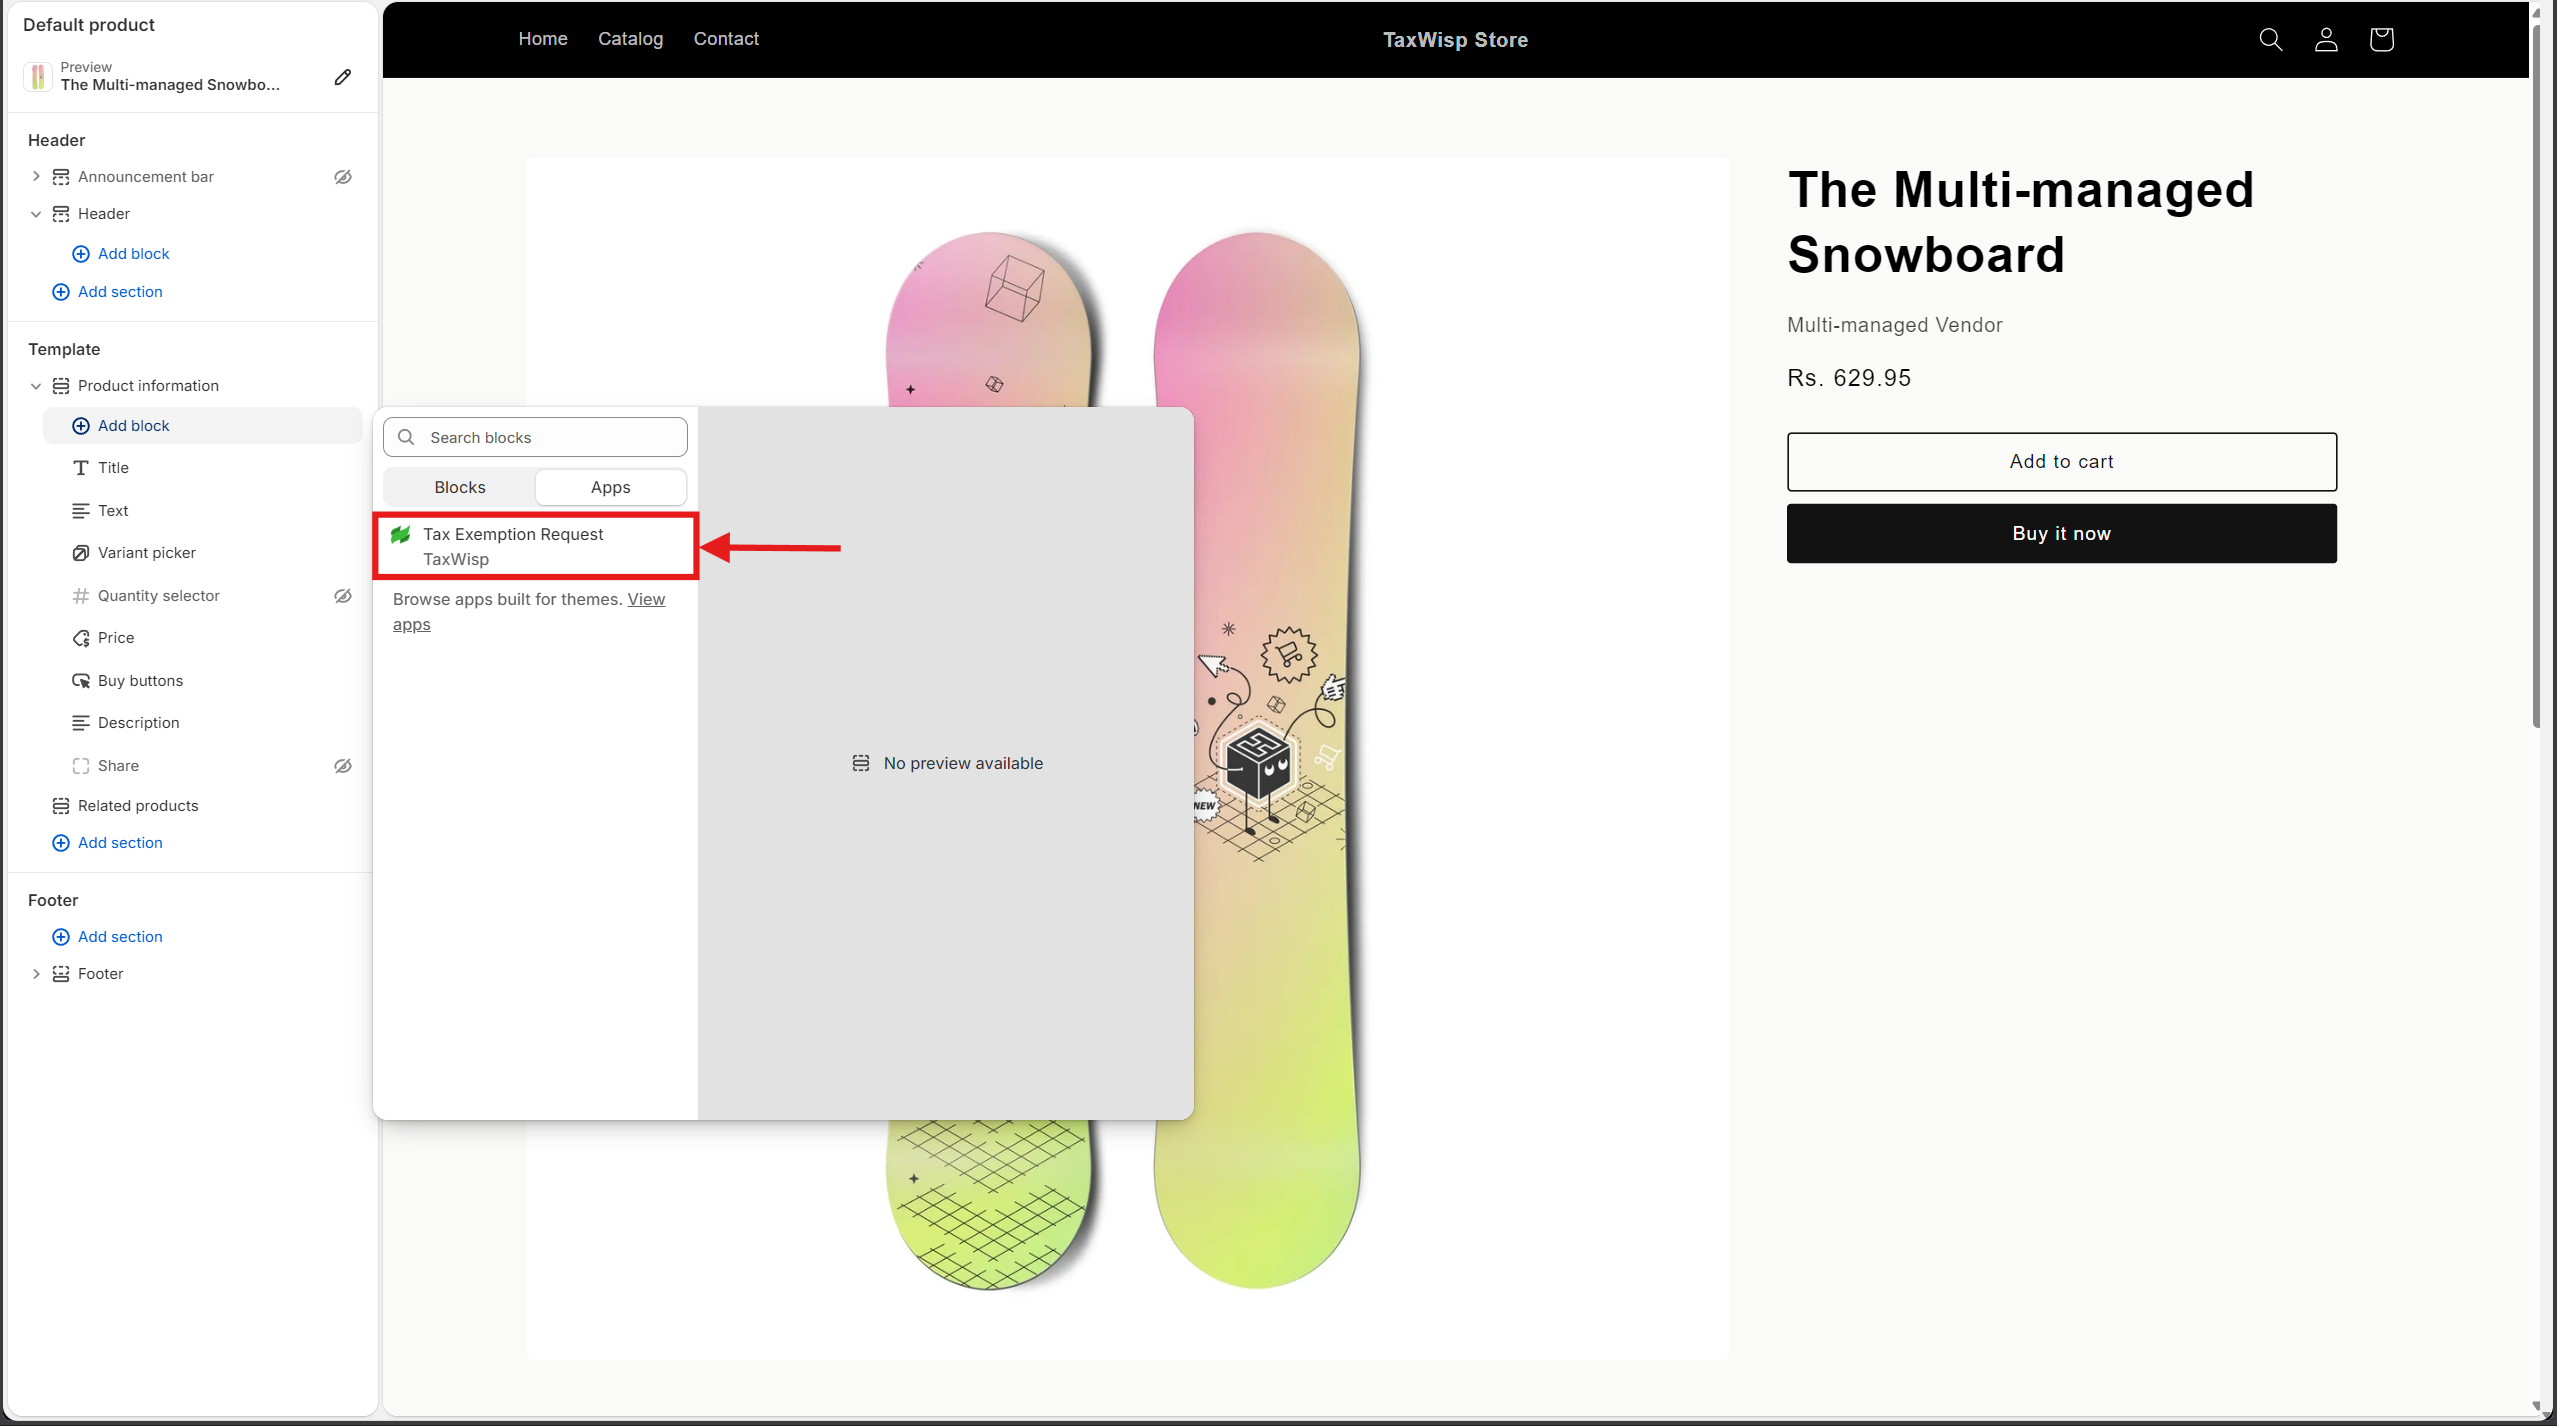
Once the TaxWisp app block has been added, the extension customization panel will appear.
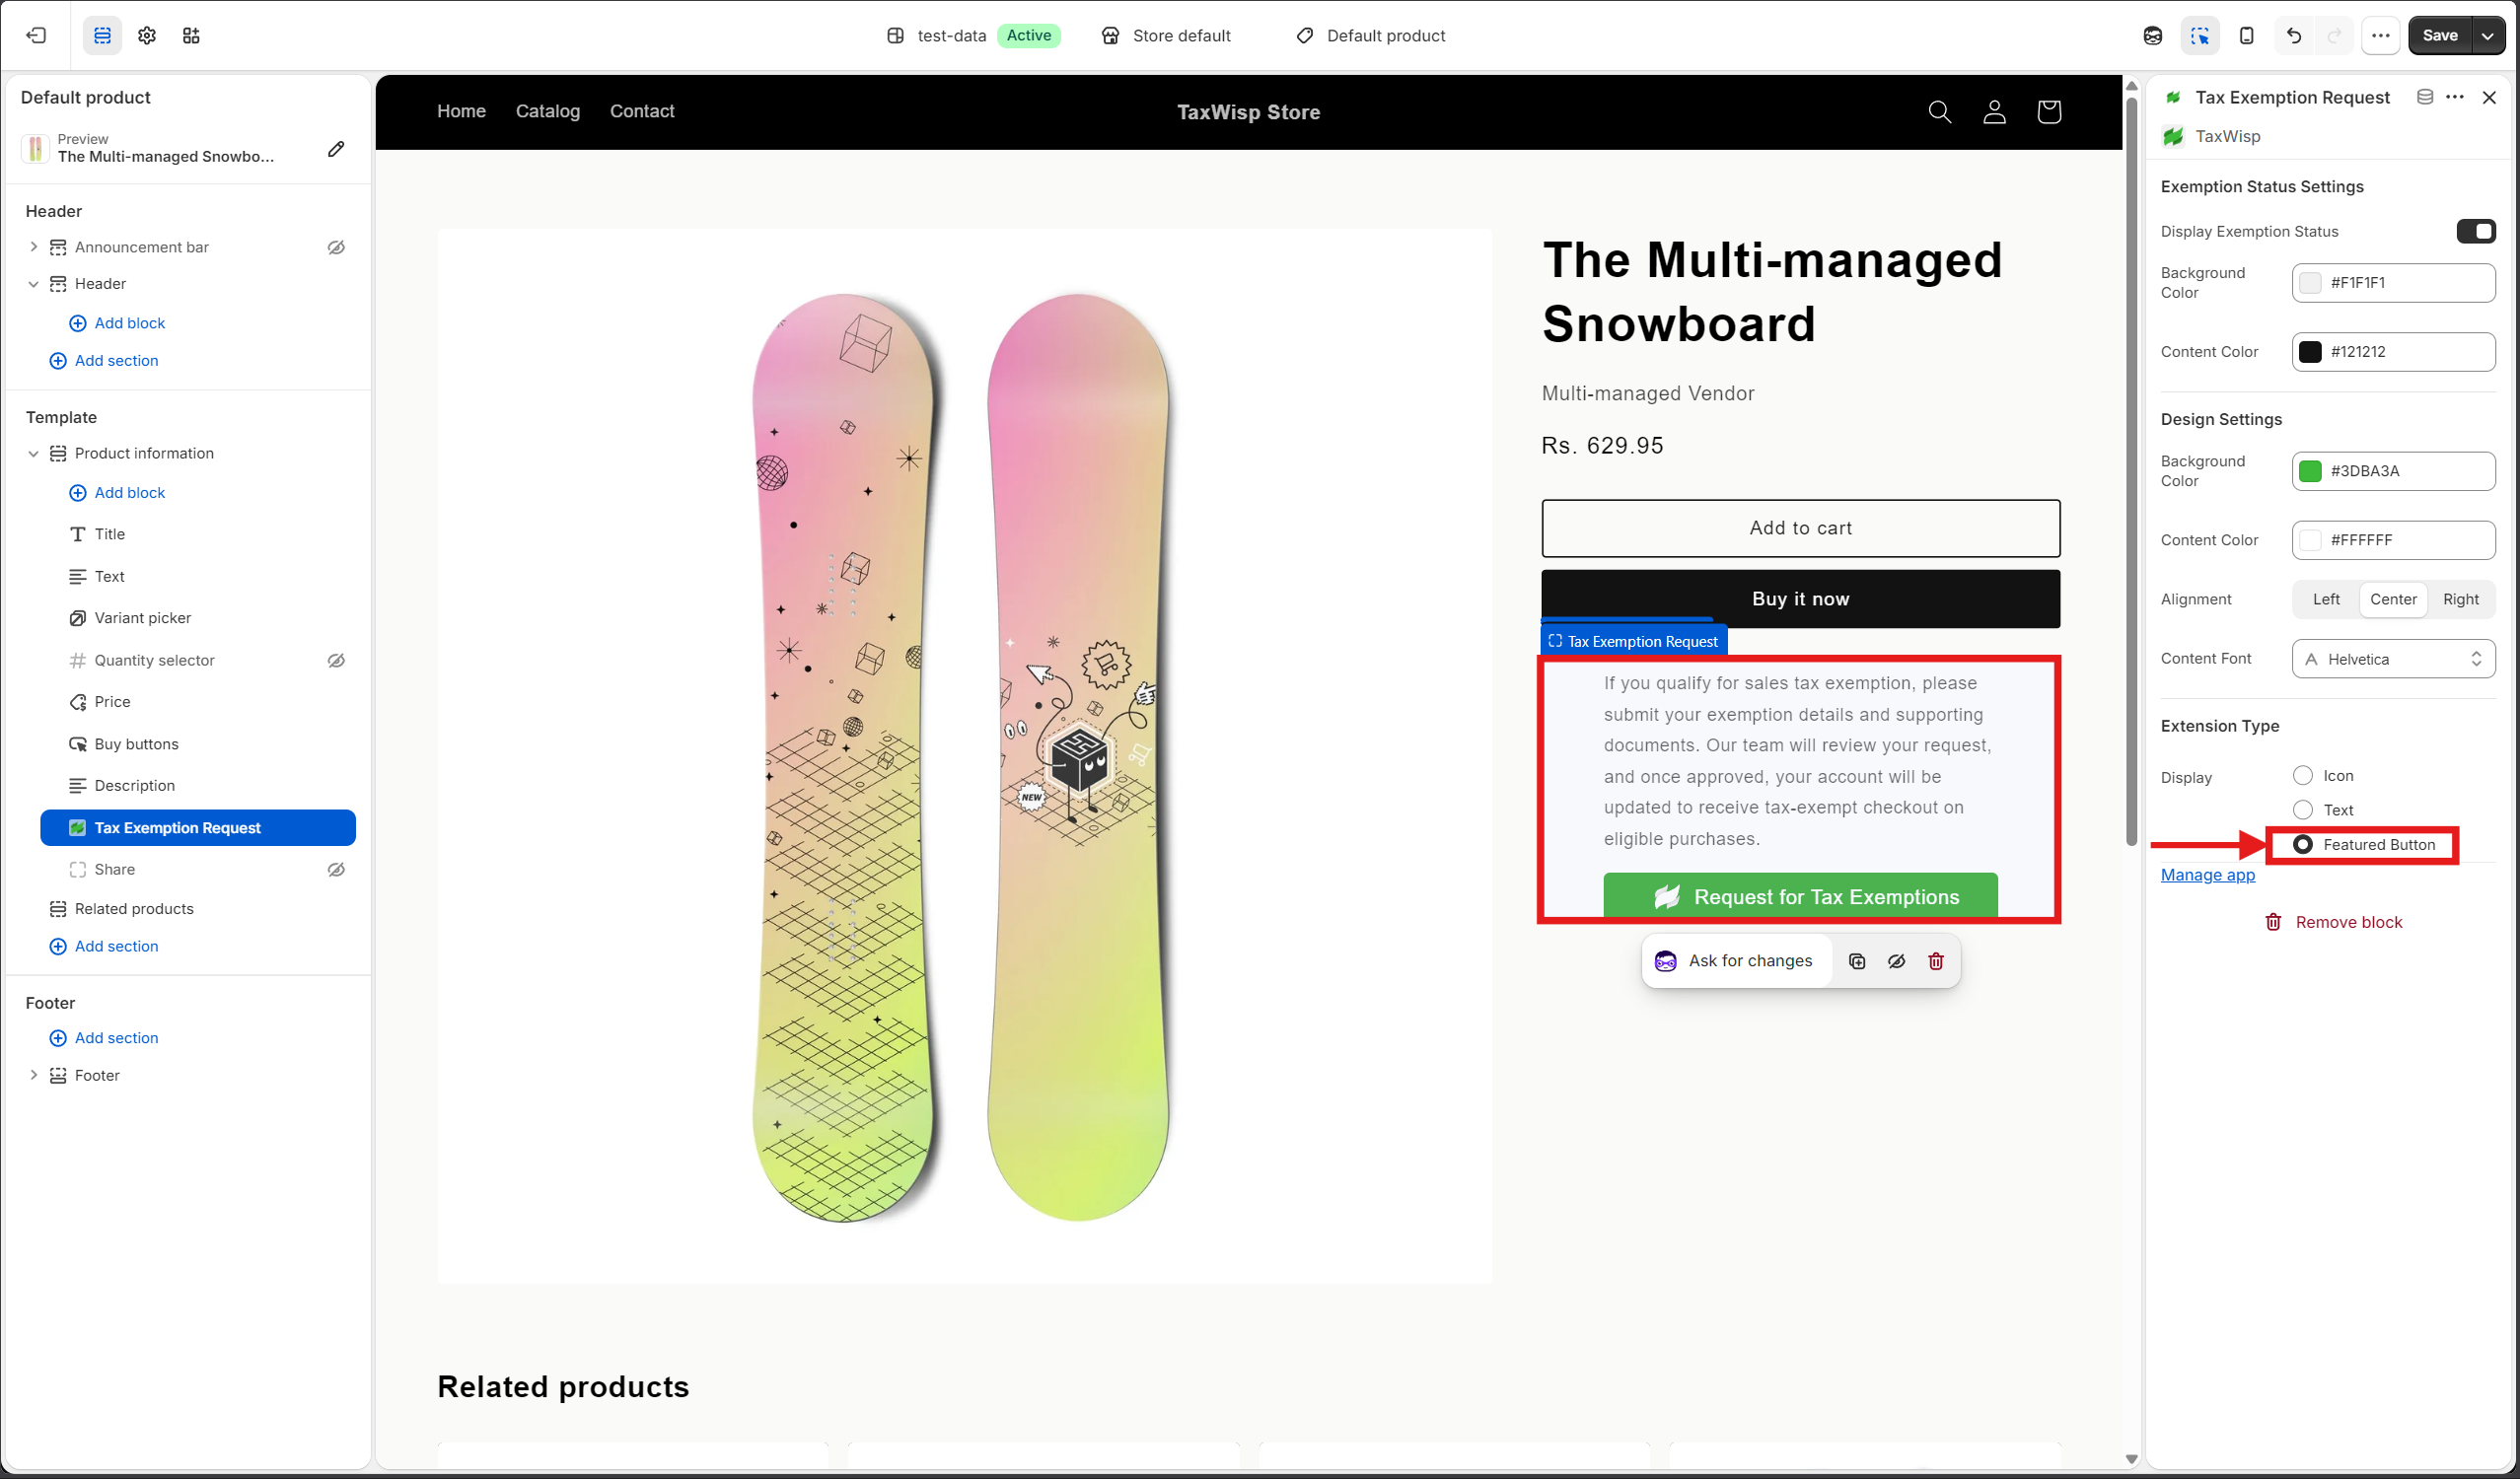
Configure the Product Page Extension
Since this extension is being added to a Product Page, we recommend configuring it as a Featured Button so customers can easily discover and submit tax exemption requests before completing their purchase.
1. Exemption Status Settings
The Display Exemption Status option allows customers to view the status of their exemption request directly from the extension.
When enabled, customers can see whether their exemption request is:
- Pending
- Approved
You can also customize the status appearance by configuring:
-
Background Color
-
Content Color
-
Tip: Enable this option on Product Pages so returning customers can immediately see whether their exemption has already been approved, helping reduce duplicate submissions.
2. Design Settings
Use the Design Settings to match the TaxWisp extension with your storefront's branding.
You can customize:
- Background Color
- Content Color
- Content Alignment
- Content Font
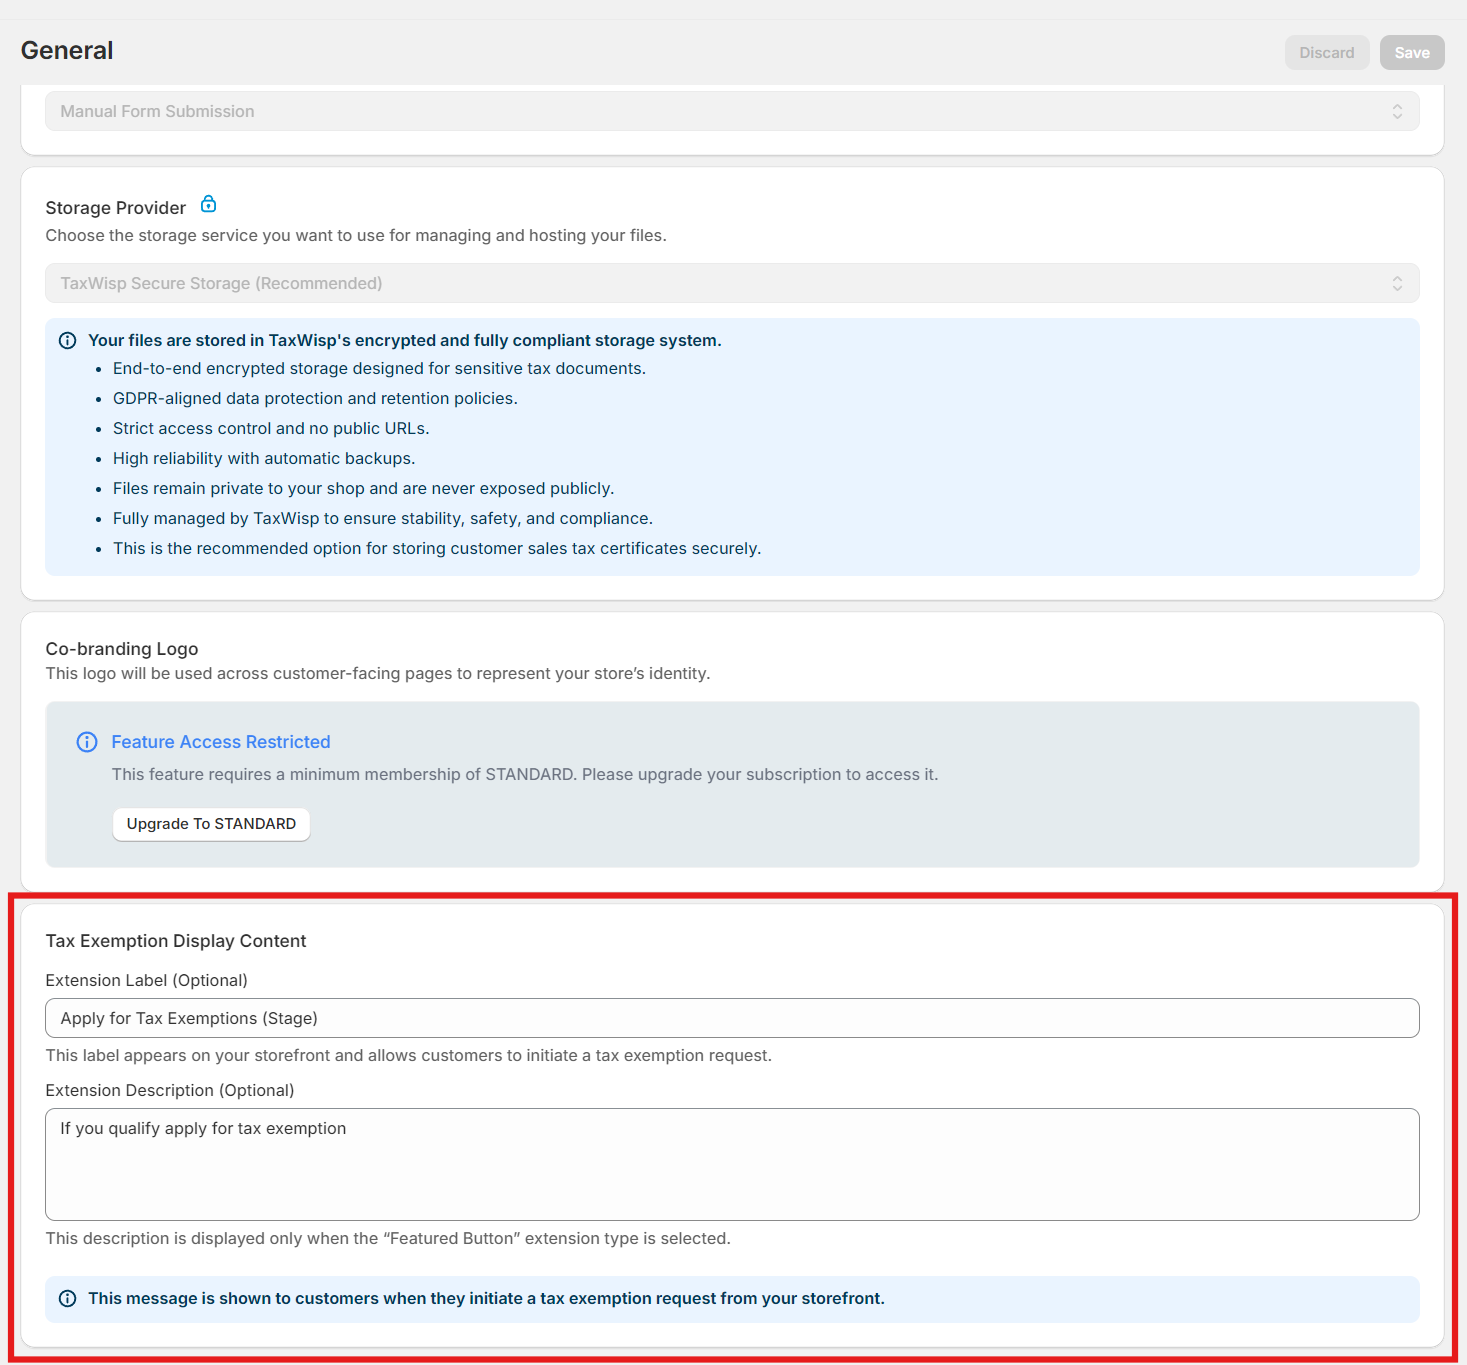
The Extension Label (for example, Request Tax Exemption) and Extension Description are configured from Shopify Admin → Apps → TaxWisp → Settings → Tax Exemption Display Content. Any changes made there are automatically reflected on your storefront.
3. Extension Type
TaxWisp supports three display types: Icon, Text, & Featured Button.
Select Featured Button for Product Pages. It provides the highest visibility and encourages customers to request tax exemption before purchasing. The Icon and Text display types are better suited for compact layouts or secondary locations.
4. Save & Verify the Extension
Drag the TaxWisp block within the Product Information section to position it where customers can easily find it.
Recommended Placement: Position the extension immediately below the Buy Button so customers can request tax exemption before adding products to their cart or proceeding to checkout.
Click Save in the top-right corner.
5. Verify the TaxWisp Extension
Finally, open one of your product pages on your storefront and verify that the TaxWisp extension is displayed correctly with your selected styling and content.
If the Request Tax Exemption option isn't visible, revisit the Theme Editor to ensure the app block has been added to the correct section and that your changes have been saved.
Step 7: Adding the TaxWisp Extension to Your Store Footer
In addition to the TaxWisp Header icon and Product Page extension, you can also add the TaxWisp extension to your Store Footer. This provides customers with another convenient entry point to request tax exemption and is ideal for stores that prefer a clean, minimal experience.
There are two ways to open the Theme Editor and add the extension.
Method 1: Using the Dashboard Shortcut (Recommended)
-
Open Shopify Admin → Apps → TaxWisp.
-
From the TaxWisp Dashboard, click Add Extension to Storefront.
-
Once the Theme Editor opens, select the Footer section.
-
Add the TaxWisp extension to your Store Footer.
Method 2: Using the Shopify Theme Editor
-
In your Shopify Admin, navigate to Online Store under Sales Channels, then click on Themes and select Customize.
-
You’ll be taken to the Theme Customization page. From the navigation, select Footer.
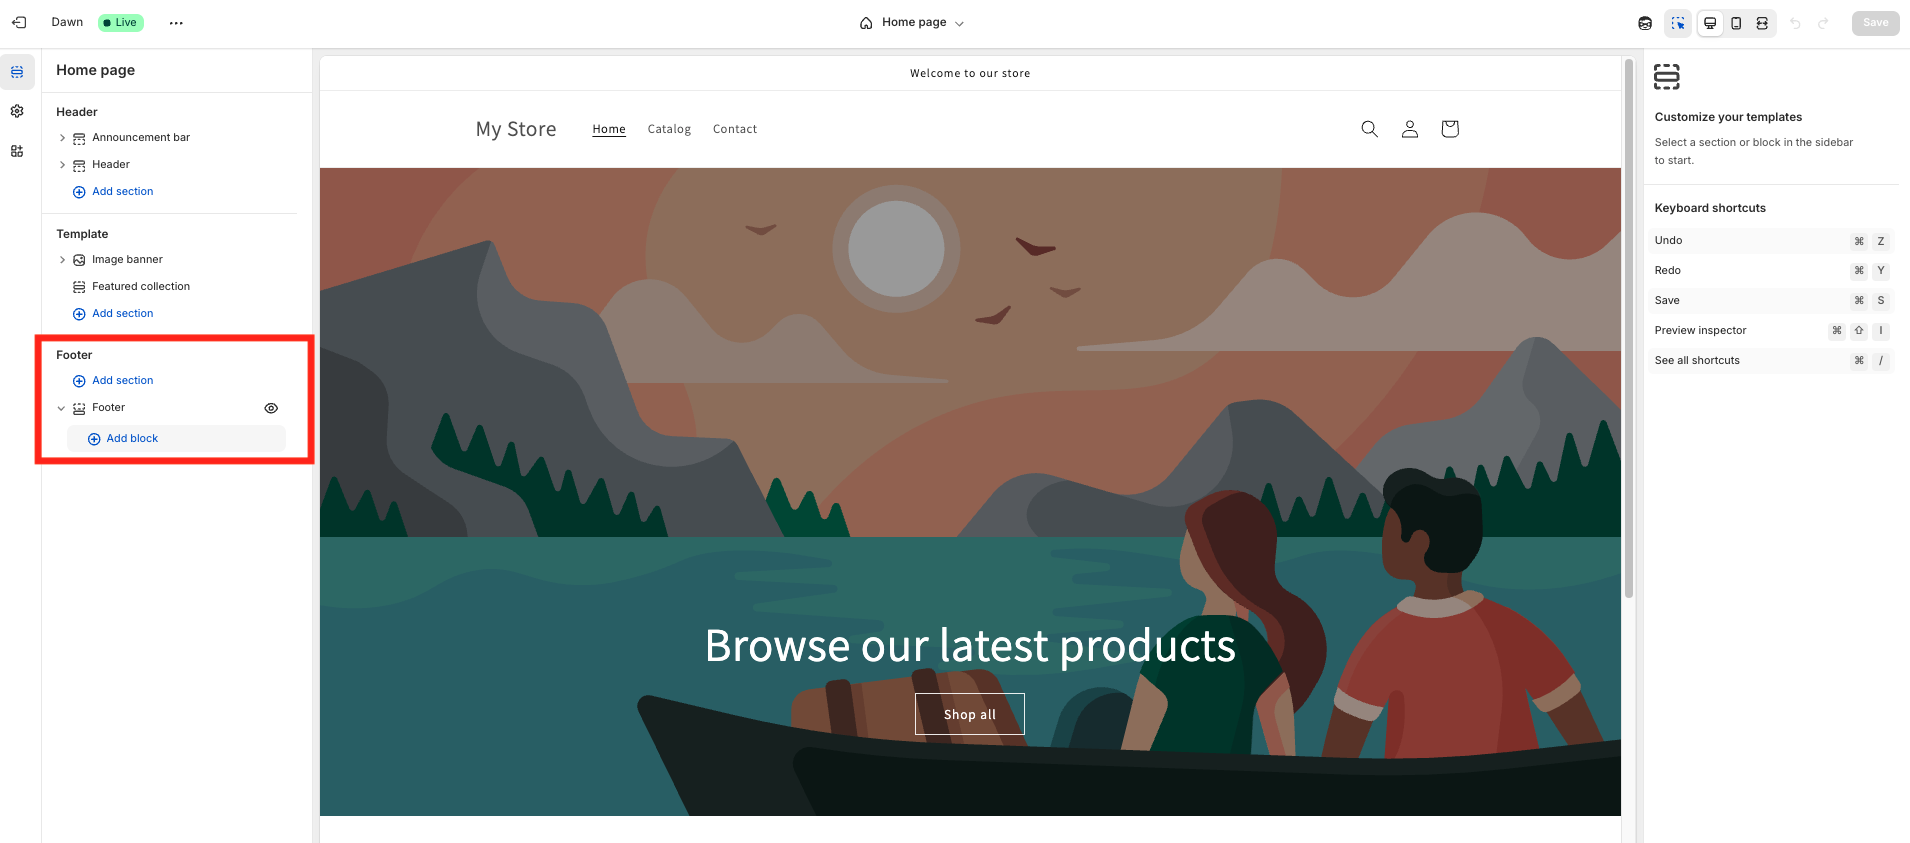
-
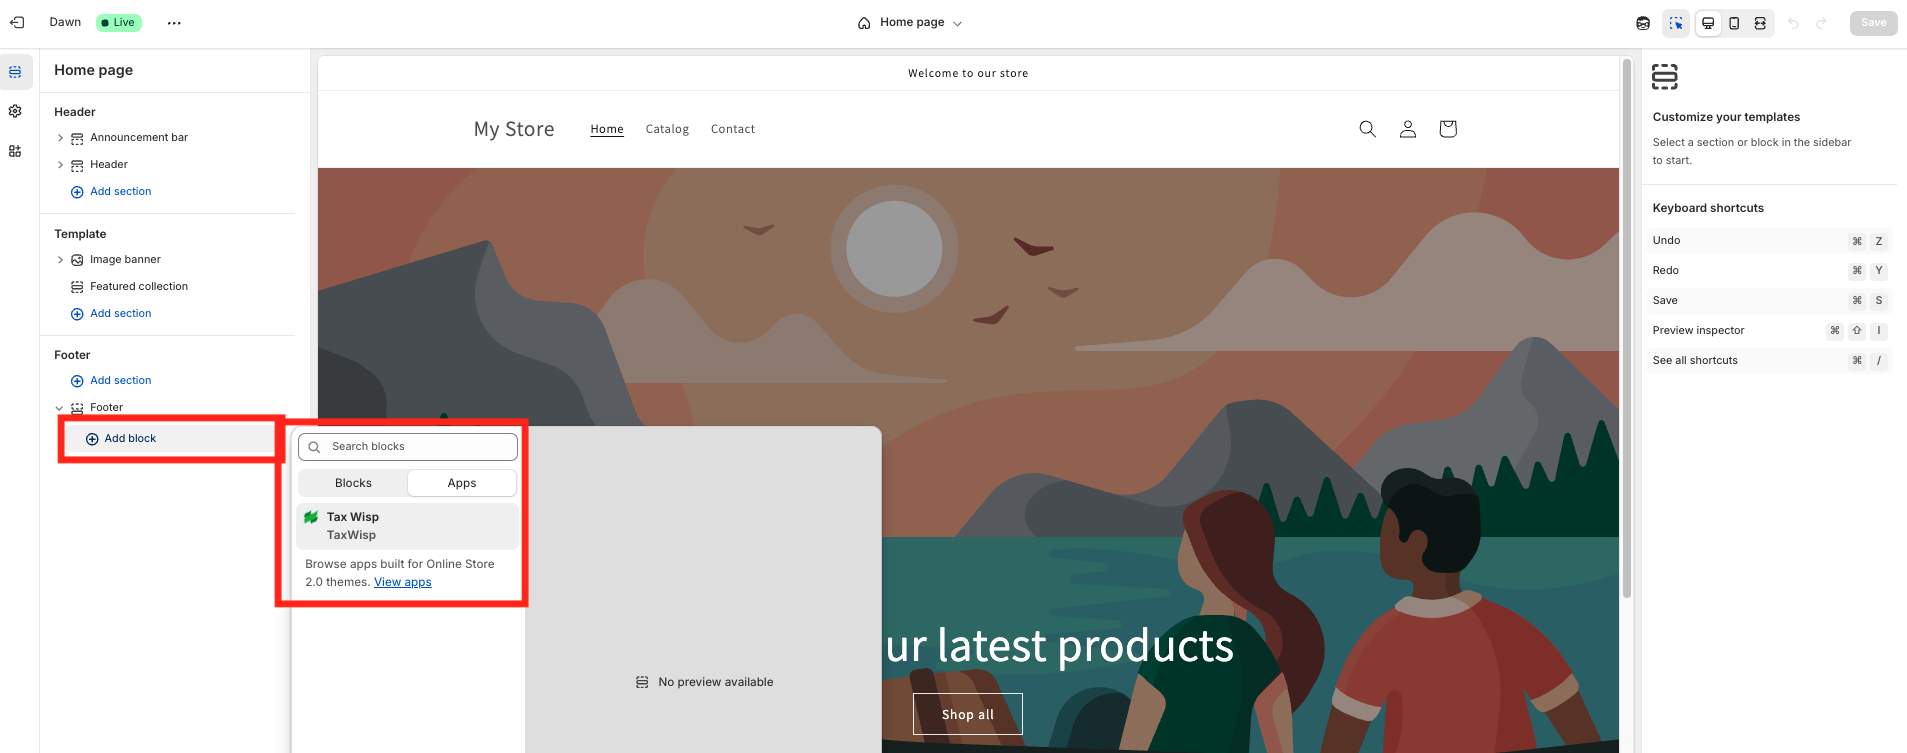
In the Footer section, you’ll see an option to Add Block. Click on it. This will open a prompt where you can search for blocks and apps. Click on Apps, and you’ll see TaxWisp listed.
-
Select TaxWisp to add the app extension to the footer.
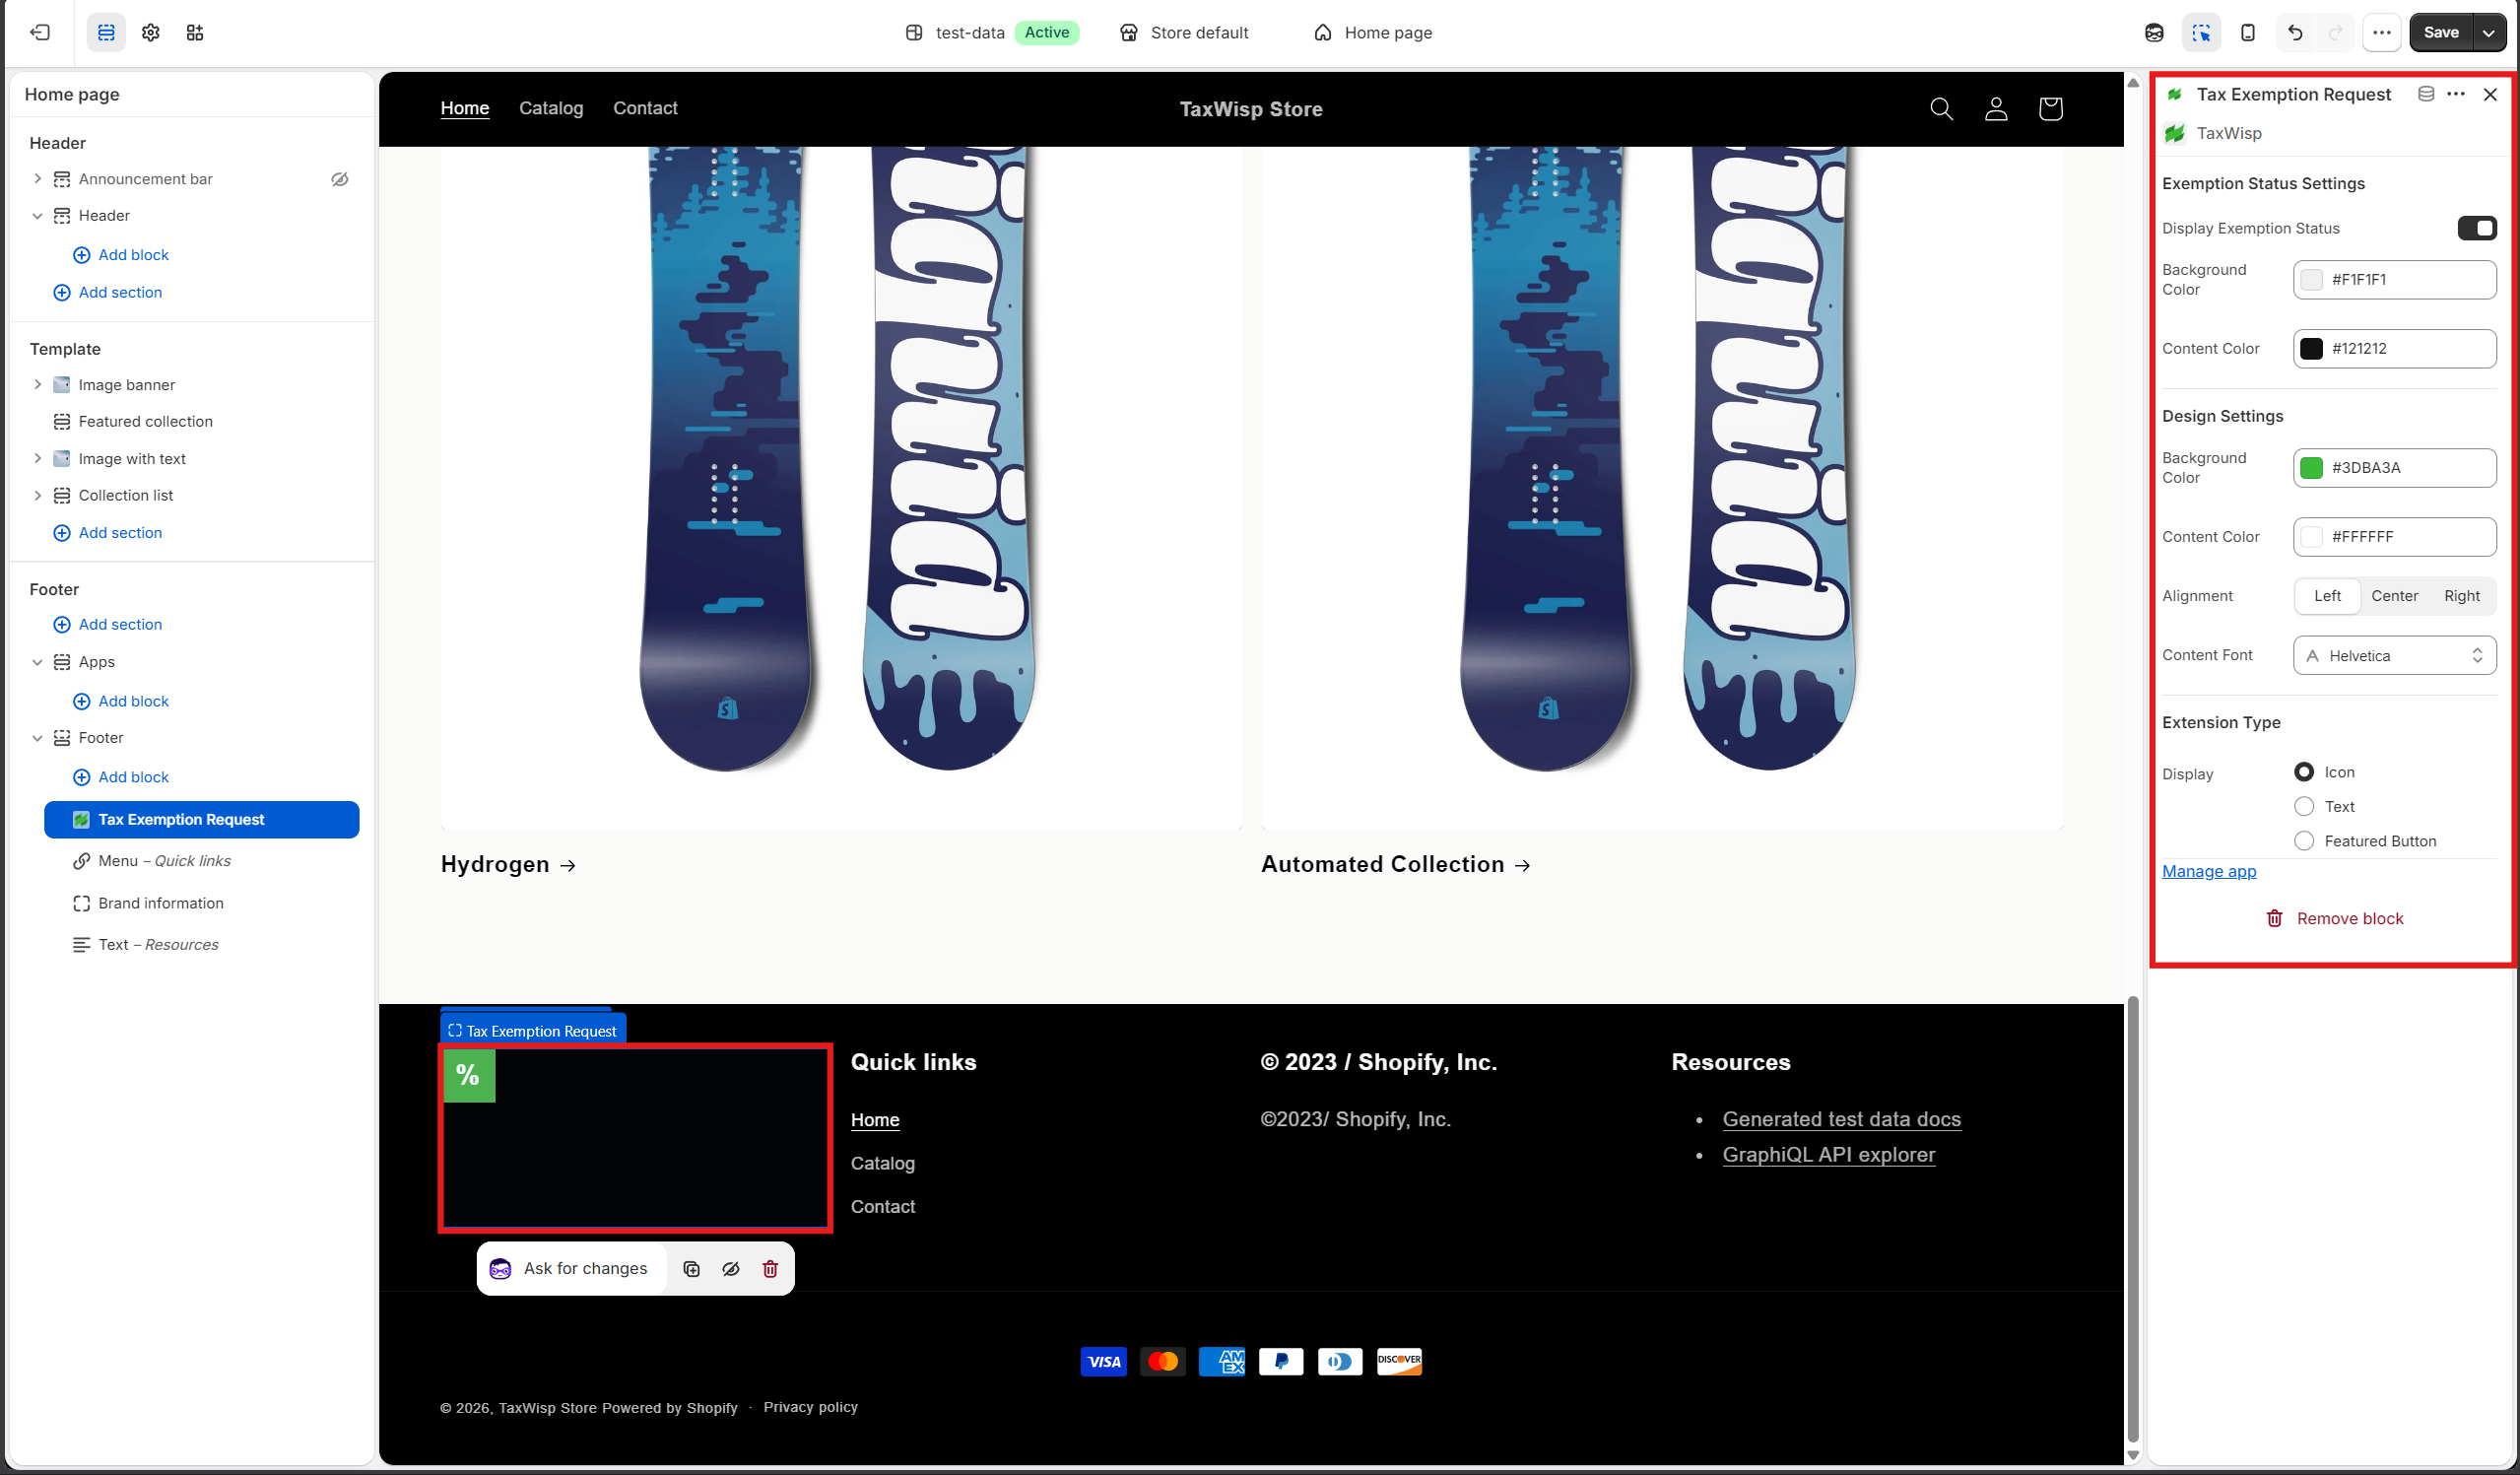
-
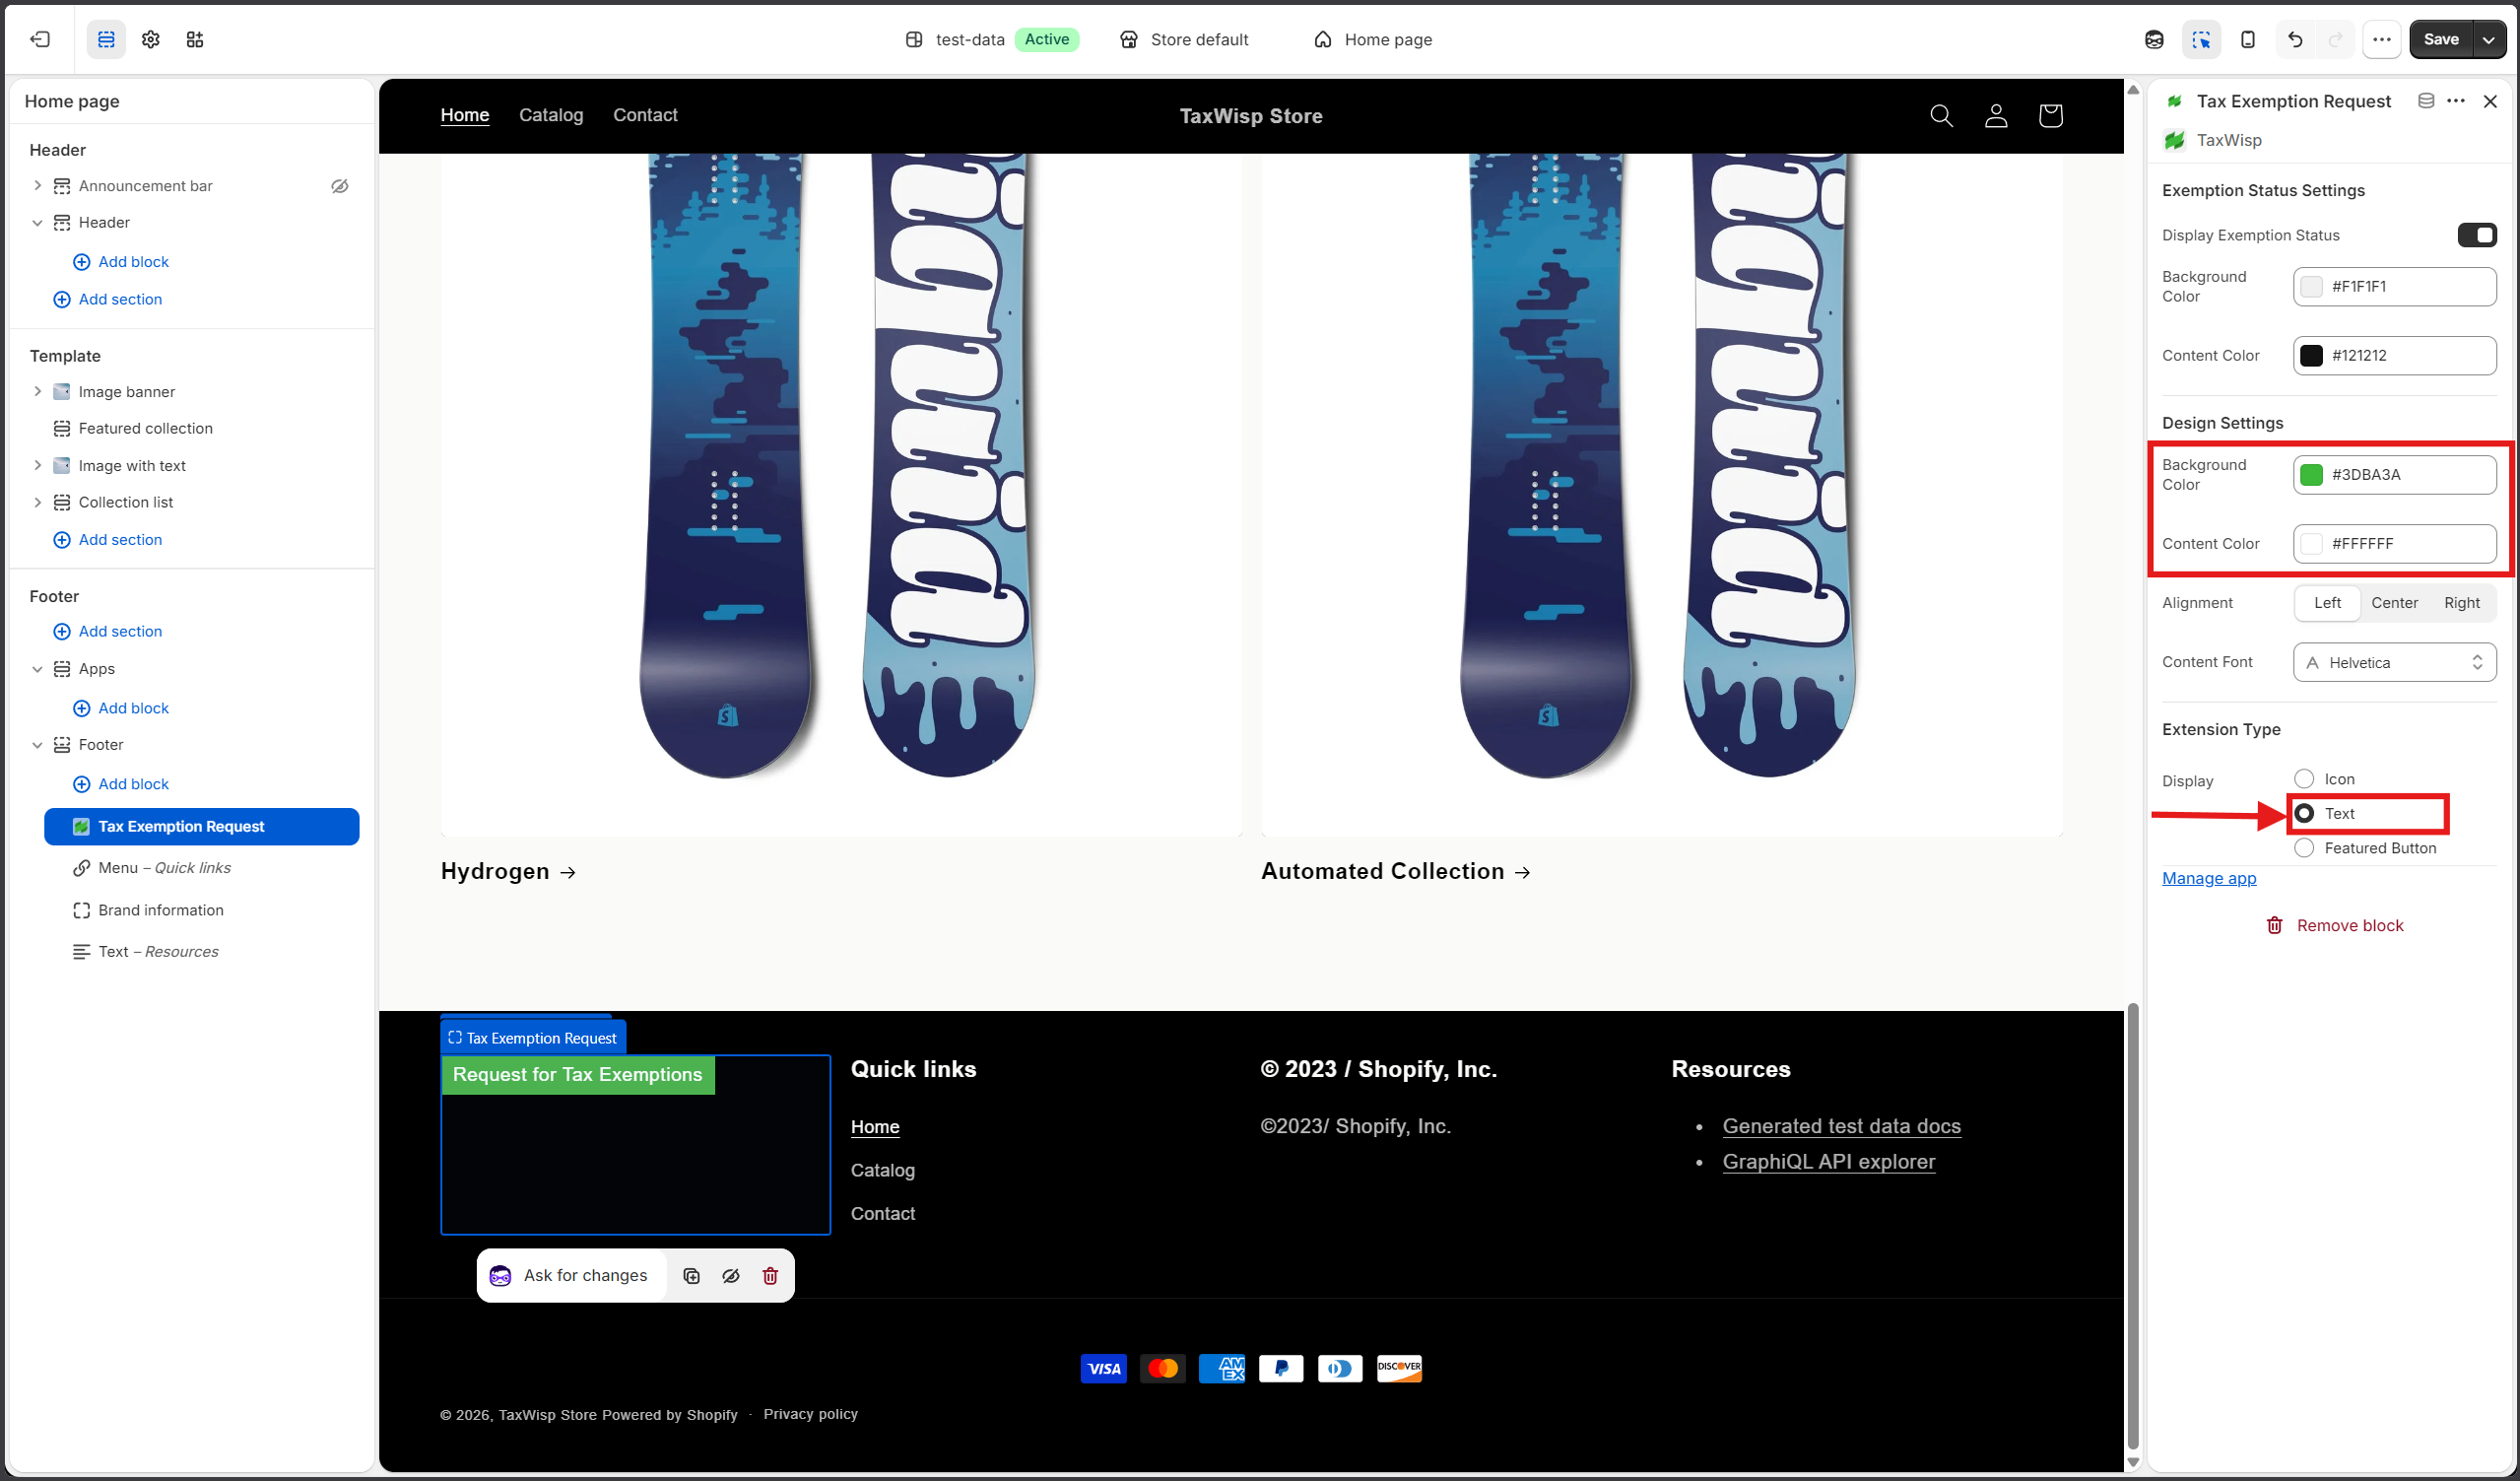
Make sure you select Text instead of Icon or Featured Button for better visibility and accessibility on the footer menu. You can change the text color based on your preference.
Once the TaxWisp app block has been added, the extension customization panel will appear.
Configure the Footer Extension
Since this extension is being added to your Store Footer, we recommend configuring it as a simple and easily accessible entry point for customers to request tax exemption.
1. Exemption Status Settings
The Display Exemption Status option controls whether customers can view the status of their exemption request directly from the extension.
Recommendation: You can leave Display Exemption Status disabled for the Footer extension. The footer is intended to provide customers with an easy way to start the tax exemption process rather than display exemption status.
2. Design Settings
Use the Design Settings to customize the appearance of the footer extension so it matches your store's theme.
You can configure:
- Background Color
- Content Color
- Content Alignment
- Content Font
The Extension Label (for example, Enroll for Tax Exemption or Request Tax Exemption) and the Extension Description are configured from Shopify Admin → Apps → TaxWisp → Settings → Tax Exemption Display Content. Any changes made there will automatically be reflected on your storefront.
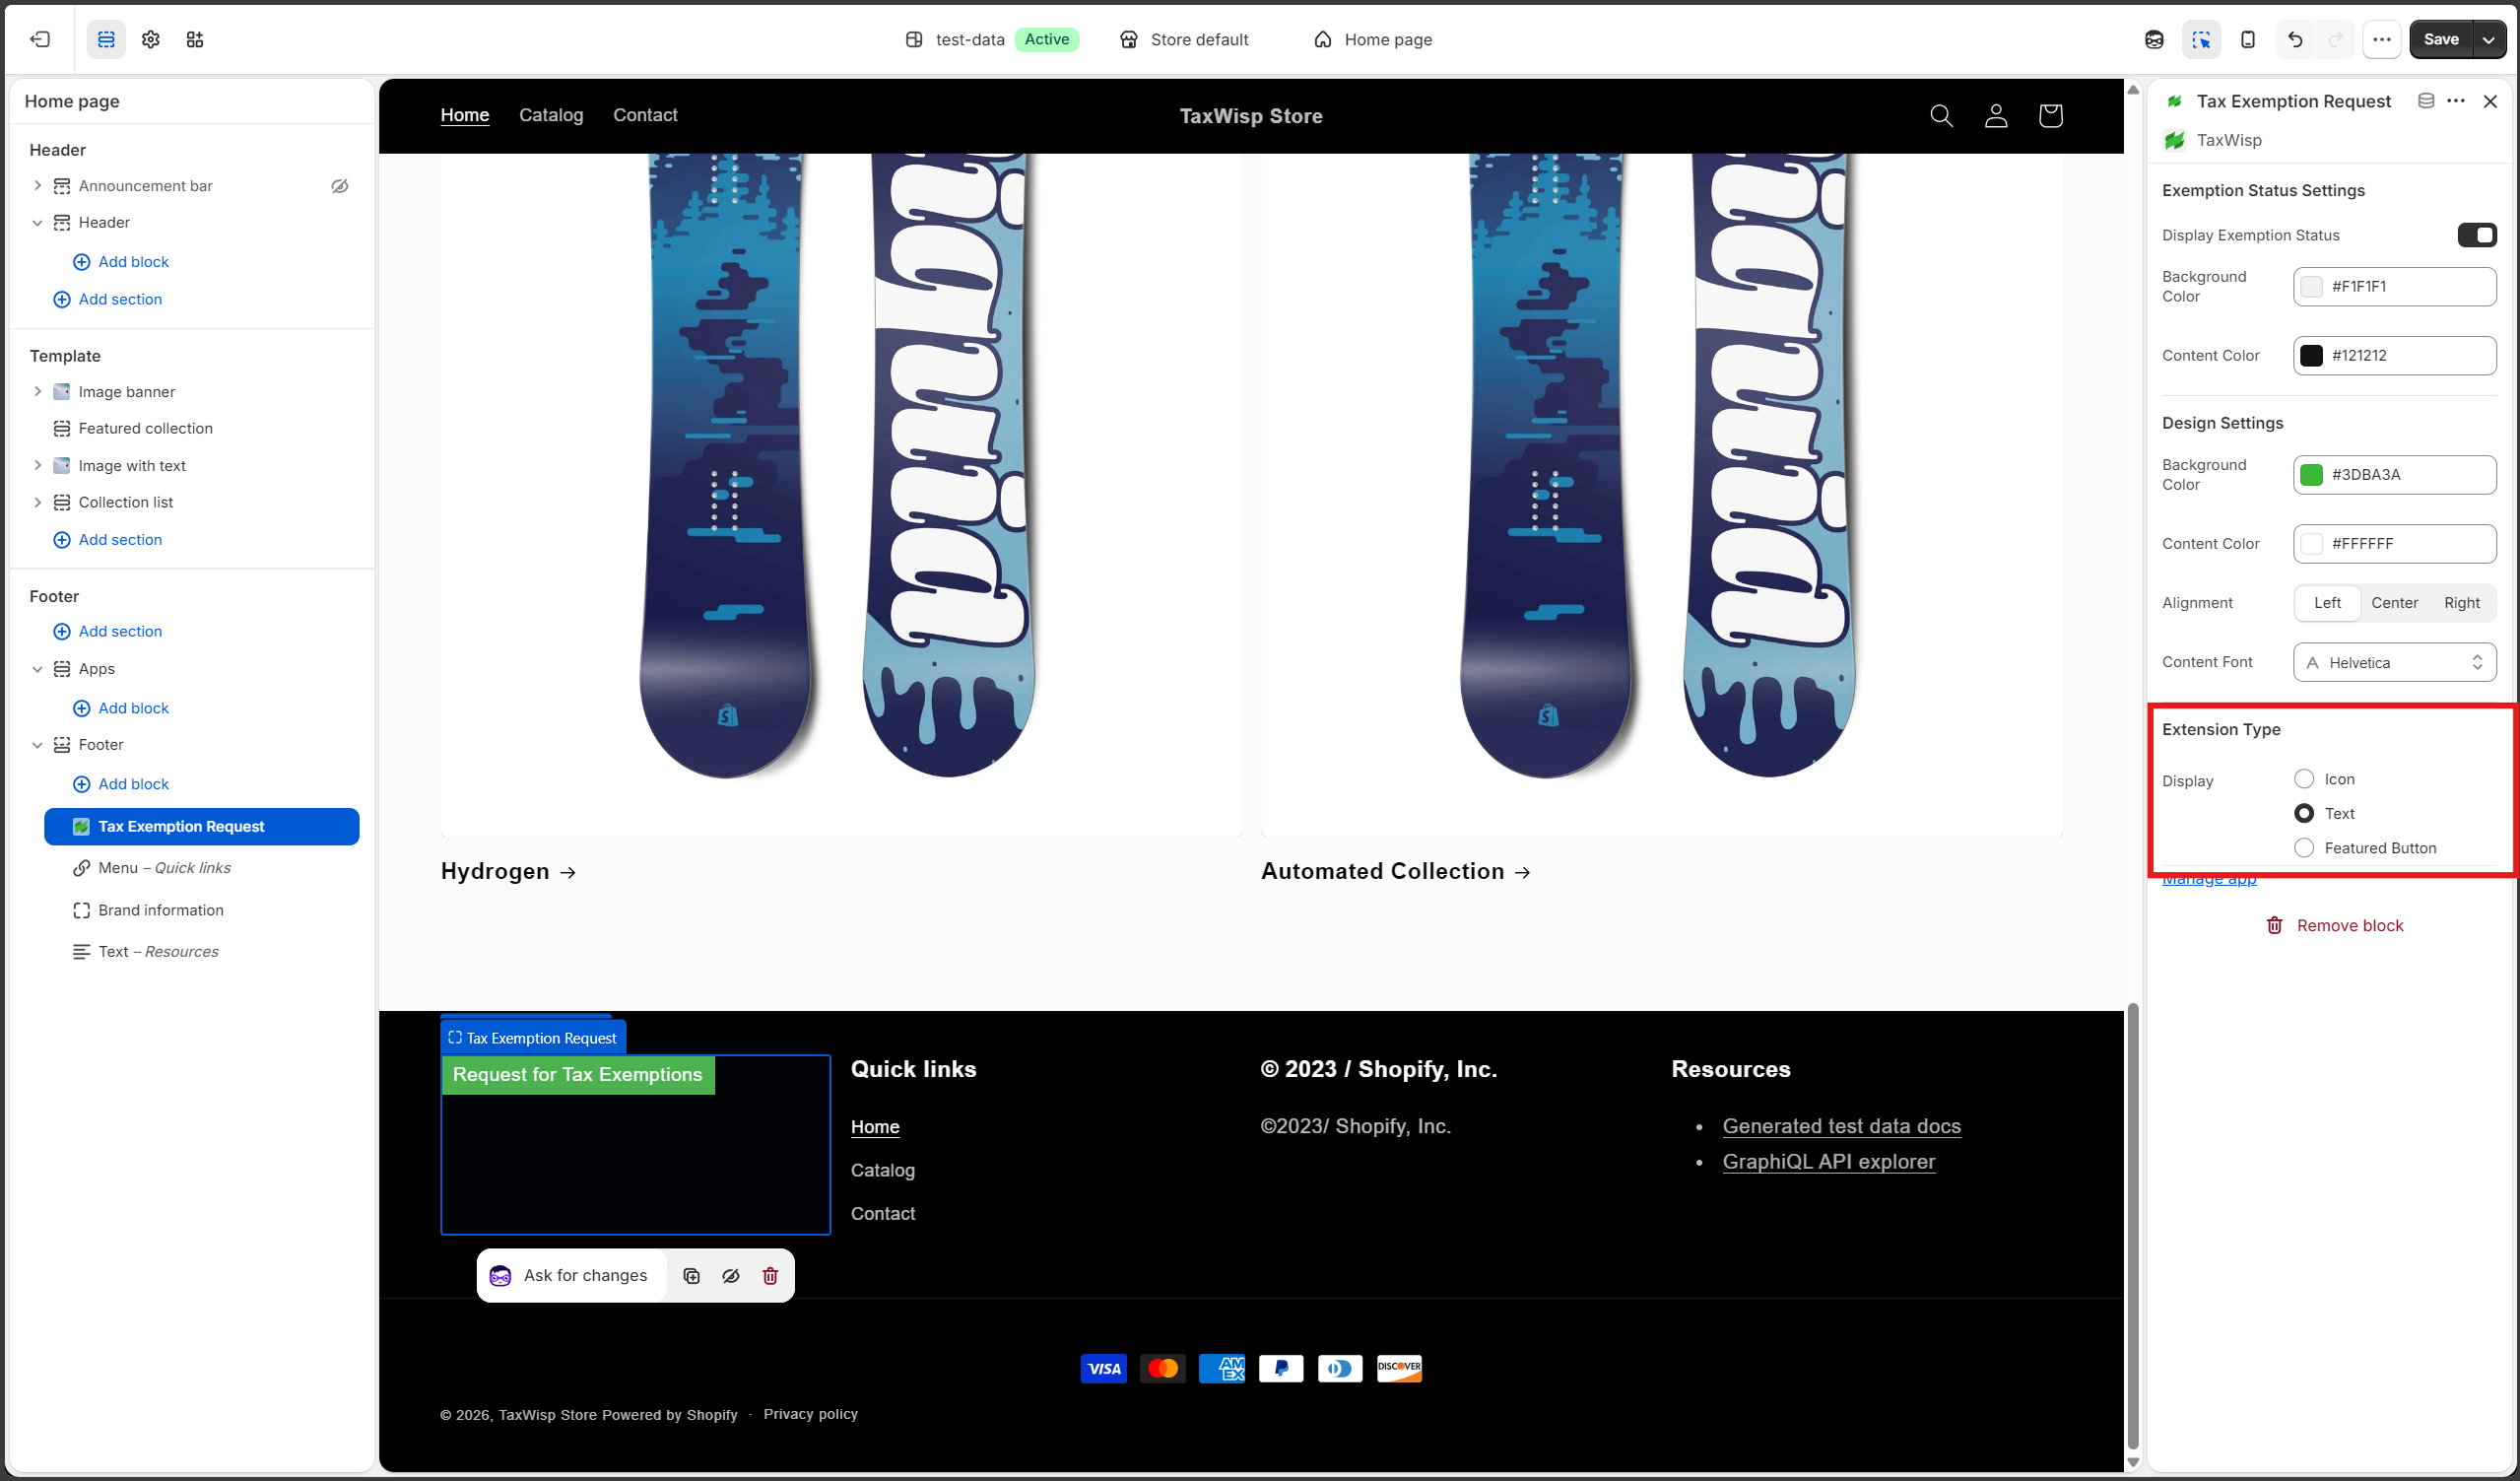
3. Extension Type
TaxWisp supports three display types: Icon, Text, & Featured Button.
Recommendation: Select Text for the Store Footer. It integrates naturally with footer links while providing customers with a clear way to access the tax exemption request process. You may also choose Featured Button if you want the request option to be more prominent. The Icon display type is generally recommended for compact locations such as the Store Header.
4. Save & Verify the Extension
Click Save in the top-right corner. Visit your storefront and scroll to the footer to verify that the TaxWisp extension is displayed correctly.
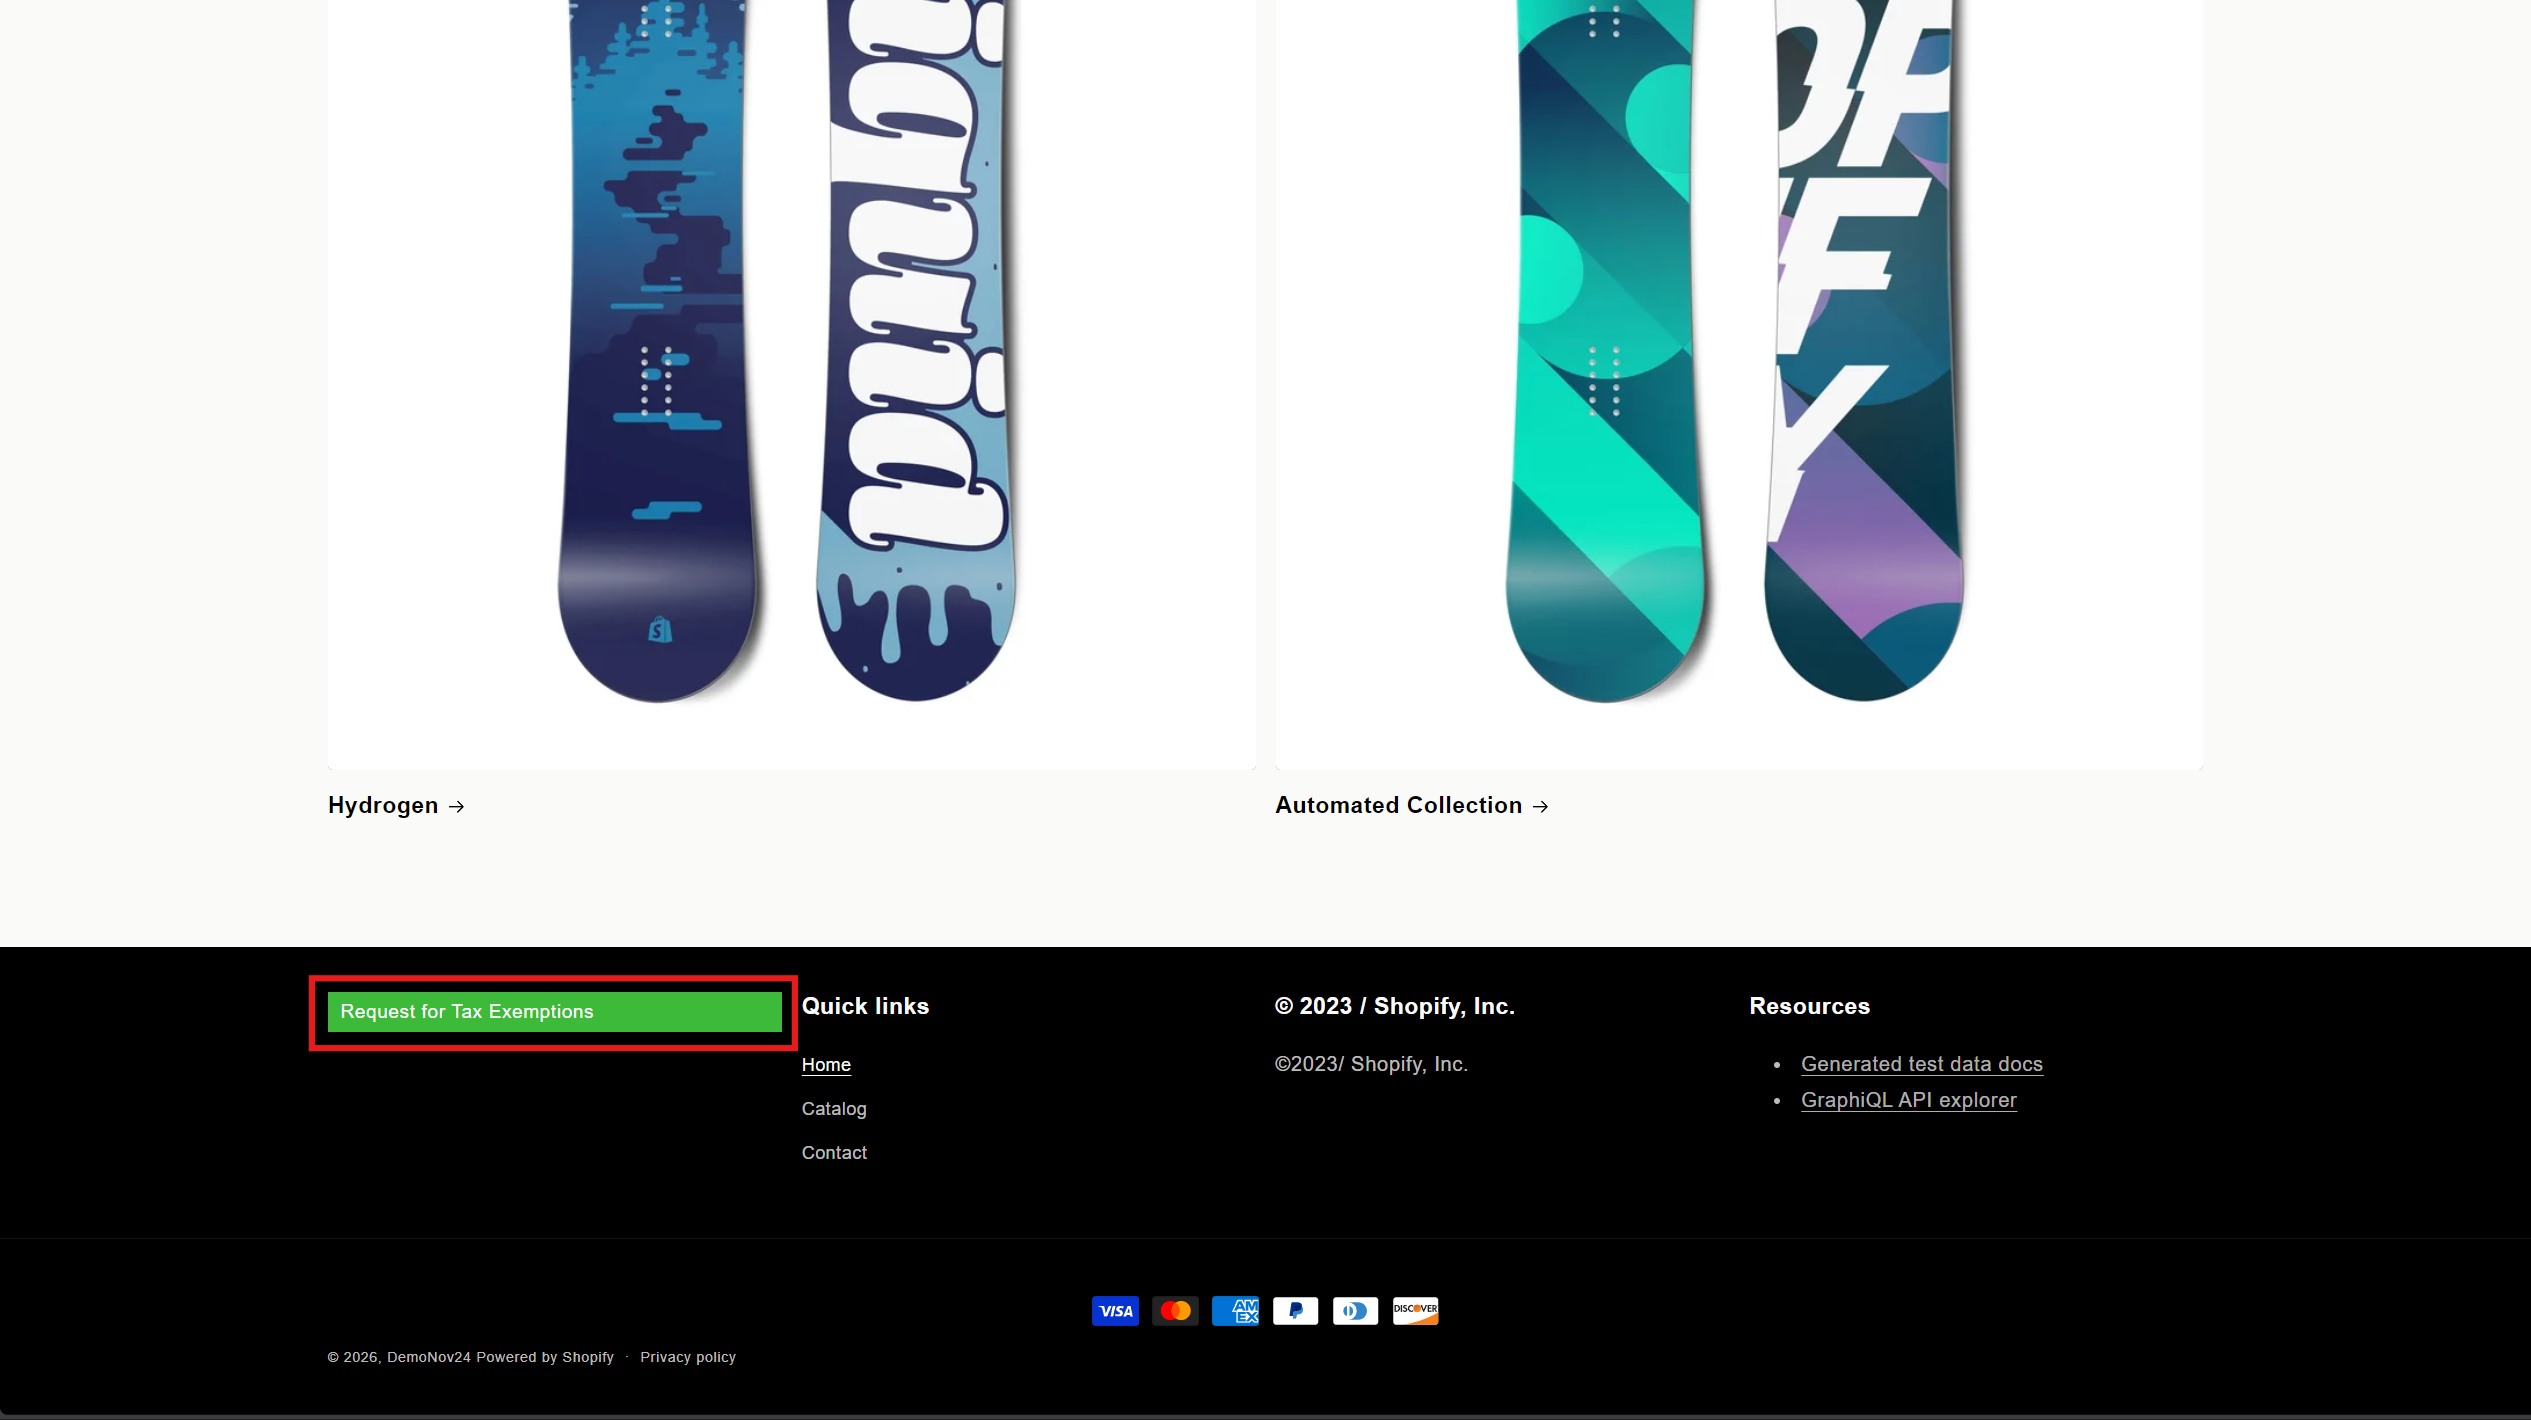
If the extension isn't visible, revisit the Theme Editor to ensure the TaxWisp app block has been added to the correct section and that your changes have been saved.
Once configured successfully, customers will see the TaxWisp footer link (or button, depending on the selected display type) and can use it to start the sales tax exemption request process.
Step 8: Adding the TaxWisp Extension to Your Checkout Page
Adding the TaxWisp Checkout Extension allows customers to request sales tax exemption directly during checkout, providing the most seamless experience before they complete their purchase.
Available only for Shopify Plus stores. Shopify only allows Checkout UI Extensions on Shopify Plus plans. If you're using a Shopify Standard plan (Basic, Grow, or Advanced), you won't be able to add TaxWisp to your checkout page.
There are two ways to open the Checkout Editor and add the TaxWisp Checkout Extension.
Method 1: Using the Dashboard Shortcut (Recommended)
-
Open Shopify Admin → Apps → TaxWisp.
-
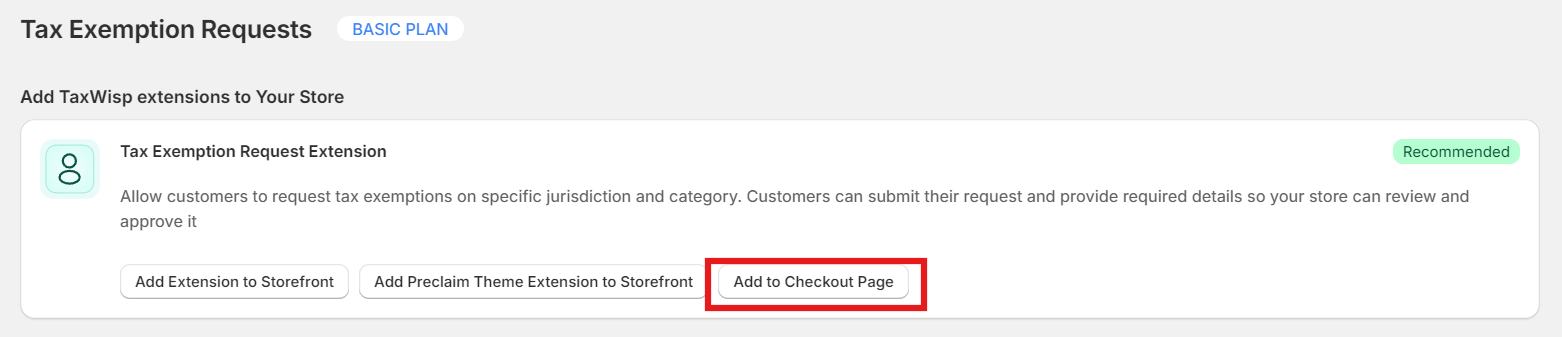
From the TaxWisp Dashboard, locate the Tax Exemption Request Extension card.
-
Click Add to Checkout Page.
-
You'll be redirected directly to Shopify's Checkout Editor, where you can add and configure the TaxWisp Checkout Extension.
Method 2: Using Shopify Checkout Settings
-
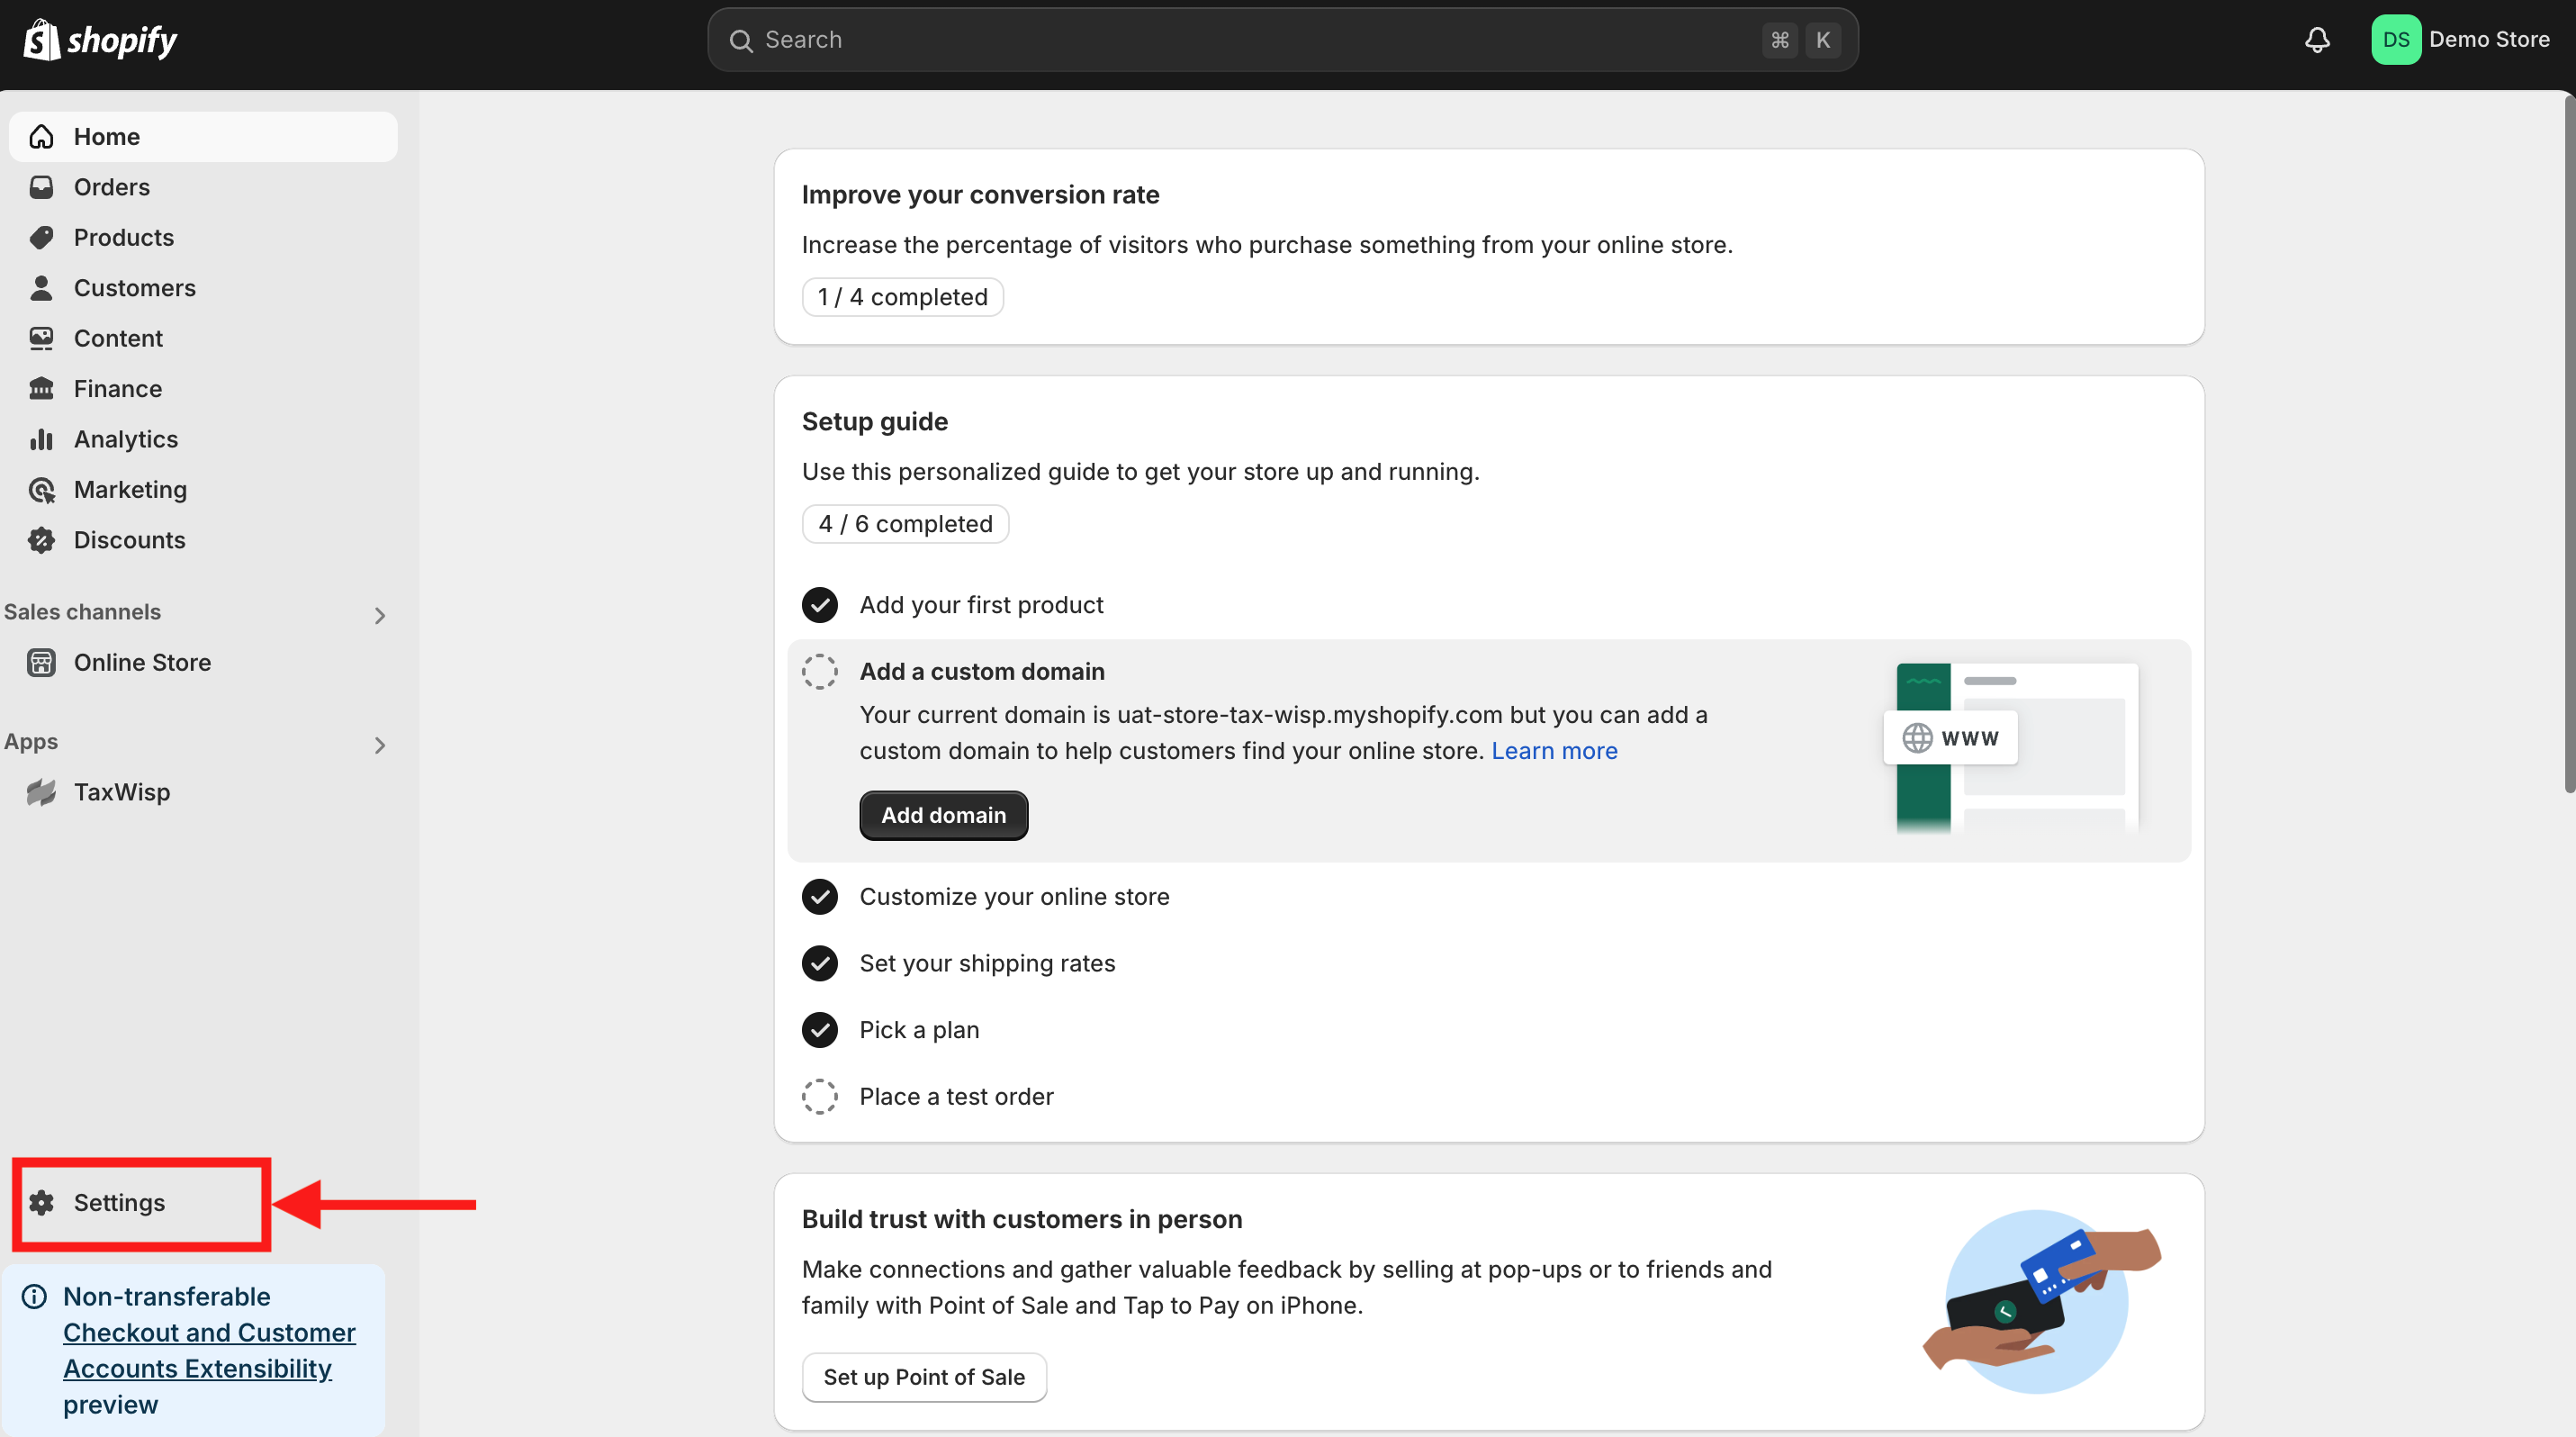
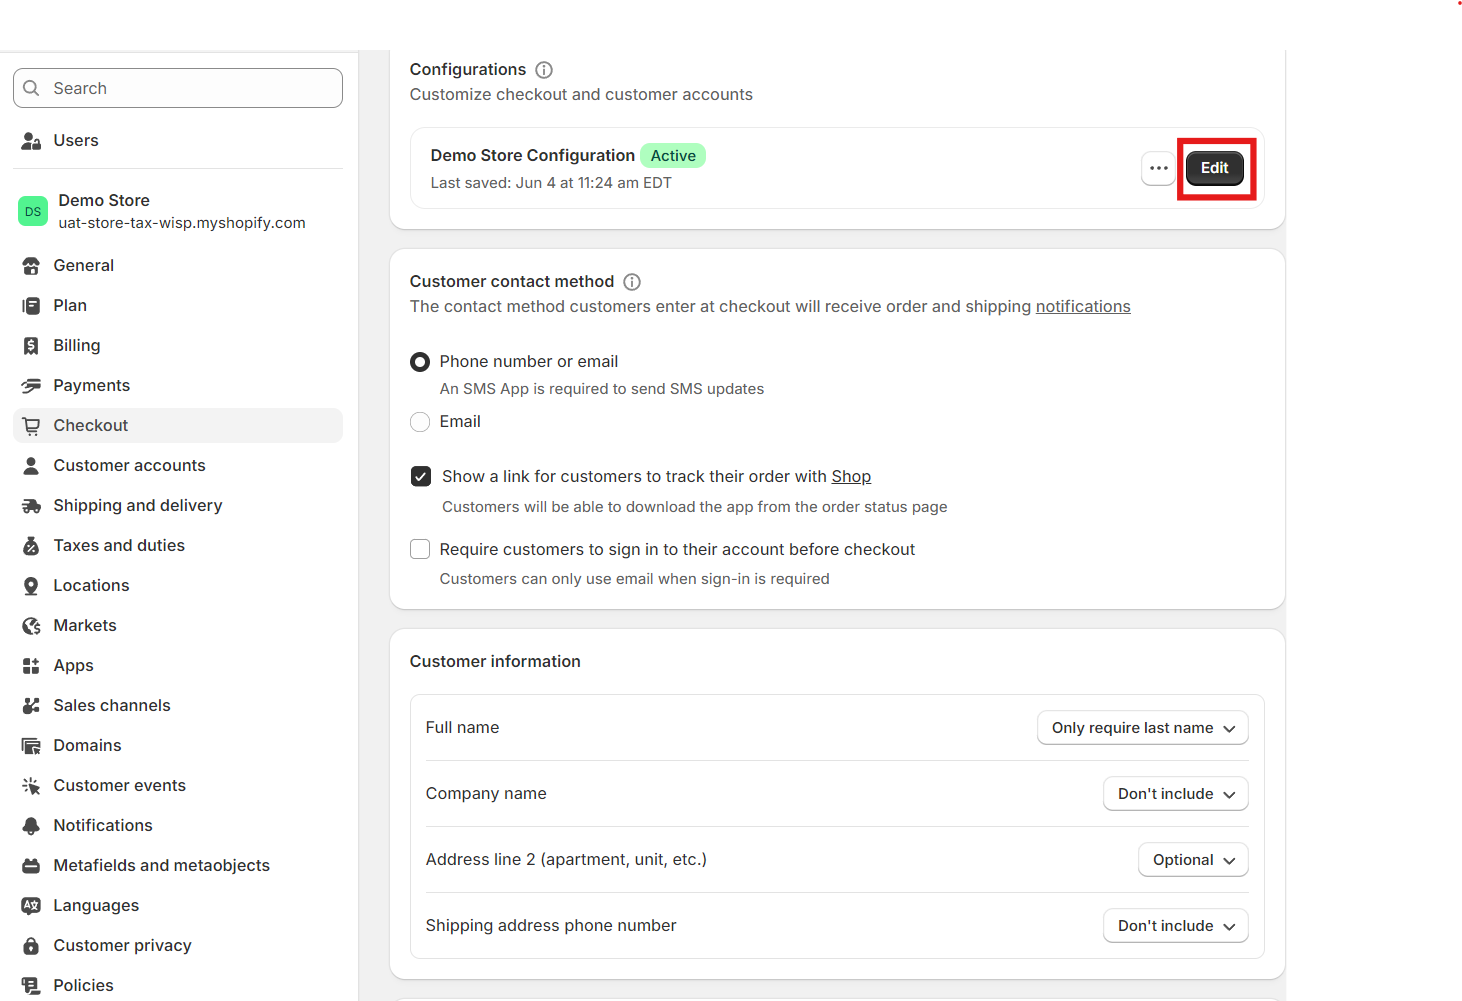
In your Shopify Admin Panel, go to Store Settings.
-
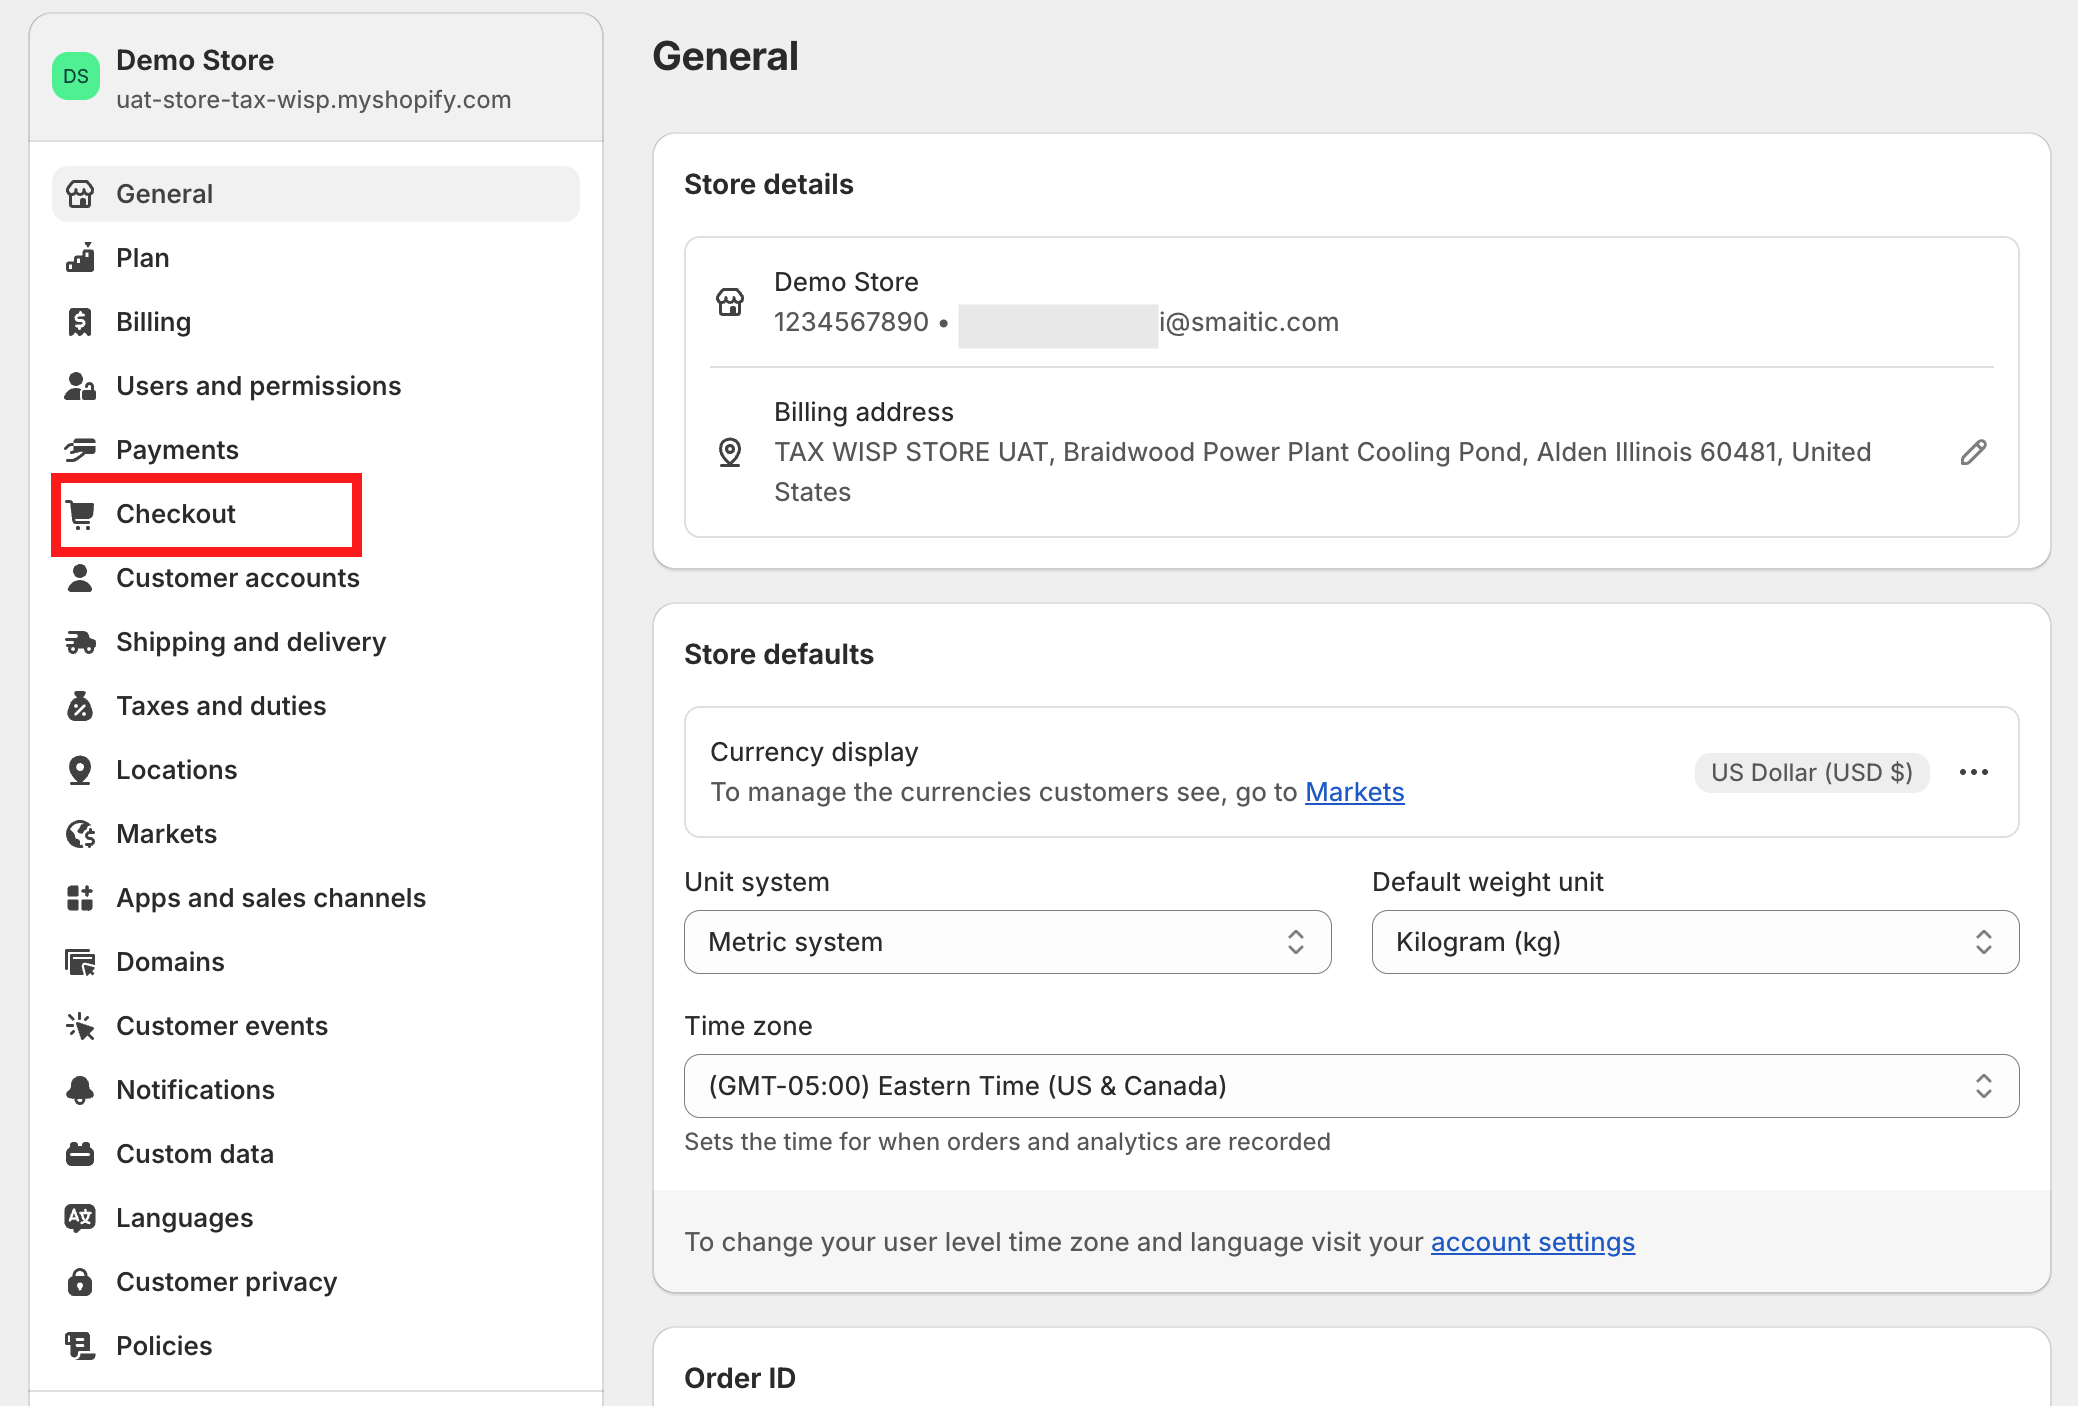
On the Settings page, select Checkout from the left-hand navigation menu.
-
Under the Configurations section, click on Edit.
-
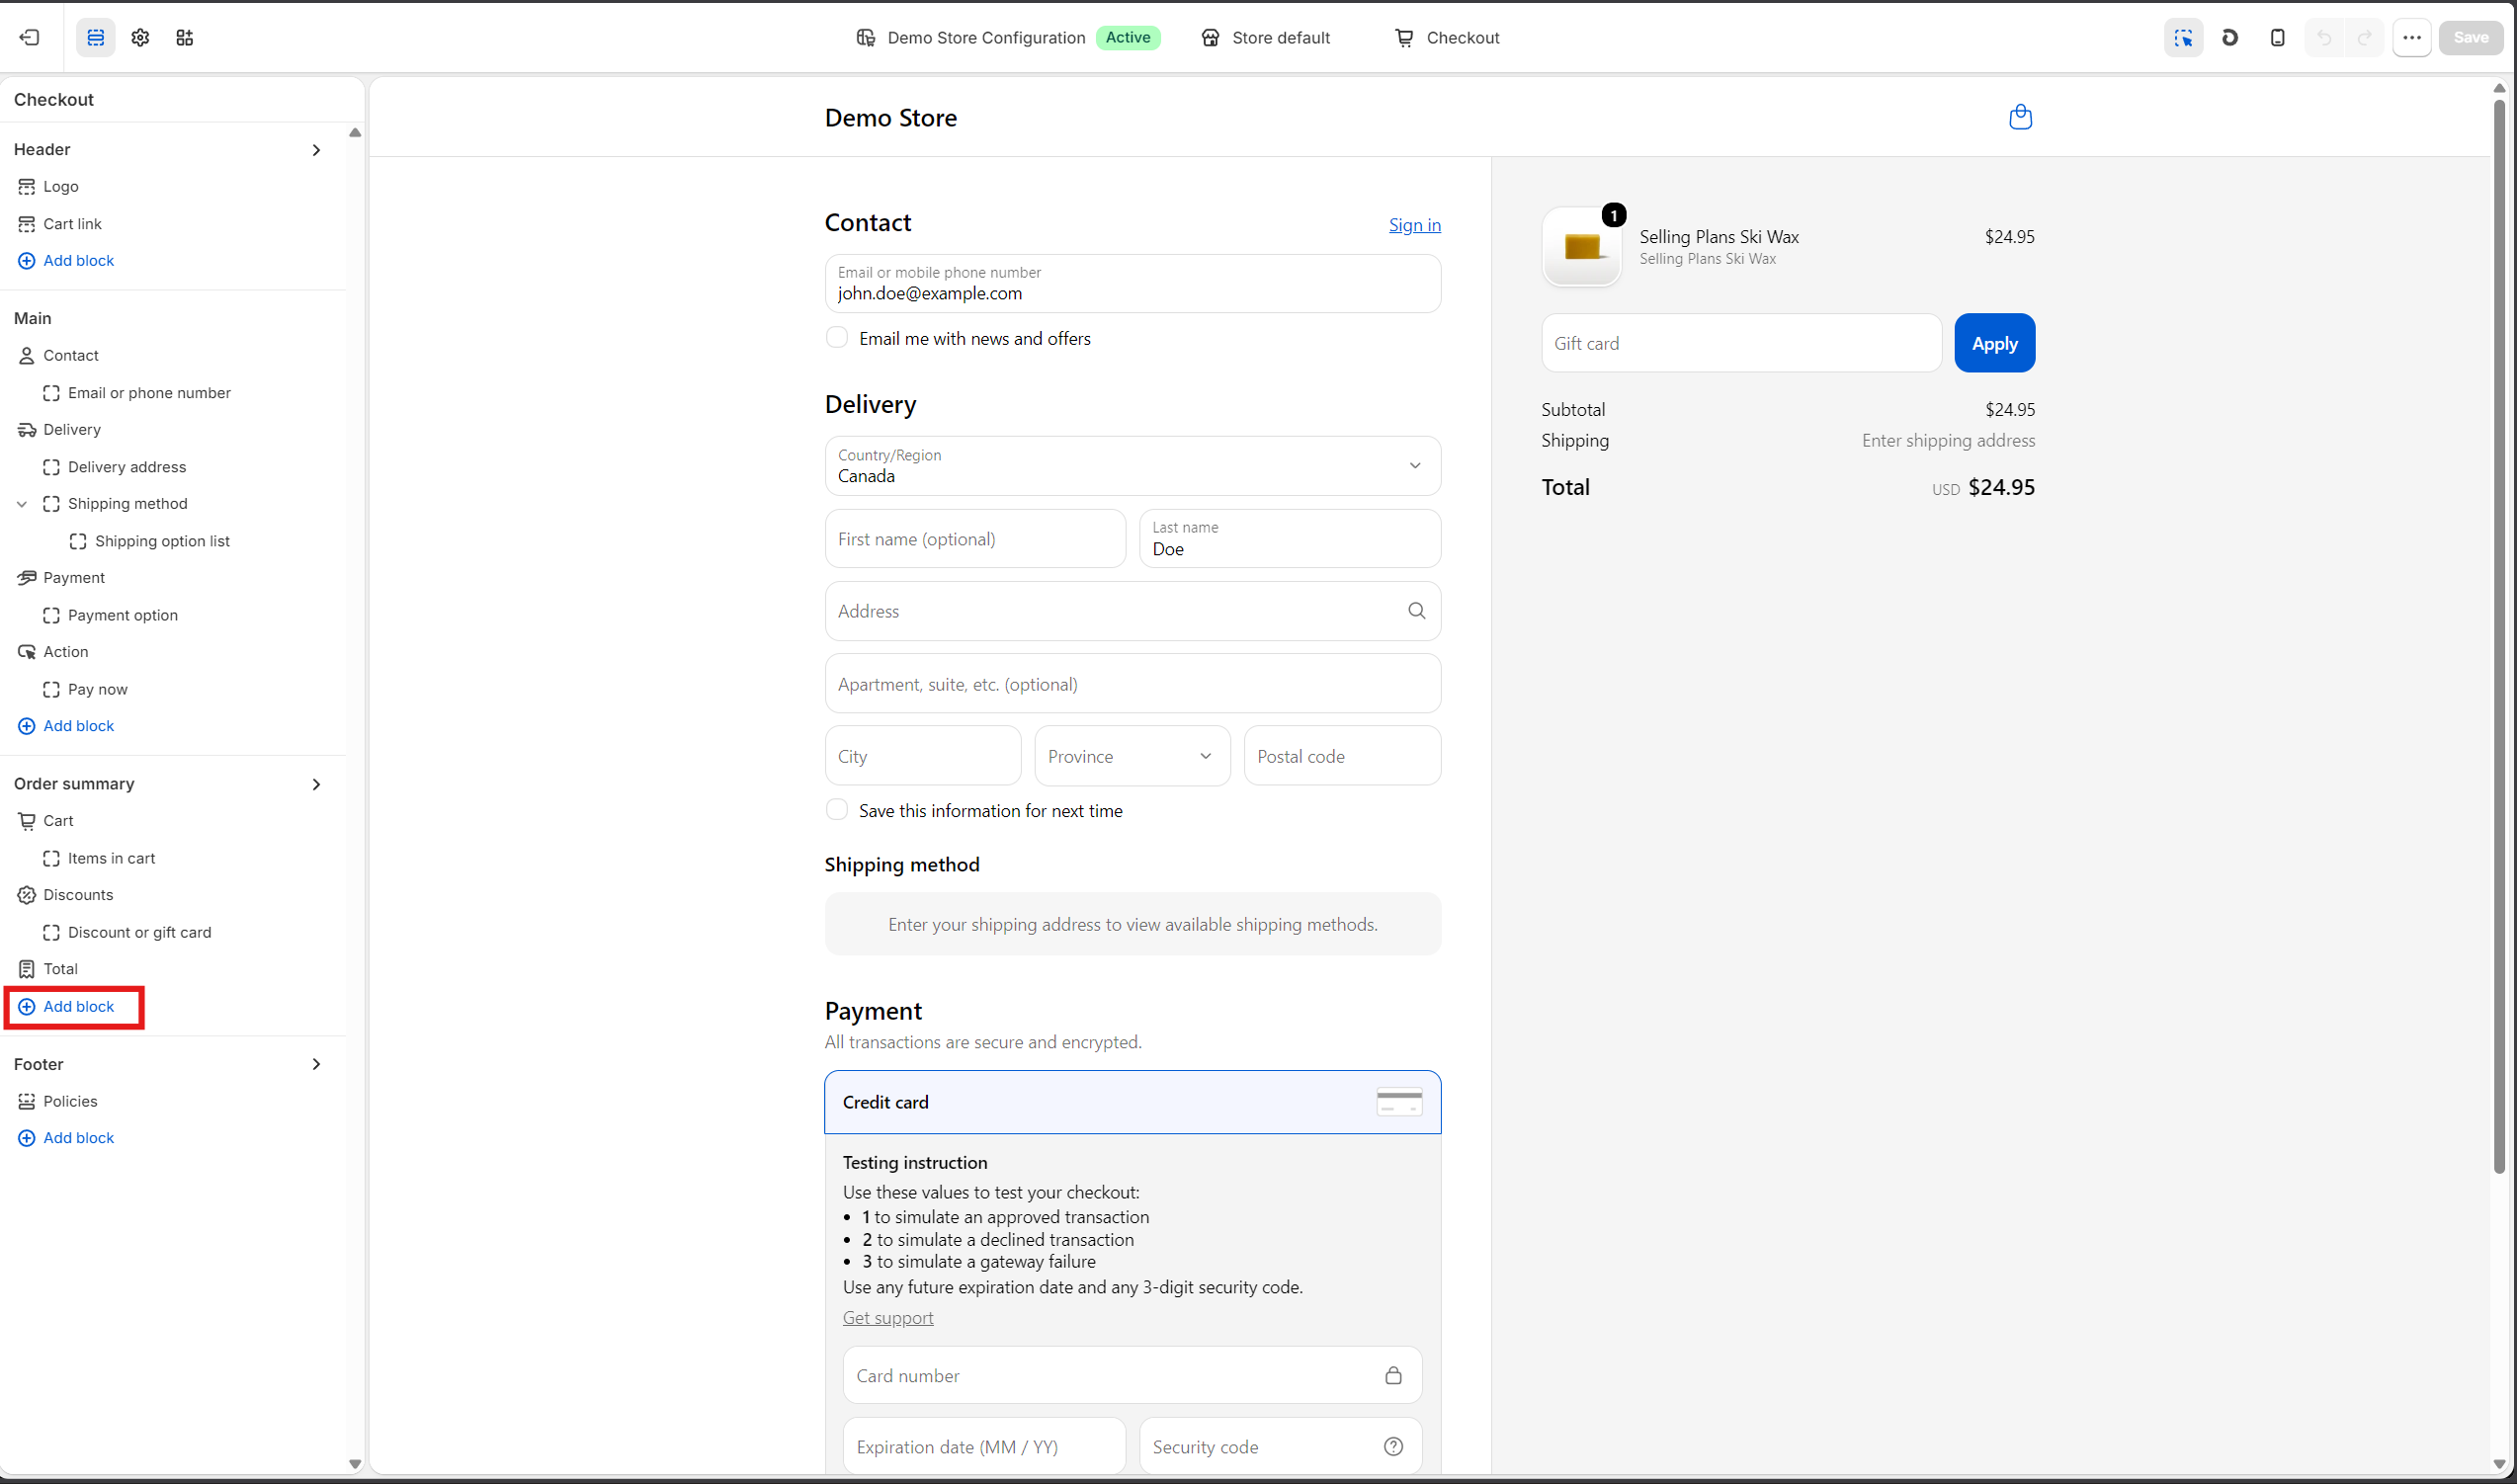
You’ll be directed to the Checkout Customization page. On the left-hand side, find and click Add app block under Order Summary Section. You can add the TaxWisp extension to any section of your checkout page upon your preference, but we recommend adding it to the Order Summary section for better visibility.
-
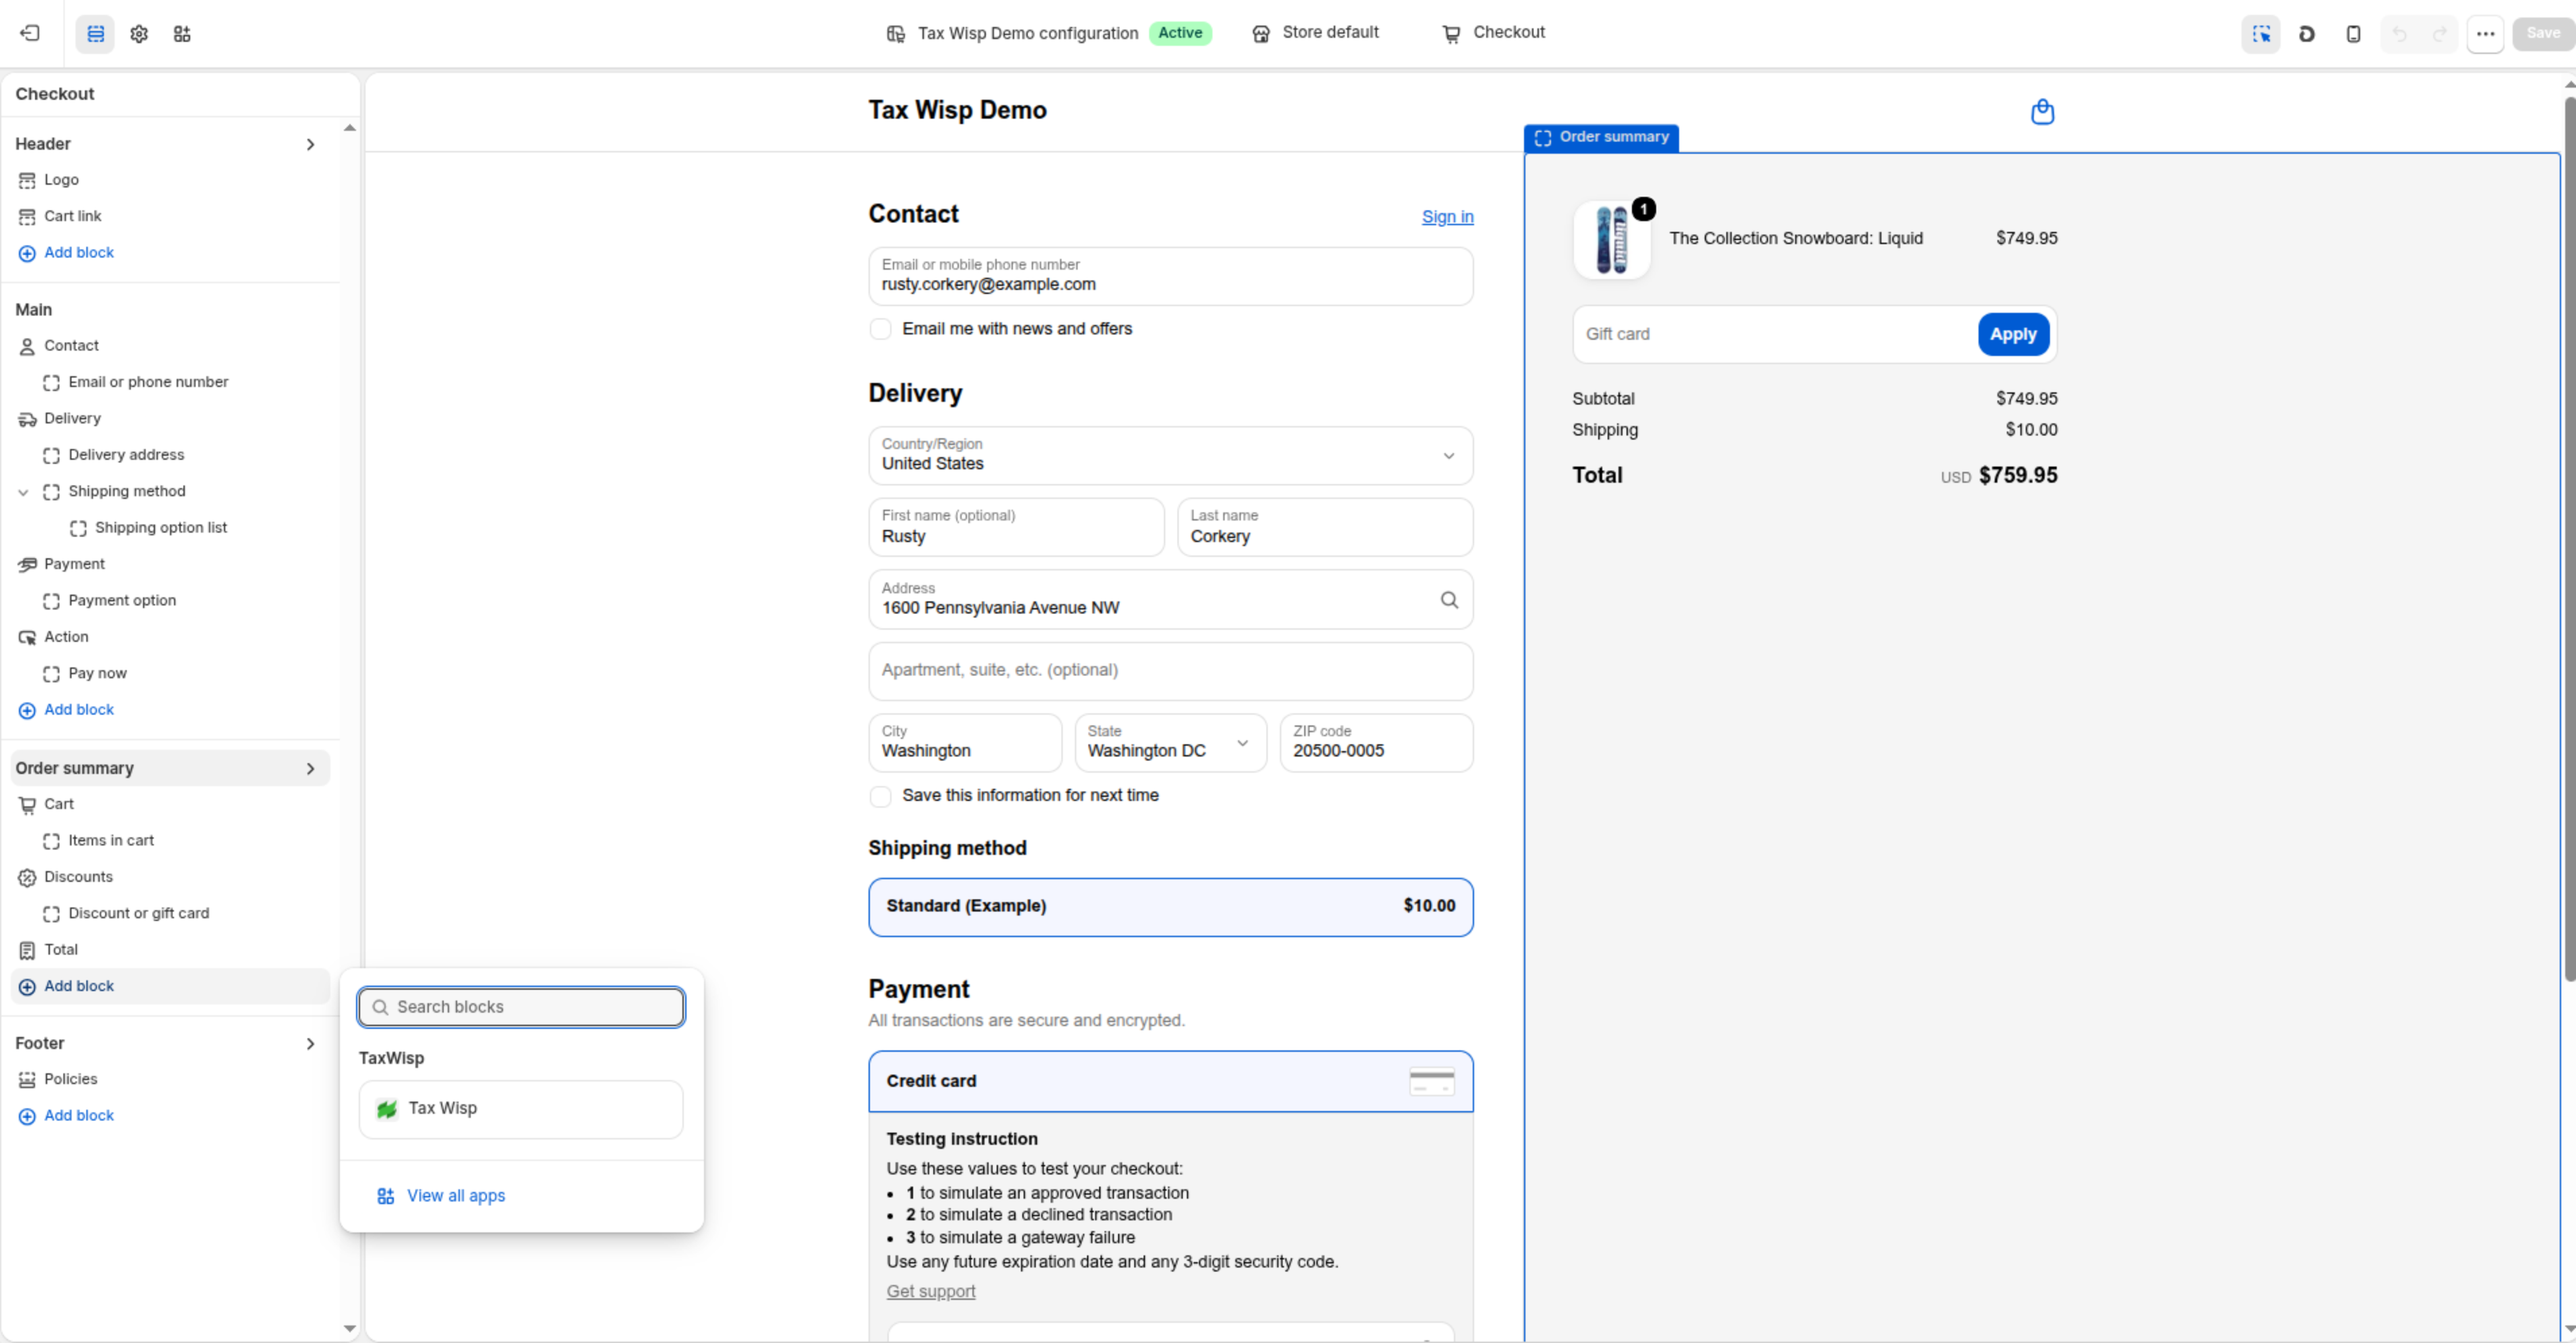
From the list of available extensions, select TaxWisp to add it to the checkout page. You can place the extension in any section of the checkout page.
Once the extension has been added, the customization panel will appear.
Configure the Checkout Extension
The Checkout Extension requires minimal configuration.
1. Checkout Behavior
The only checkout-specific setting available is: "Include block in Shop Pay"
Enable this option if you want the TaxWisp Checkout Extension to also appear when customers use Shop Pay during checkout.
Recommendation: Enable this option if your store supports Shop Pay and you want tax-exempt customers to have a consistent checkout experience regardless of the checkout method they choose.
2. Extension Content
The Checkout Extension automatically uses the same Extension Label and Extension Description configured for your storefront extensions.
To customize this content, navigate to: Shopify Admin → Apps → TaxWisp → Settings → Tax Exemption Display Content
Any updates made there will automatically be reflected on the Checkout Extension.
3. Position the Extension
Drag and reposition the TaxWisp Checkout Extension within the selected checkout section.
Recommended Placement: Place the extension below the Order Summary totals. This ensures the tax exemption request option is clearly visible before customers complete their purchase.
4. Save & Verify the Extension
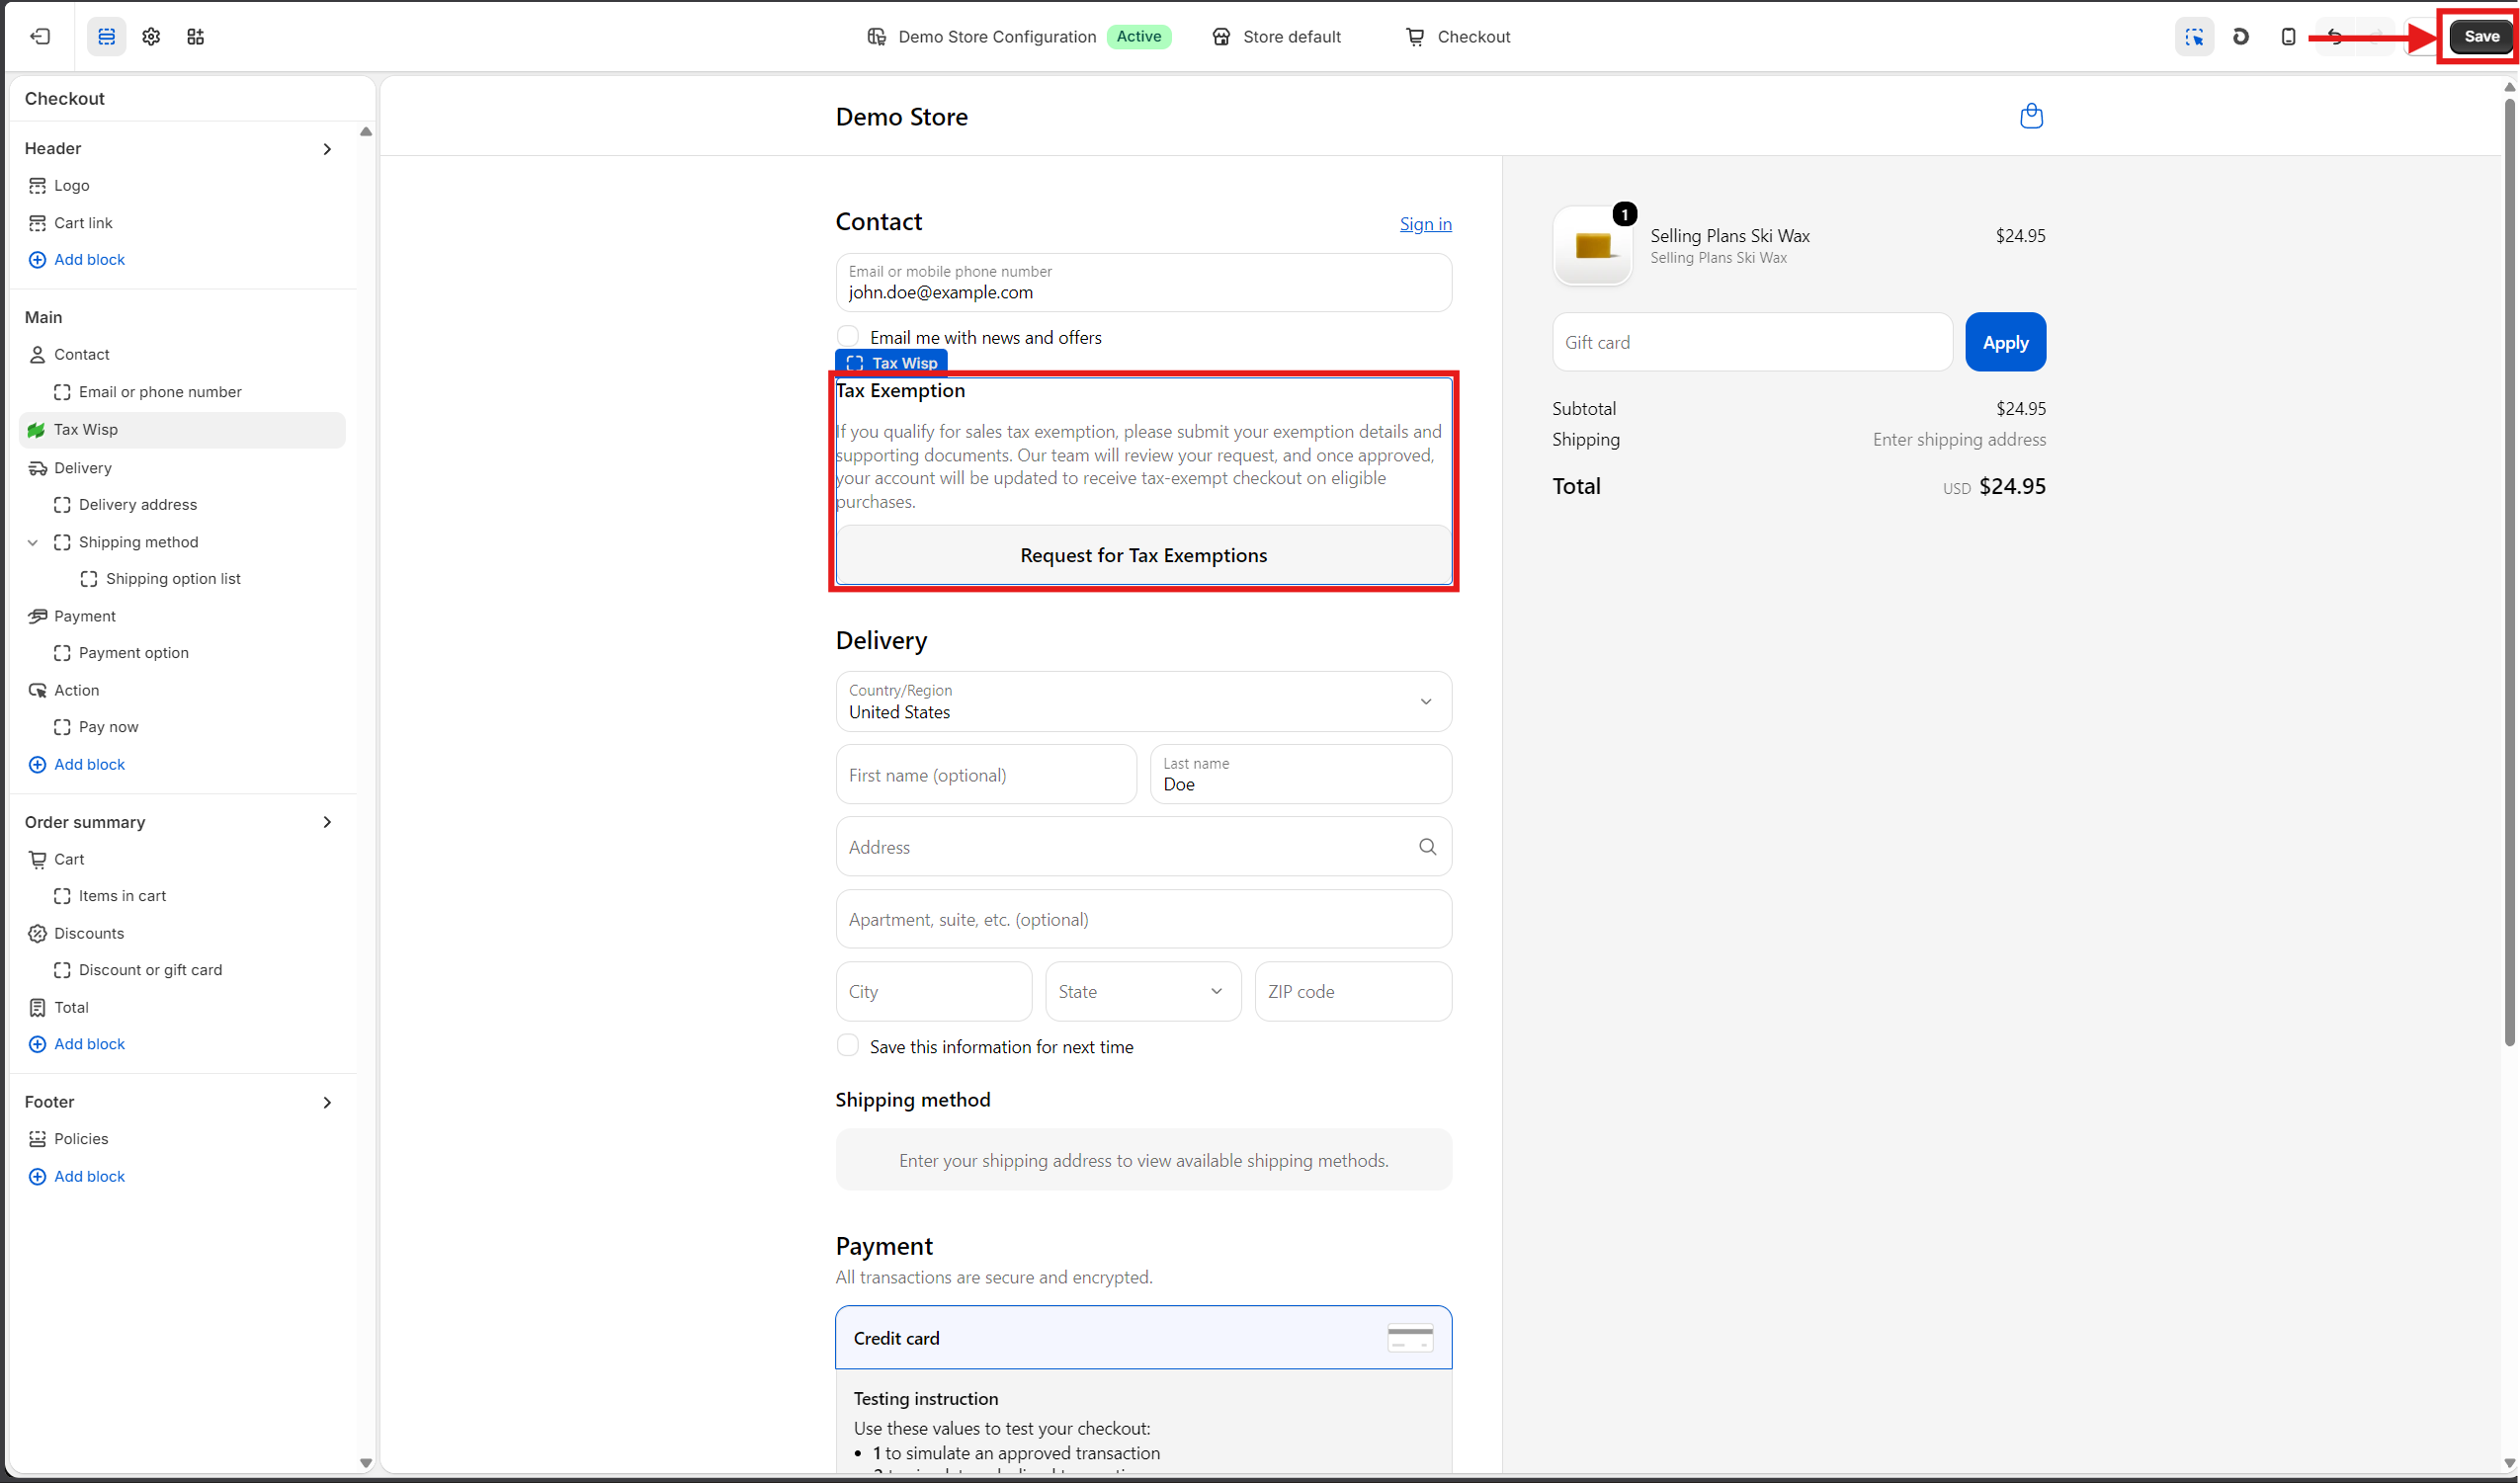
Click Save in the top-right corner once you complete adding the TaxWisp checkout extension.
Open your storefront and proceed to checkout to verify that the TaxWisp Checkout Extension is displayed correctly. If enabled, repeat the process using Shop Pay to confirm that the extension is also displayed there.
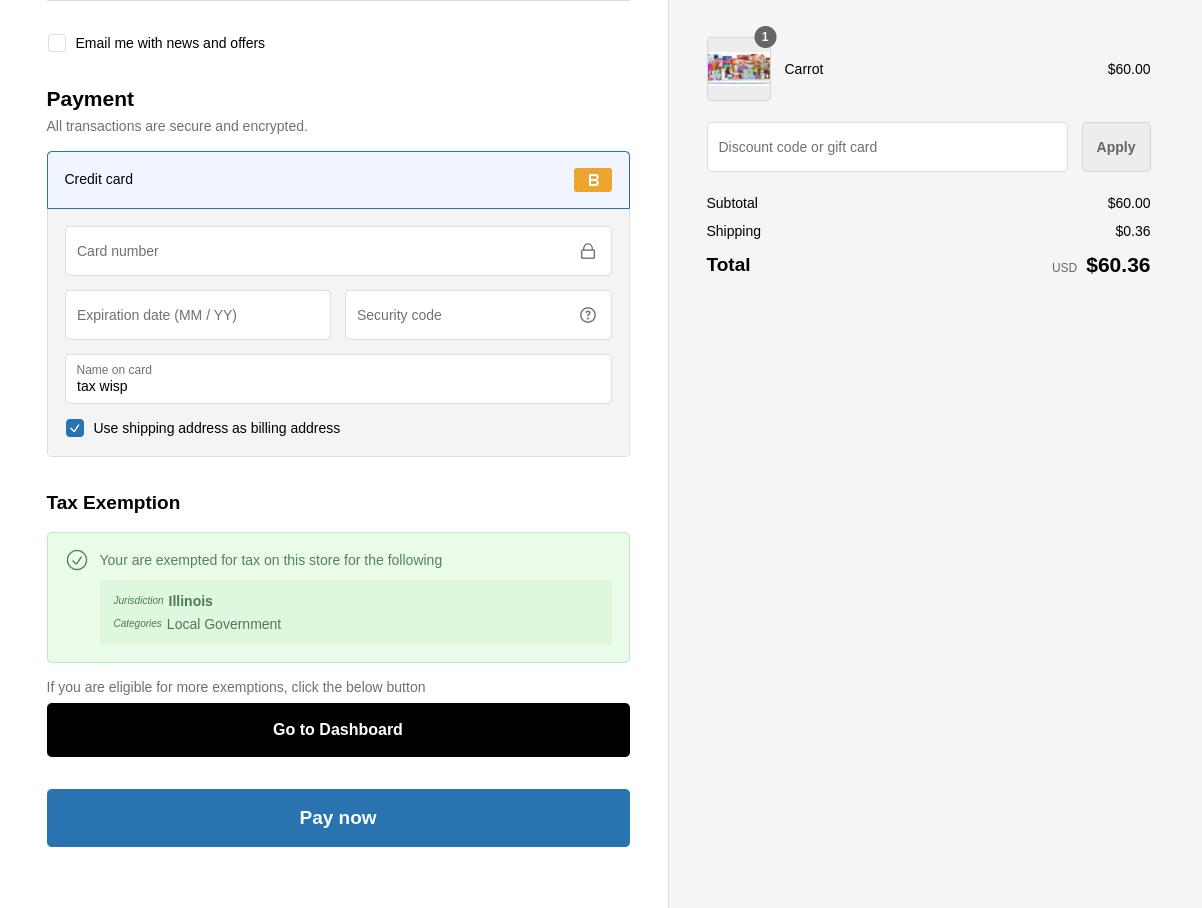
If the extension isn't visible, revisit the Checkout Editor to ensure the TaxWisp app block has been added to the correct checkout section and that your changes have been saved.
Once configured successfully, eligible customers will be able to request sales tax exemption directly during checkout, providing the fastest and most seamless tax-exempt experience for Shopify Plus stores.
Step 9: Configure Your TaxWisp Settings
Before accepting tax exemption requests from customers, we recommend configuring the basic TaxWisp settings to match your store's requirements. These settings determine how customers interact with TaxWisp and how exemption requests are managed within your store.
Navigate to: Shopify Admin → Apps → TaxWisp → Settings
Review and configure the following settings:
- Communication Emails – Add one or more email addresses to receive notifications for tax exemption requests and other exemption-related events.
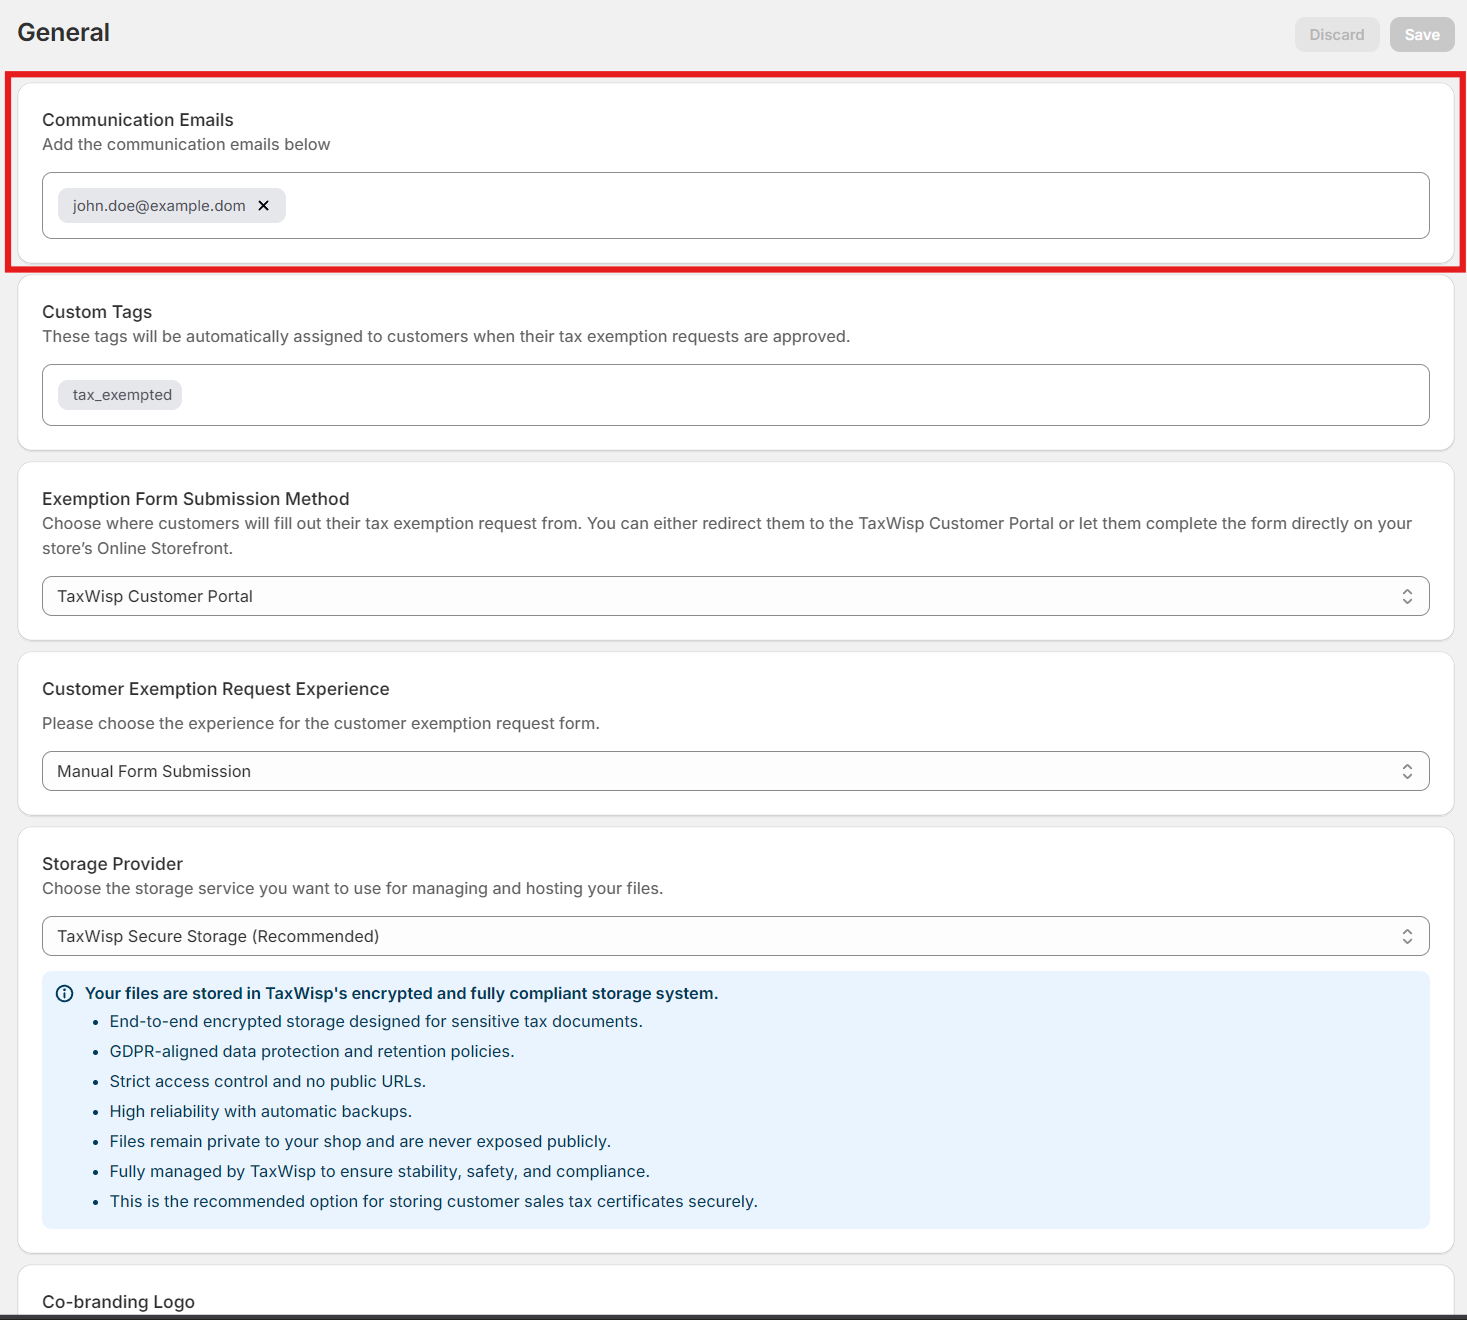
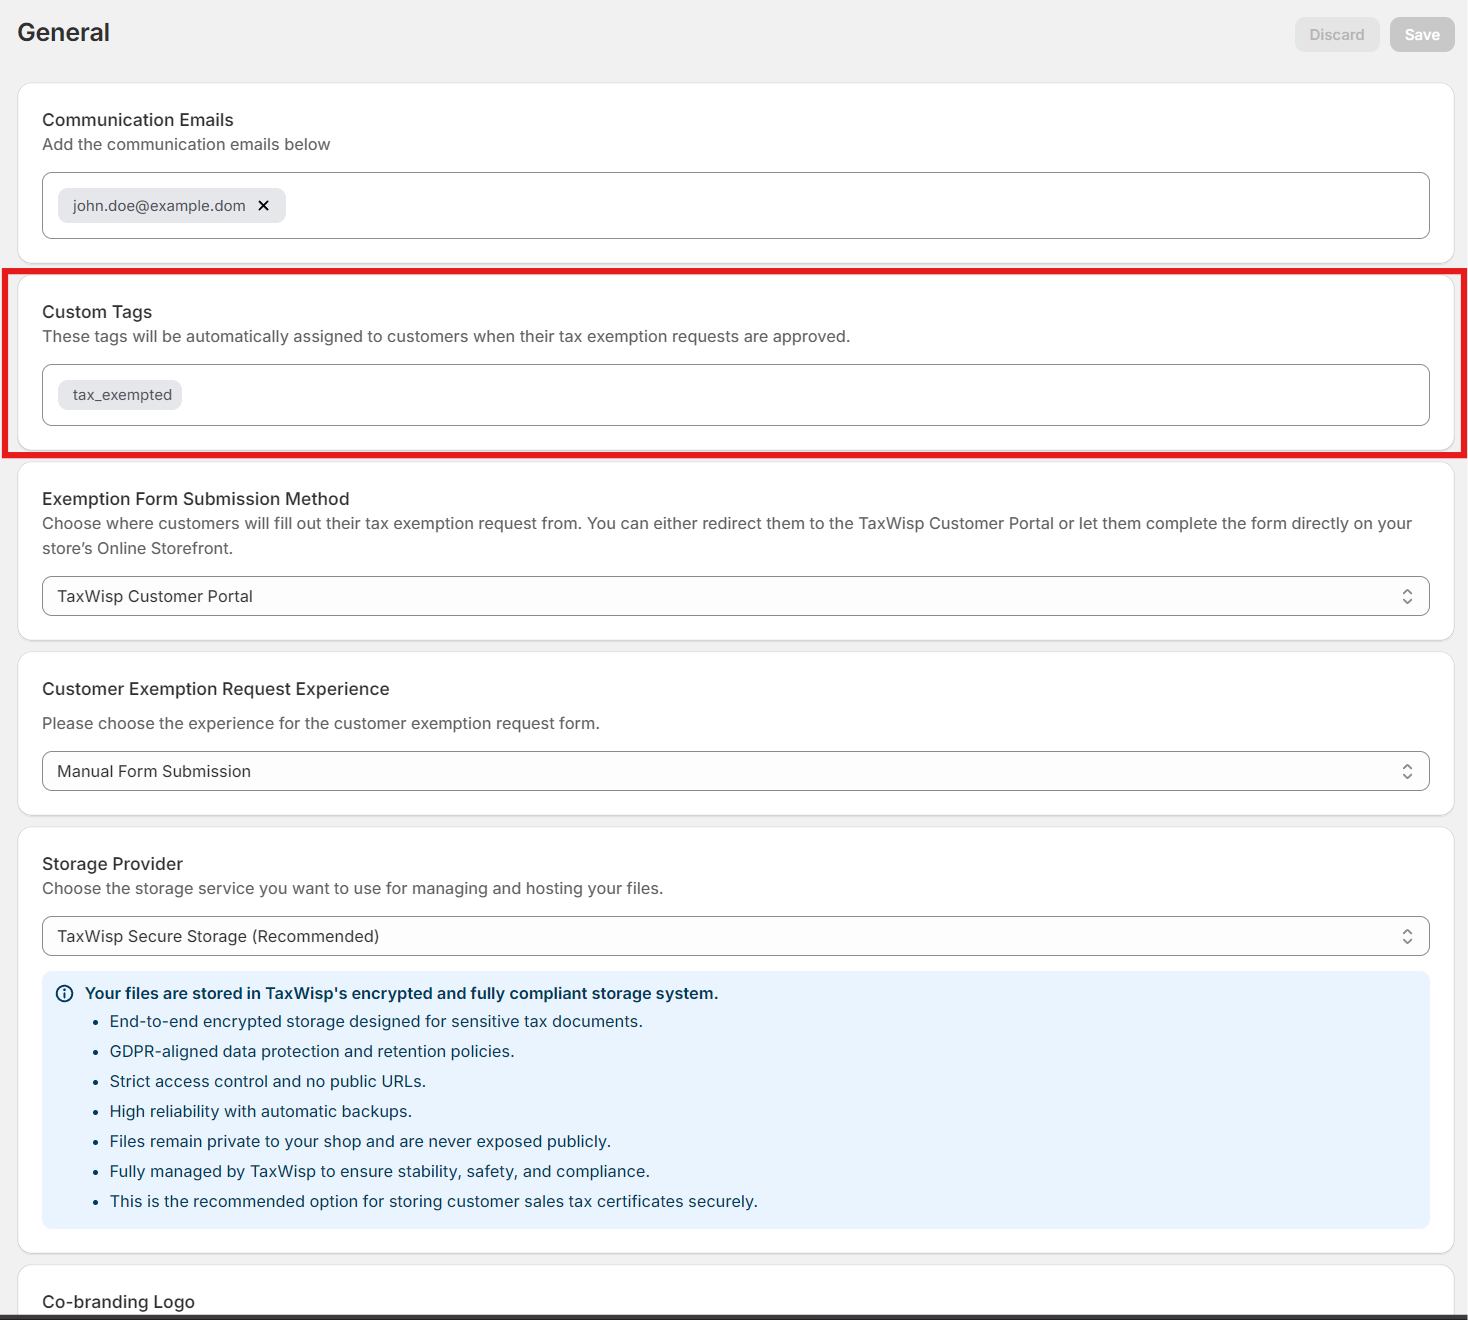
- Custom Customer Tags – Define the customer tags that will be automatically assigned when exemption requests are approved.
- Tax Exemption Display Content – Customize the extension label and customer-facing description displayed on your storefront and checkout extension.
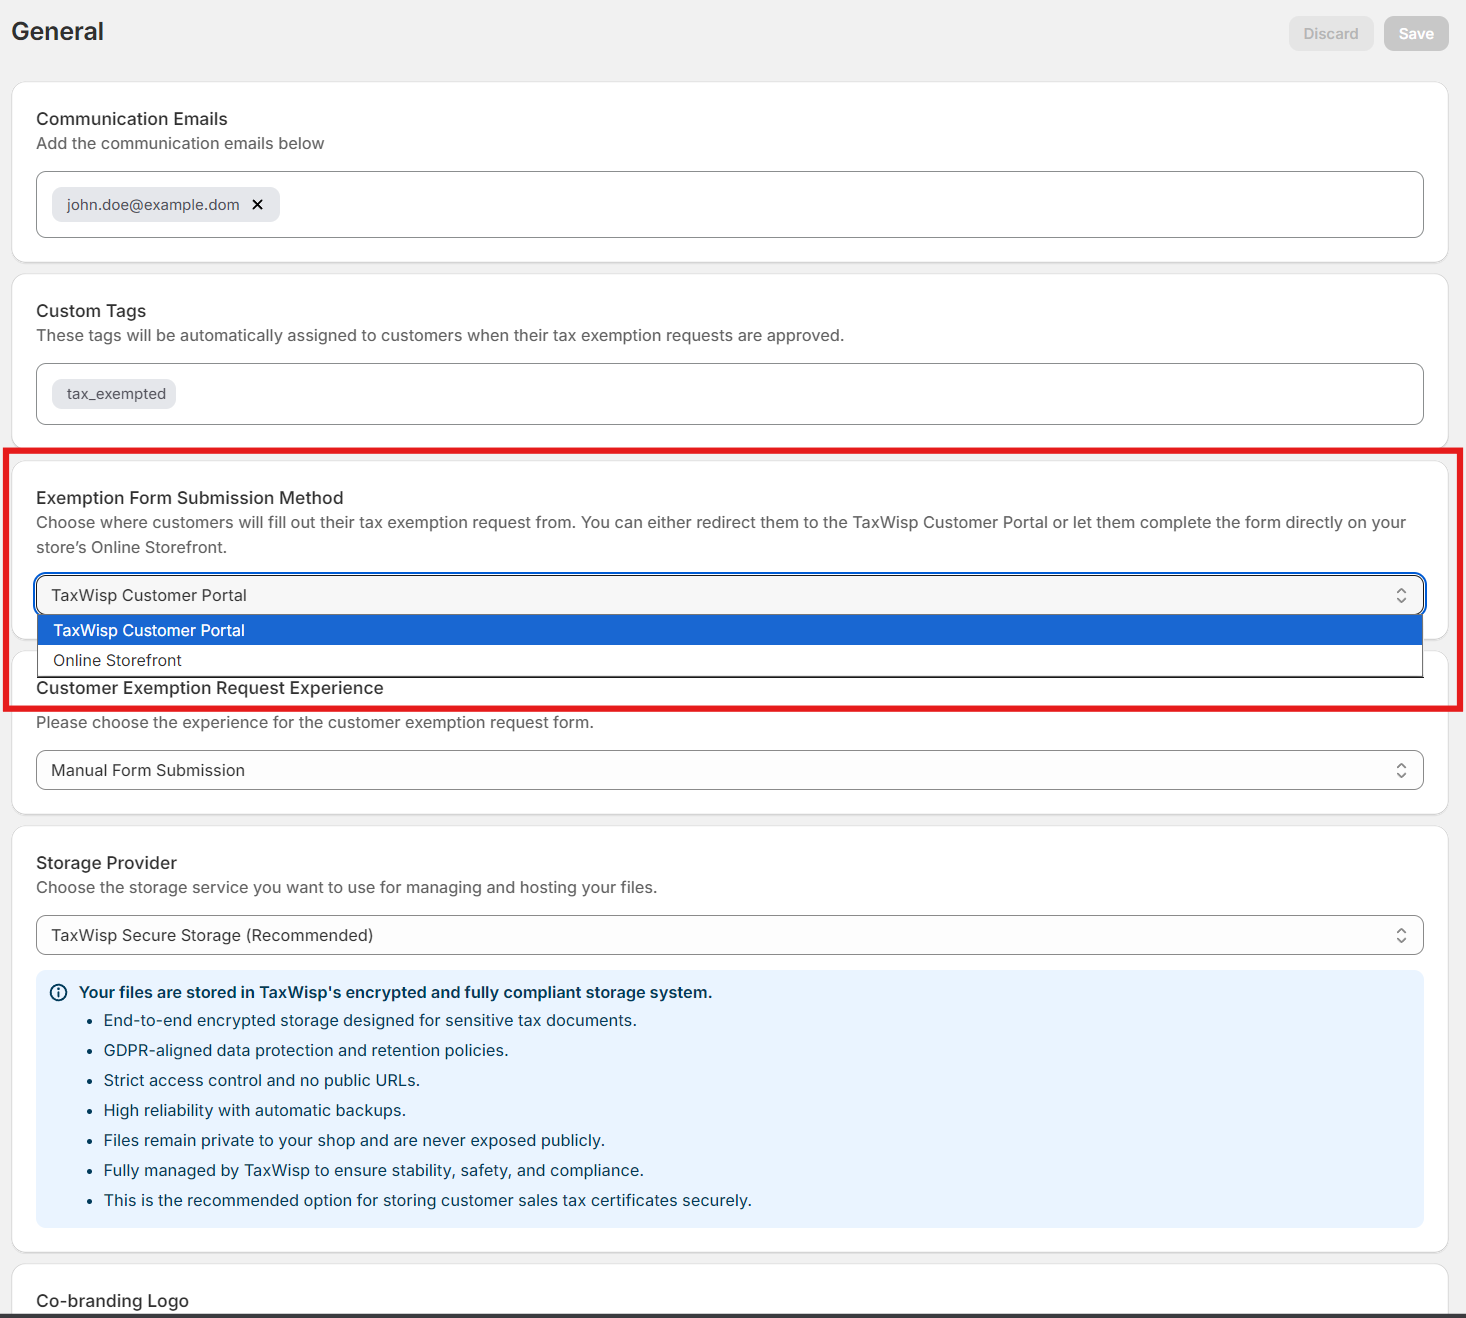
- Exemption Form Submission Method – Choose whether customers submit exemption requests directly from your Online Storefront or through the TaxWisp Customer Portal.
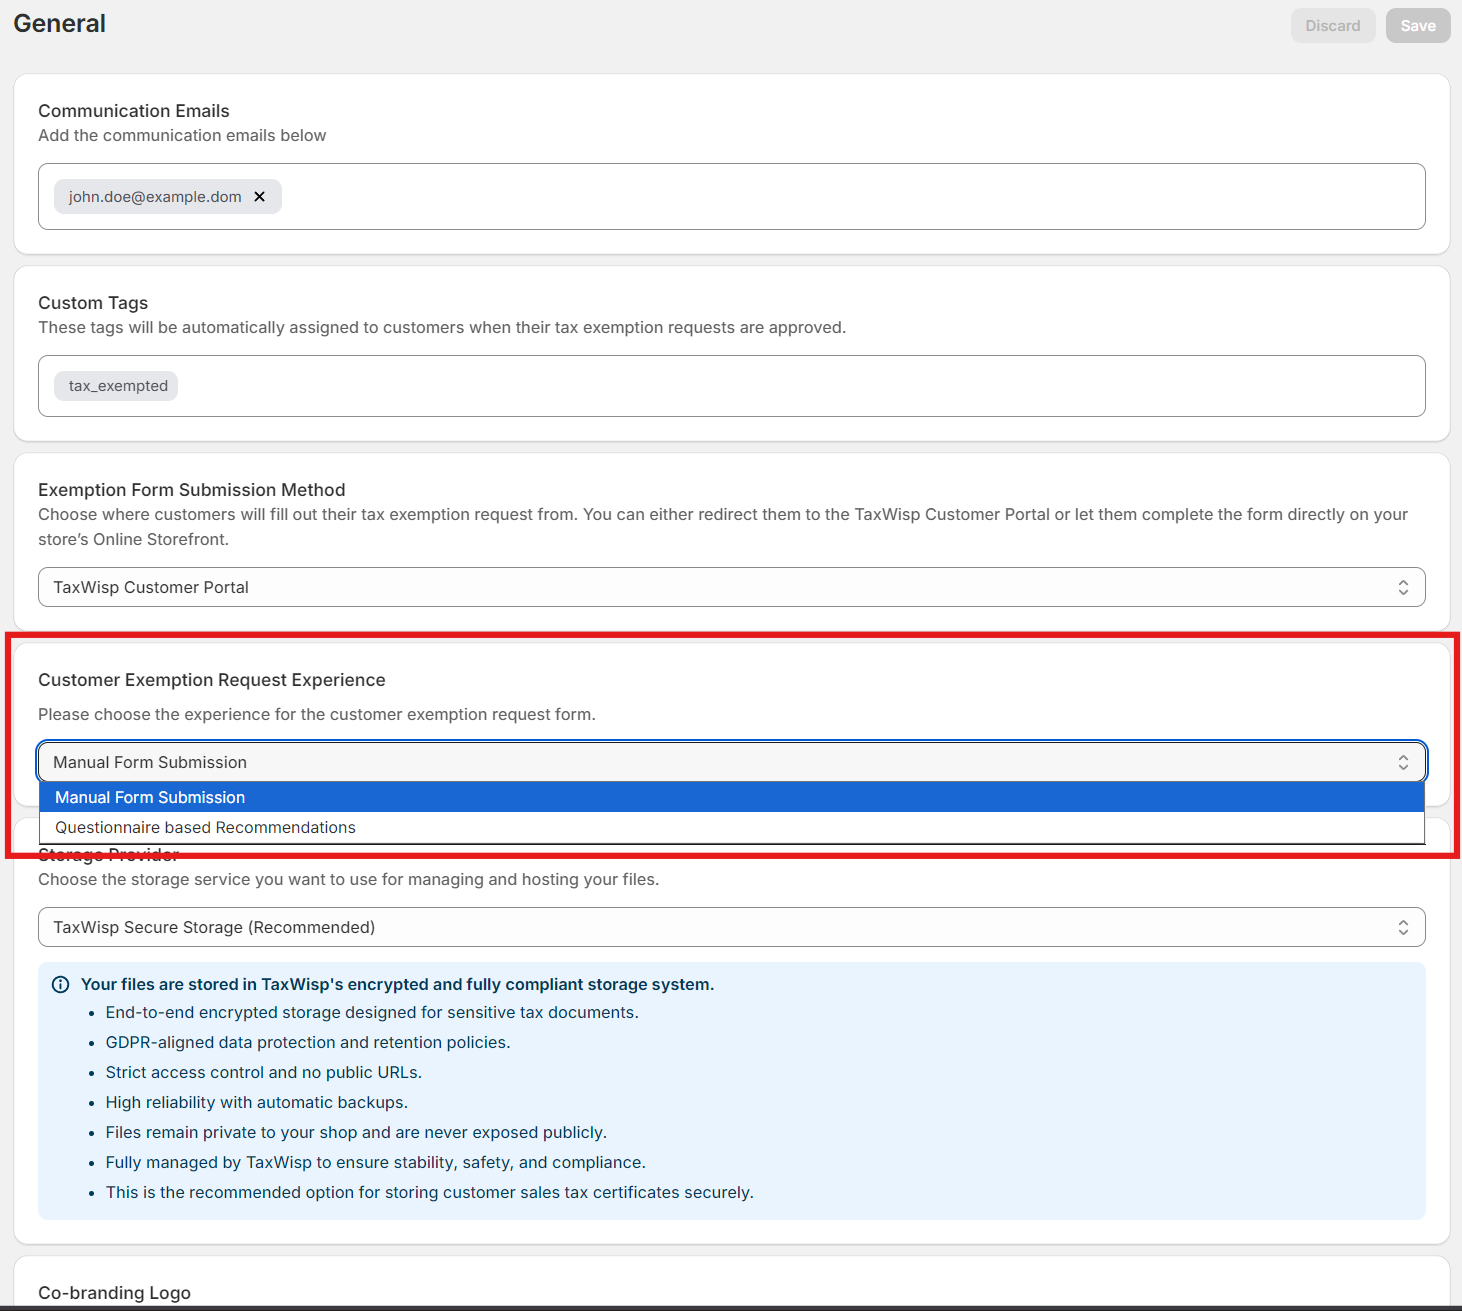
- Customer Exemption Request Experience – Select whether customers complete a traditional Manual Form or use the Chat-Based Recommendation experience to help identify the appropriate exemption category.
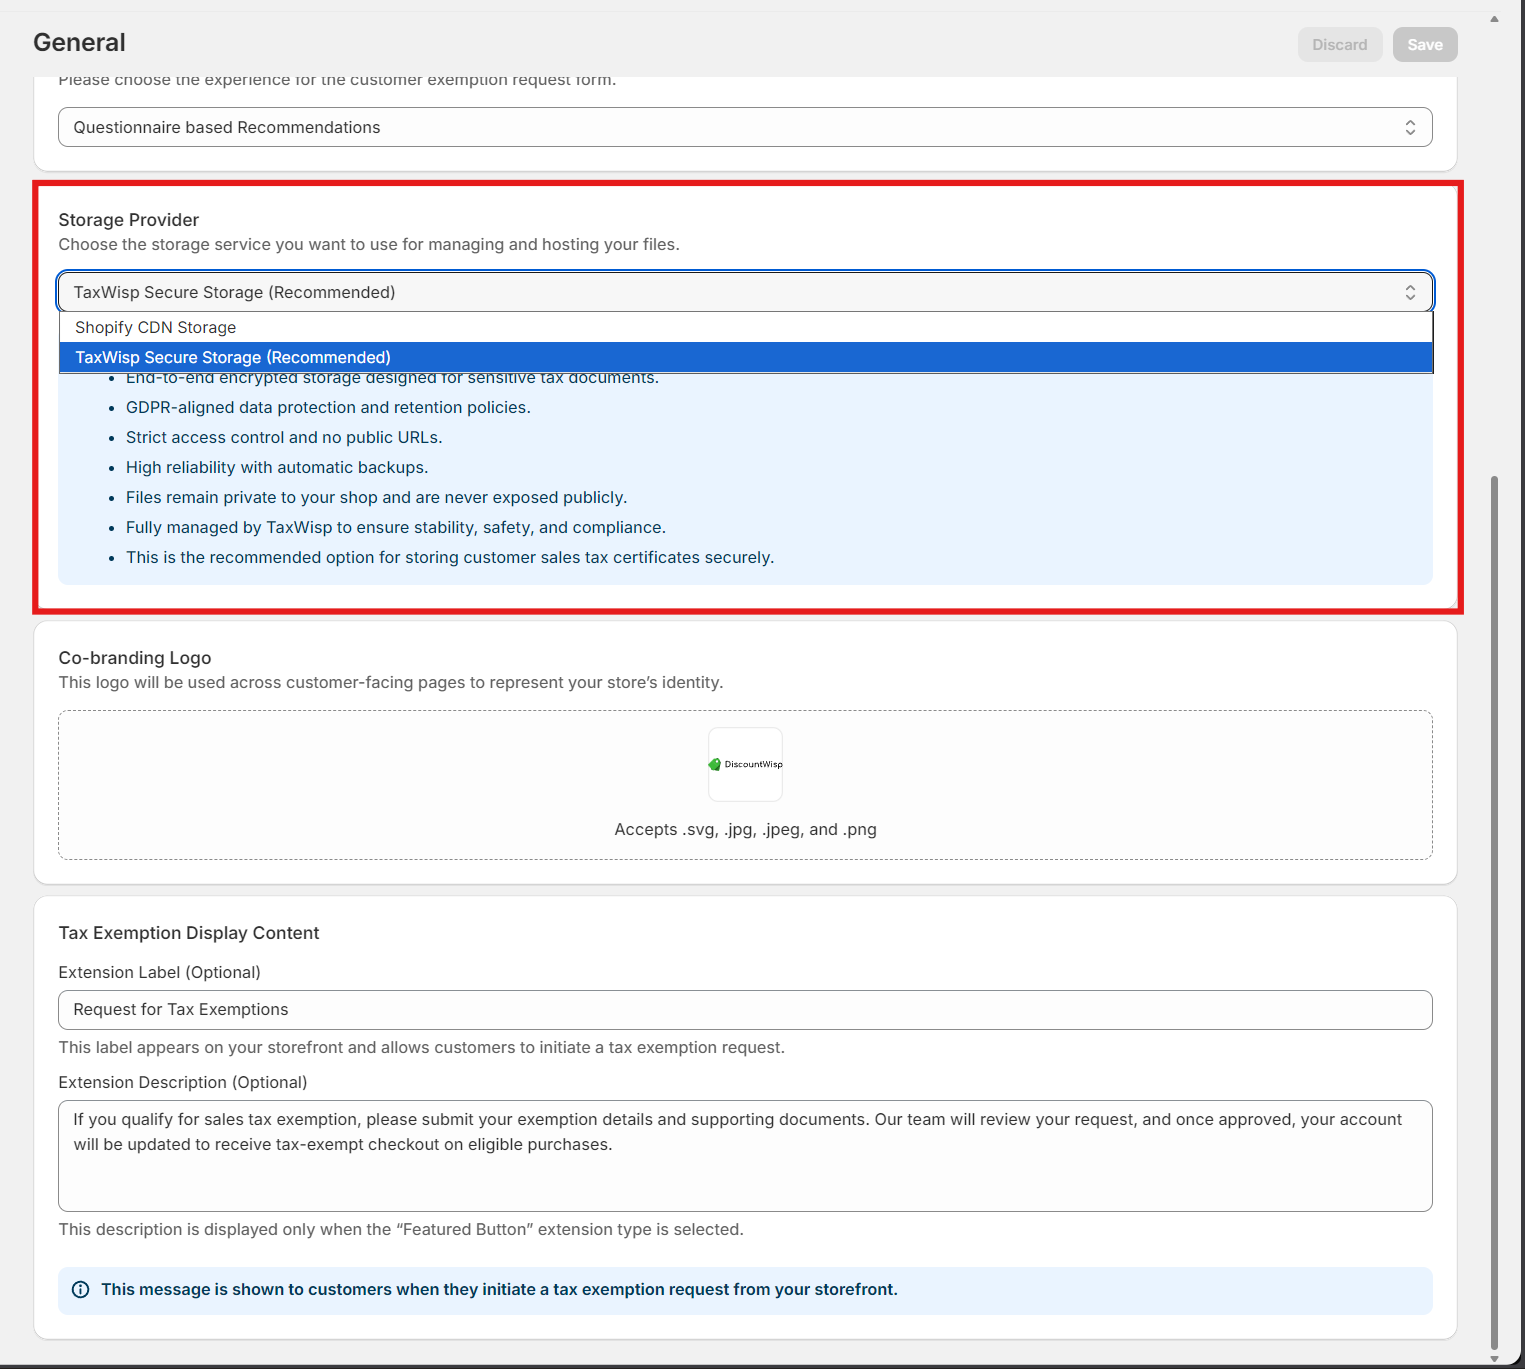
- Storage Provider – Choose where customer exemption certificates are securely stored: TaxWisp Secure Storage or Shopify CDN Storage.
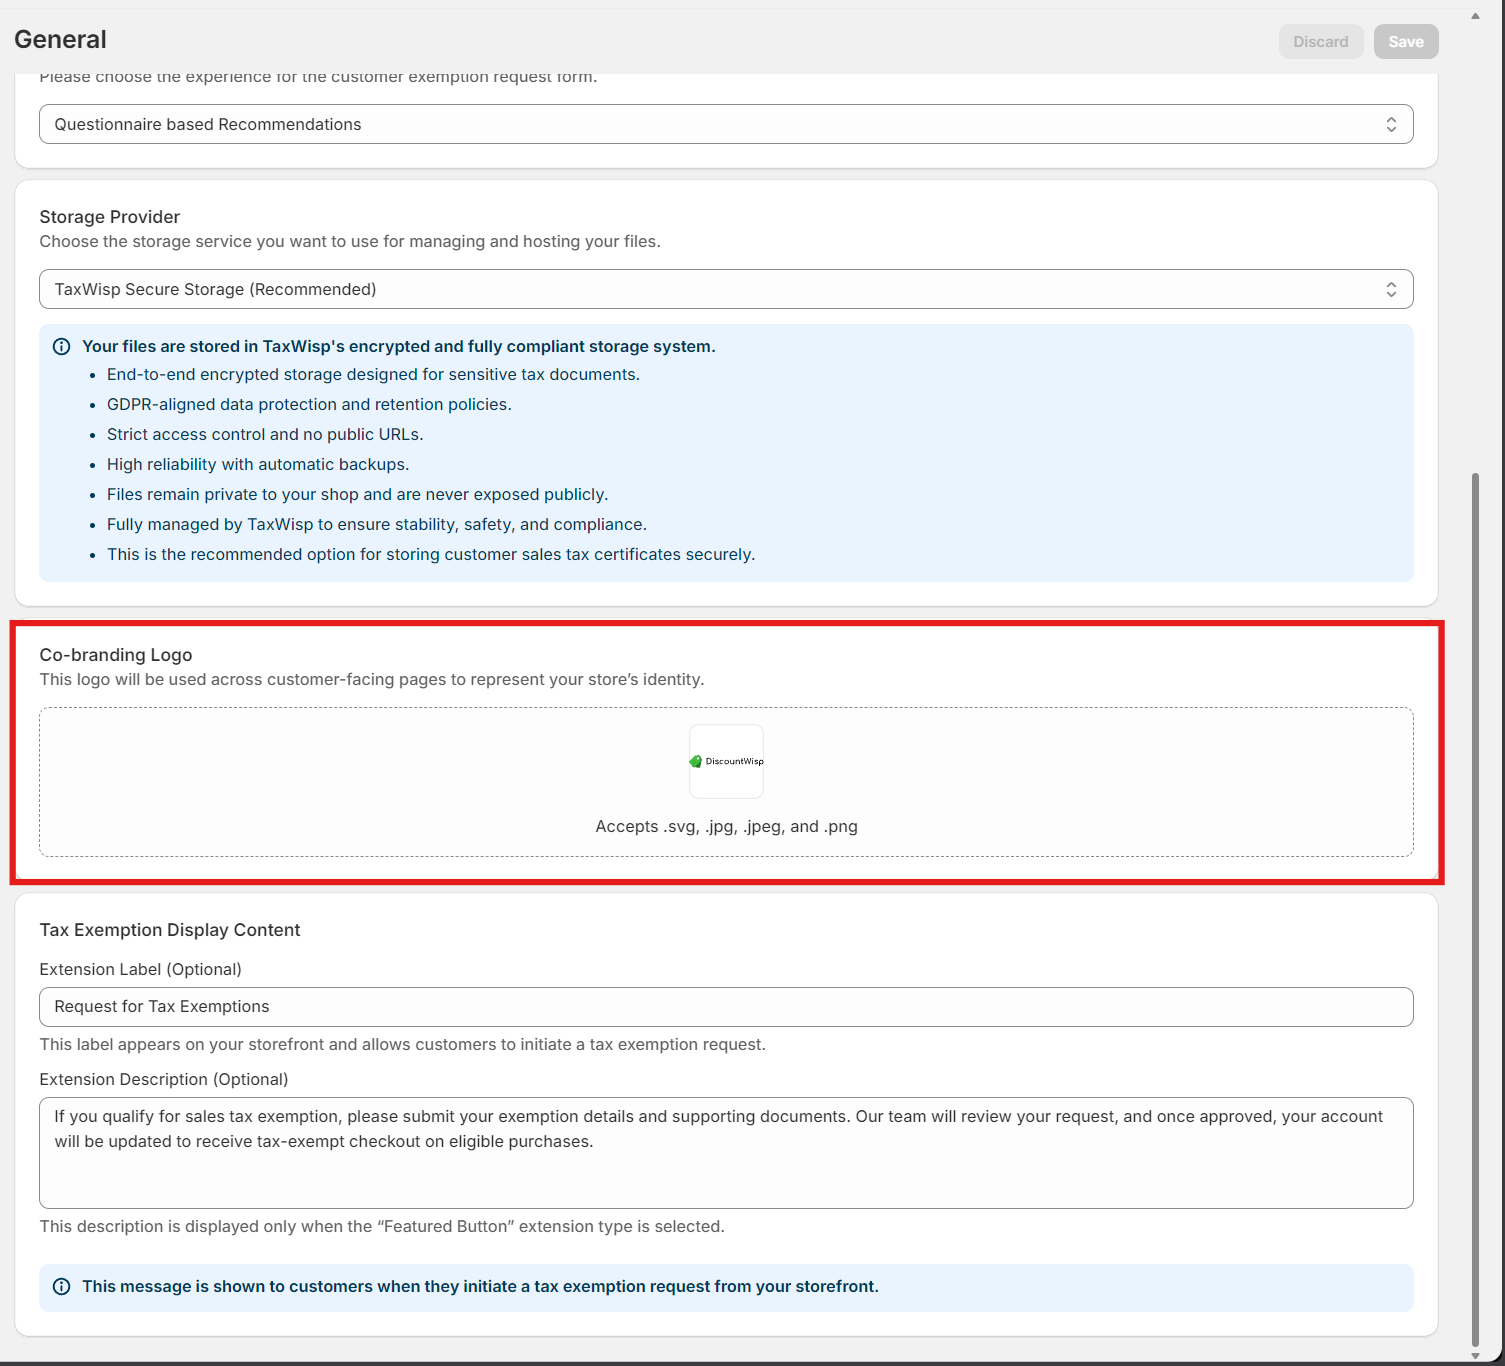
- Co-branding Logo (Standard & Premium Plans) – Upload your store logo to provide a branded experience throughout the TaxWisp Customer Portal.
These settings can be updated at any time as your business requirements evolve. You can also configure advanced features such as Auto Approval, AI Document Validation, and Approval Criteria from the Auto Approval & AI Validation page within TaxWisp Settings.
Once you've completed the initial configuration, you're ready to start accepting and managing sales tax exemption requests with TaxWisp.
Video Tutorial: How to add TaxWisp Extensions to your Shopify Store?
Learn how to easily add TaxWisp extensions to your Shopify store to help customers submit tax exemption requests. This video tutorial walks you through adding the TaxWisp icon (%) to your store header, enabling the product page extension for direct exemption access, and adding a text-based link in the footer. These steps ensure customers can find and use TaxWisp wherever they are on your store. Perfect for all Shopify stores, regardless of your plan.
Video Tutorial: How to add TaxWisp Checkout Extension to your Shopify Plus Store?
This video tutorial is for Shopify Plus stores only and shows you how to add the TaxWisp Checkout Extension to your checkout page. By enabling this extension, eligible customers can submit their tax exemption requests during checkout—making the process faster, easier, and more efficient. Watch the step-by-step guide to seamlessly integrate TaxWisp into your Shopify Plus checkout experience.
Step 10: Start Using TaxWisp
- With TaxWisp installed and configured, you're ready to start offering tax-exempt status to your customers during the checkout process.
- Please note that the store can only collect taxes from a specific jurisdiction if they have a store presence within that jurisdiction.
- Monitor exemption requests, track exemption statuses, and manage customer exemptions efficiently using the app dashboard.
- Enjoy the benefits of streamlined tax exemption processes and enhanced customer satisfaction!
If you encounter any issues during the installation process or need assistance with using TaxWisp, don't hesitate to reach out to our Support Team for help. We're here to ensure a smooth and successful experience with our app.